We, teachers, are tasked to guide our learners. The job is to ensure they incorporate the lessons in real life. And that they possess skills like comprehension and application. In this way, they can use what they’ve learned! Apply their learning in real-life situations. So teachers, how do we ensure that happens?
Teachers and instructors will need the perfect instruments and tools for teaching. And this includes what they use for making quizzes, tests, and assessments. As a human being, we can’t split into numbers. Quiz-making doesn’t end with writing up a test. You need to figure out how it’s going to benefit learners. And most of all, know how to disseminate your quiz.
- Things You Should Consider Before Creating a Quiz
- How to Create an Online Quiz with OnlineExamMaker?
- How to Create an Educational Quiz?
- How to Create a Personality Test?
- How to Make an Online Quiz Certificate?
- Online Course Creating Resources for Teachers
In this ultimate guide, educators and teachers will benefit and learn:
● Know how to make an online quiz.
● Know what quiz-making software to use.
● Know more resources for improving your teaching and testing.
The article will be a detailed read. So prepare your glasses and get your drink! I split the ultimate guide into three significant parts. It’ll be easier for you to comprehend this way:
You might like to know
Create an auto-grading quiz/assessment without any coding – try OnlineExamMaker today!
Things You Should Consider Before Creating a Quiz
First up, you need to think and plan before creating a test. It’s significant to know the basic know-how before constructing one. Here are the things you should consider before making a quiz:
What do you want to assess?
You need to identify what the quiz bearings will be. The subject of the quiz is essential. It’s because different subjects may flourish in specific test types. And at the same time, they could miss the target if it’s wrong. So, first, know what topic to use. And second, know what test type is suitable for the given topic.
Choosing a Quiz Software Tool
Selecting the appropriate software is a must. And this is because some are tricky and complicated. You’ll need a simple and easy-to-use one, like OnlineExamMaker. The interface isn’t complex, and navigating is easy. Its functionality is also required and tested. It allows you to maneuver and create a quiz smoothly.
Computer or Hardware
The device you need to create a quiz is also crucial. OnlineExamMaker is a mobile-friendly tool, it is accessible to any smart device. However, when creating a quiz, it’s easier on a computer. It will lay out the whole site or software. And this will help you get things wrapped up quickly.
Camera for Proctoring
It’s necessary to have a camera on your computer. It could be a built-in camera or a webcam for monitoring. It’ll make your learners aware of your presence. It encourages online interaction. Your learners will also have to turn on their cameras. It’s because this is under the anti-cheating feature of OnlineExamMaker.
Internet Connection
The last thing to consider is your connectivity. Ensure that you have a steady internet source. A stable wifi connection will make quiz-making easier. You can make the online quiz you need on OnlineExamMaker. Just as long as you have your computer and internet. You don’t have to worry about loss of connection or power. Your progress is safe and saved. Retrieving your quiz will be easy!
Teachers and instructors who want to create an online quiz can use OnlineExamMaker! OnlinExamMaker is a fitting software for creating tests, quizzes, and exams. It has a uniquely designed system that is foolproof. It’s an all-around testing tool that serves different purposes. You can use it for training, education, assessments, and teaching. Even if you use your phone, you can still create a quiz!
Stay tuned and keep reading the details. You’ll learn how to create a quiz step-by-step on OnlineExamMaker.
Create Your Next Quiz/Exam with OnlineExamMaker
How to Create an Online Quiz with OnlineExamMaker?
How to Create an Educational Quiz?
Step 1: Navigate OnlineExamMaker
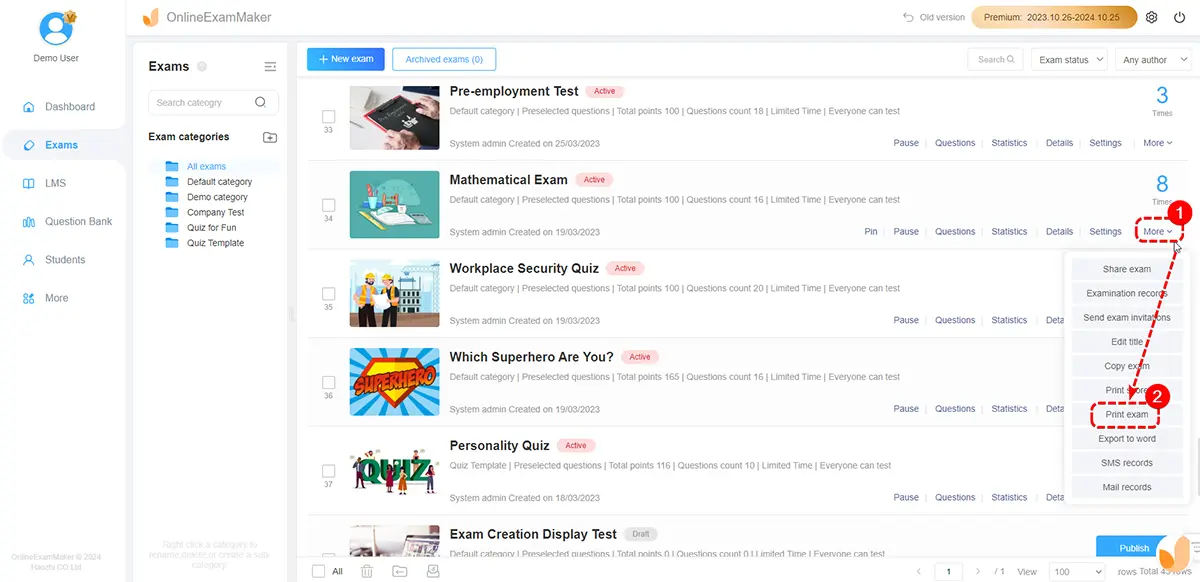
In this step, go to the left side of the dashboard and click ‘Exams.’ After that, click ‘Prize Quiz’ and click ‘+ New Prize Quiz’ to start!
Step 2: Edit Quiz Information

The next step is to type in the basic information of the quiz. Choose a fun title! After that, you can choose the mode of advance. Now click the ‘Advanced Settings’ button to open more options. You can select a template cover or upload of your choosing! Once you’ve done that, type in the keywords of your quiz. You can even add a short explanation or an encouraging note! Click ‘Save and Next’ to proceed.
Step 3: Adding Questions
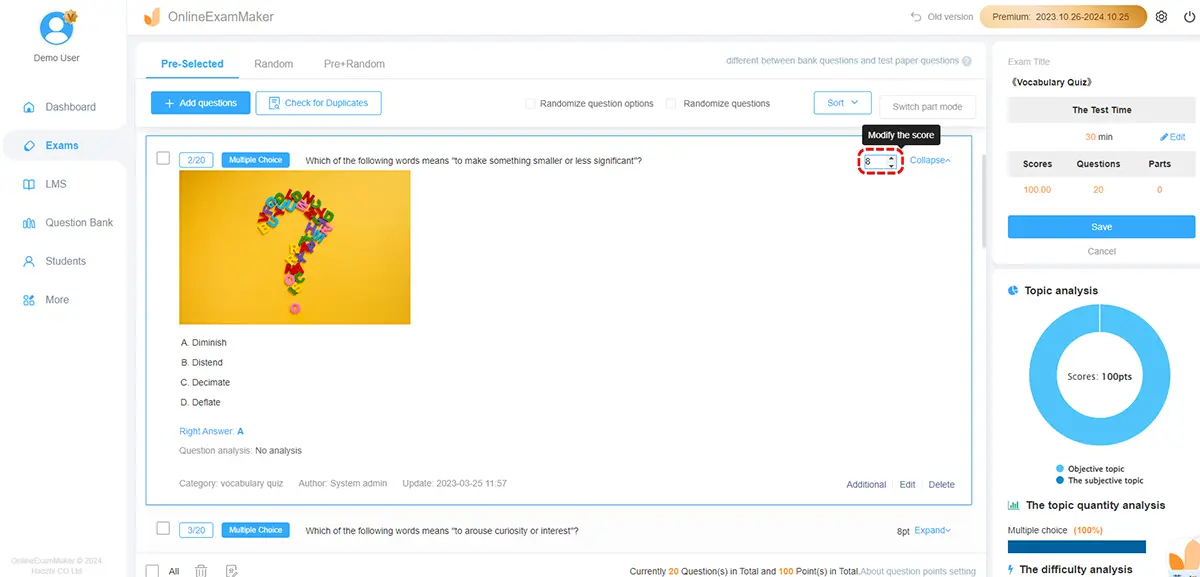
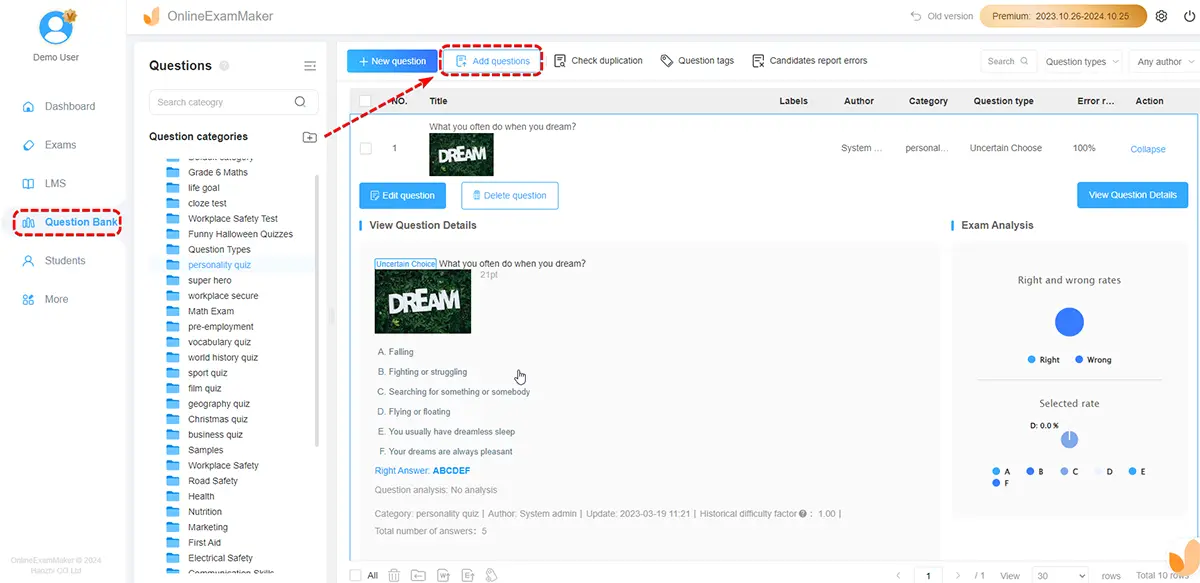
After that, it’s time to encode the quiz questions. Pan over to the left side of the screen to click the ‘Question Bank’ button. After that, click ‘Question List.’ Click ‘+ Add questions’ to start creating your query. Now, type in your question in the question stem. And once that’s done, encode the possible answers. Set the right answer and click the ‘Save’ button to save the question! You can use pre-made questions with the question bank or manually add them.
Step 4: Setting the Rewards
he next step is to add the corresponding score for the correct answers. Click ‘Add reward’ and set the incentives and feedback. Click ‘Save’ to set the number of questions with corresponding points. Click the ‘Save.’
Step 5: Adjusting the Quiz Settings

In this step, you’ll be configuring the rules and time of your quiz. You can set your terms and guidelines. And you can adjust the number of quiz attempts. The exam login options have two choices: every student can move forward, or only a few can. You can also personalize the quiz with your own theme and header! After you’ve modified the settings to your liking, click ‘Save’ to draft.
Step 6: Publishing and Sharing the Quiz
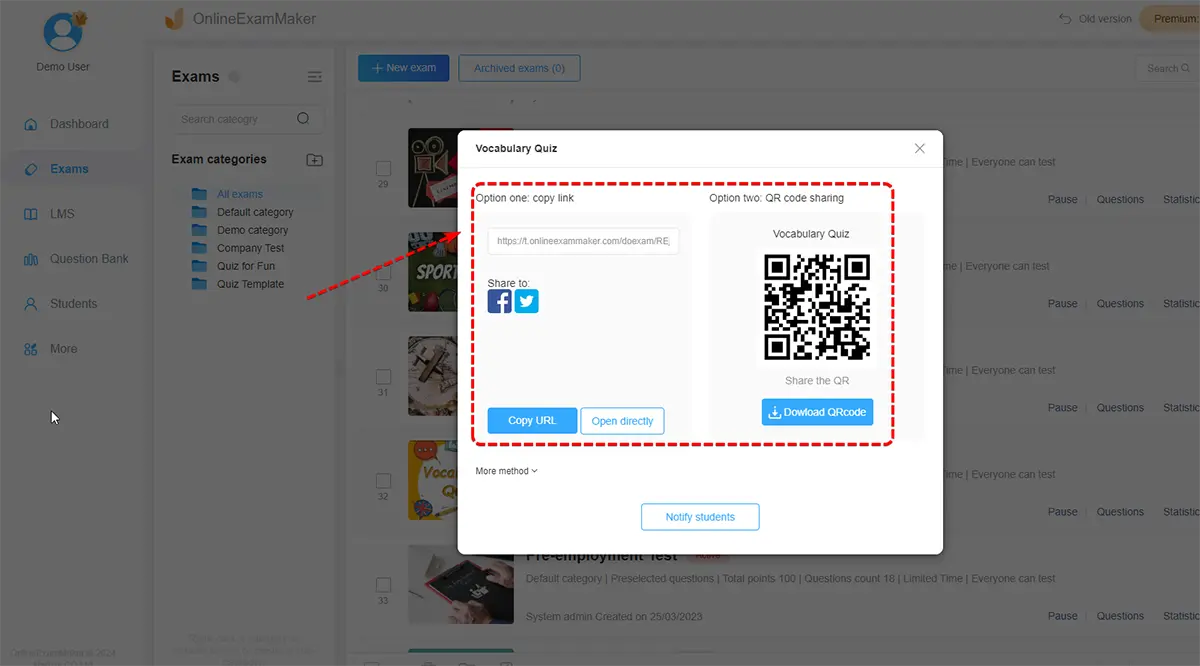
Next, go to the left side of your dashboard and click ‘Exams.’ After that, click the ‘Prize Quiz’ button. Here you’ll choose the quiz you made. Once you’ve selected your quiz, click ‘Publish.’ You can share it with your students with the customized link or QR code. And ta-da! Now, you have an Online Quiz!
How to Create a Personality Test?
Step 1: Go to OnlineExamMaker dashboard
In this step, navigate to the left side of the screen or dashboard. Click the ‘Exams’ and ‘Exams List’ buttons to open the quiz creator. Now click ‘+ New Exam’ to start creating a Personality Test!
Step 2: Filling in Important Details
Next, you need to input the basic details of your personality test. Choose a fitting title, and categorize your assessment. In this way, you become more neat and organized. Click the ‘Advanced Settings’ button to open additional quiz features. Here is where you select a neat cover for your personality test. After that, type in the necessary keywords. And you can even pen a short description too! Click the ‘Save and Next’ button to move on to the next.
Step 3: Encoding Questions
Once you’ve done that, we’ll need to start encoding the questions. Click ‘+ Add questions’ to add the questions. You can use the ‘Multiple Answer’ feature on your quiz too! Make sure it highlights the different aspects, characteristics, or behaviors. Click ‘Save’ to finish making the question. After putting in all the questions, click ‘Save.’
Step 4: Configuring the Settings
Next, you need to change and modify the test settings. Check that your personality test is available and accessible at all times. In this way, your candidates can take it on their own time! Click ‘Publish’ to save and issue your personality test!
How to Make an Online Quiz Certificate?
Step 1: Navigating OnlineExamMaker
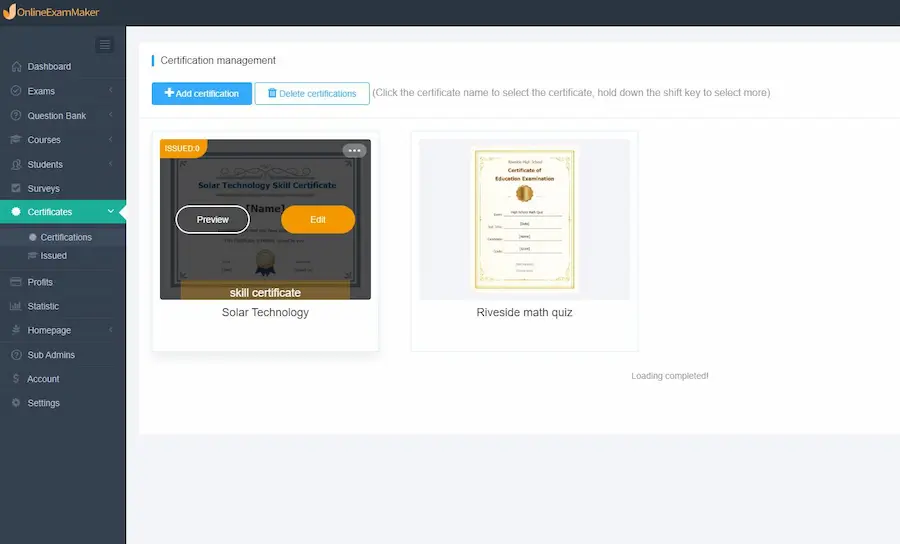
In this step, go to the left side of the dashboard. Click the ‘Certificates’ button and the ‘Certifications.’ Once you’ve done that, click ‘+ Add Certification’ to create your certificate!
Step 2: Making the Custom Certificate
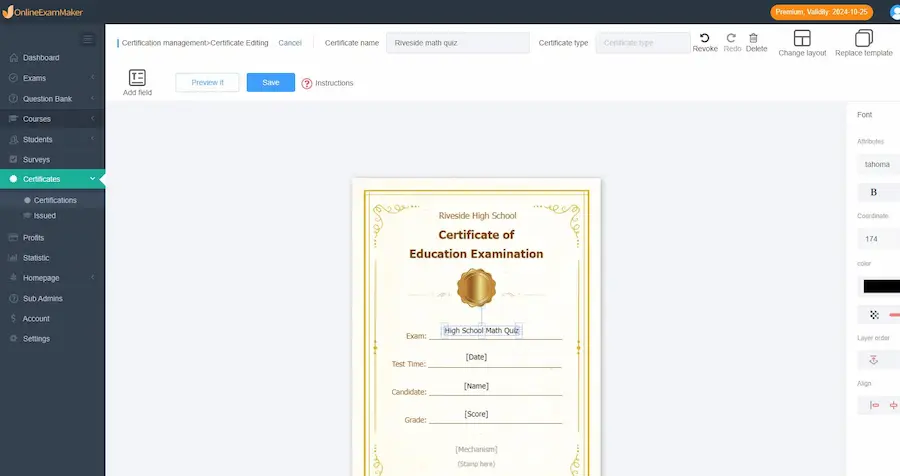
After, you need to create customized certificates. In this way, it caters to your candidate’s test results. You can manipulate the certificate however you want. Add images and texts to your liking and click ‘Save.’
Step 3: Publishing Certificates
Once that’s done, we can now set and issue the certificates we made. Click ‘Certificates.’ In this window, we can adjust the certificates based on the results of the candidates. Now, let’s go to the ‘Exams List’ button and click ‘Exams’ to select the test we want to give the certificate to. After that, toggle the ‘Settings’ button. Click to toggle ‘Certificate Setting.’ Now, you can check the box ‘Open the Certificate Issuance.’ Adjust the values based on the results, and select the certificates you made!
Online Course Creating Resources for Teachers
In this part of the guide, I’ll show you course resources! We picked these out for teachers and educators like you. It will help you improve your teaching and your students’ learning. Just like students, teachers also need help. So, here are four online resources for you:
Udacity
Udacity is a site that delivers practical and active courses. It has 36 courses in the subjects: Computer Science, Business, Physics, Psychology, and Mathematics. We can even adjust the levels: Beginner, Intermediate, and Advanced. Udacity provides you with short assessments and assignments after lessons. It helps you test your knowledge and comprehension. It has video courses you can watch and access online. And it allows you to download archived lessons and assignments into a zip file format! Udacity has self-paced courses that let you learn at your own pace. You can complete courses, lessons, and assignments on your own time.
MIT OpenCourseWare
The leading source of courseware online. MIT OpenCourseWare has reading resources from more than two thousand courses. In more than 10 top categories that have subcategories. From over 30 different departments! It provides more course materials, unlike any other website or organization. Its categories are Health & Medicine, Energy, Business, Science, Engineering, Humanities, and more! It’s the best source of free course materials for students and teachers alike.
edX
edX is another popular courseware website. It has excellent online courses from top universities (University of Washington, Harvard University, MIT, Berkeley University of California, and more!) Currently, it provides different courses for 20 subjects. All from more than 30 universities. Its courses cover lessons in History, Law, Business, Statistics, Science, Environmental Science, Ethics, Food, Literature, and Philosophy. edX is a non-profit that provides open-source courses for learners and institutions.
YouTube Channels
Teachings in Education
It’s the #1 YouTube channel that provides resources for teachers. You can learn about how to teach your students. You can also learn how to create assessments. And learn about Special Education Core Knowledge! They even teach you teacher interview questions! Teachings in Education delivers proofread and tested strategies and teaching development for educators.
YouTube:
Sprouts
Sprouts is another popular educational YouTube channel. Teachers and students can both learn valuable lessons here. It’s another resource made for teachers and teachers in the making! Sprouts creates educational videos on pedagogy, child development, and psychology! They publish their videos on Creative Commons.
Conclusion
Learning is a mutually-driven process in education. It requires the presence and effort of both students and teachers. Teachers or instructors are the propagators of knowledge. Students are like sponges because they’re the ones who absorb them. Knowledge is a powerful thing in the right hands. We need to hone and train our students. And not only in the academic field but also in holistic. Students should learn how to utilize and prosper with the knowledge they have. It’s only then that learning is successful.
And let’s not forget that how we teach is fundamental. It influences our students in more ways than we think. Teachers should also be well-trained and prepared. An effective teacher creates an effective learning environment. We need to give students a chance where they can improve. Teachers are safe spaces built for learning and social interaction. We should become influential and empathetic towards our students. And this is because, a long time ago we were once in their shoes.