PowerPoint isn’t just for boring presentations anymore. It’s secretly one of the most versatile tools for creating interactive classroom activities, and matching quizzes are where it really shines.
- Why PowerPoint for Matching Quizzes?
- Setting Up Your Matching Quiz Foundation
- The Animation Method: Drag and Drop Magic
- OnlineExamMaker: Make Advanced Matching Quizzes with AI
- Creating Interactive Feedback Systems
- The Hyperlink Alternative: Click-Based Matching
- How to Create Matching Quizzes in OnlineExamMaker?
- Testing and Fine-Tuning Your Quiz
- Tips for Maximum Student Engagement

Why PowerPoint for Matching Quizzes?
You might be wondering: why PowerPoint? Can’t I just use Google Forms or some quiz app?
Sure, you could. But here’s what makes PowerPoint special—it gives you complete creative control. You’re not stuck with templates someone else designed. You can make it look exactly how you want, add your own fonts (yes, even those cute ones from Teachers Pay Teachers), and most importantly, you can create activities that feel like games rather than tests.

As one teacher puts it perfectly: PowerPoint has “really good features for creating your own resources,” and it’s often easier to use than Word. Plus, unlike Google Slides, PowerPoint lets you download and use custom fonts, giving your materials that professional, polished look that students actually want to engage with.
Setting Up Your Matching Quiz Foundation
Every great matching quiz starts with proper setup. Think of this as laying the foundation for a house—get it right, and everything else falls into place.
Step 1: Configure Your Slide Size
First things first: forget the default slide size. Open PowerPoint, click on a blank presentation, then head to Design > Slide Size > Custom. Here’s where it gets good: switch to portrait orientation and set your dimensions to 7.5 by 10 inches. Why? It creates that perfect worksheet feel with just enough white space around the edges to make it look professional, not cramped.
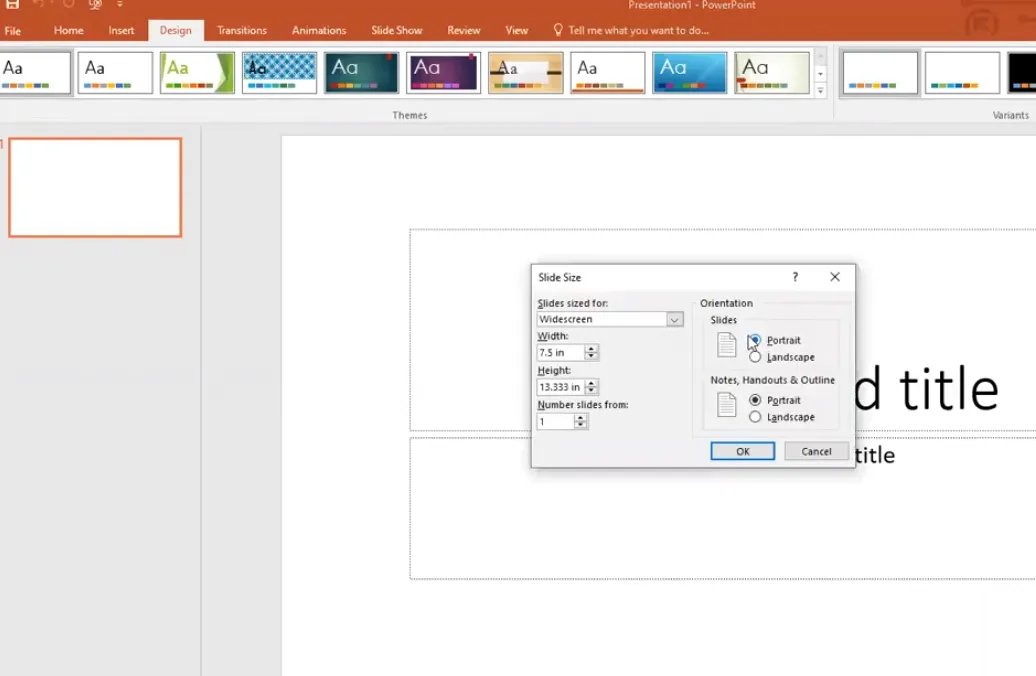
Pro Tip: If you’ve already created your content and forgot to change the slide size first, choose “Ensure Fit” instead of “Maximize” when prompted. This scales everything down proportionally rather than cutting off your hard work at the edges.
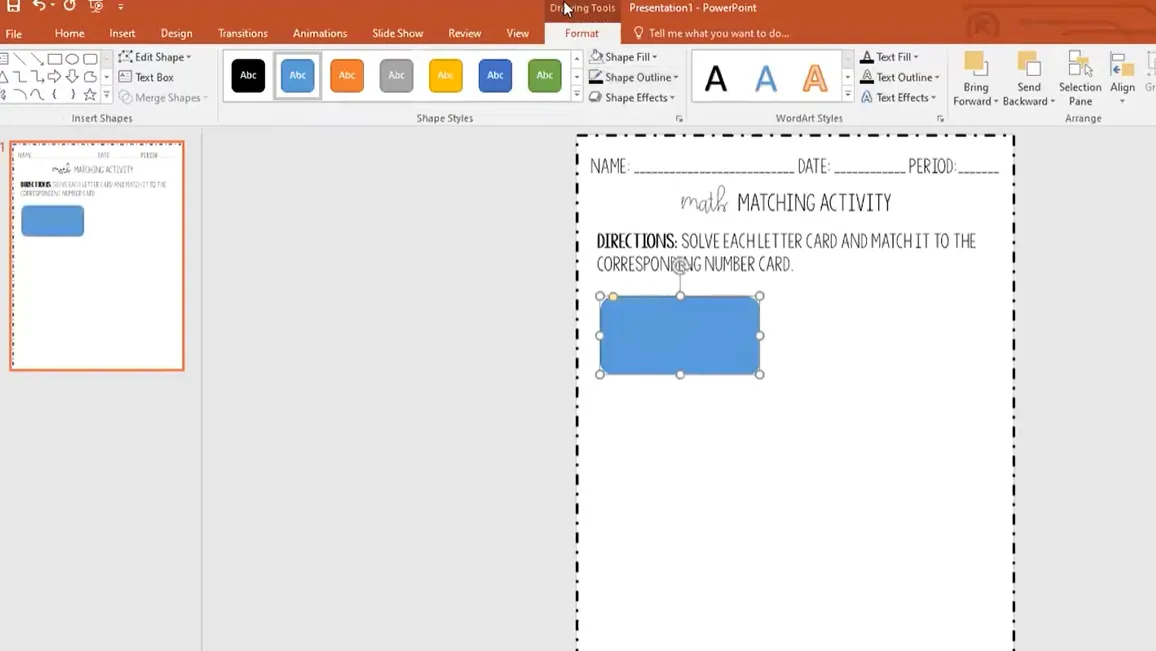
Step 2: Create Your Border and Basic Structure
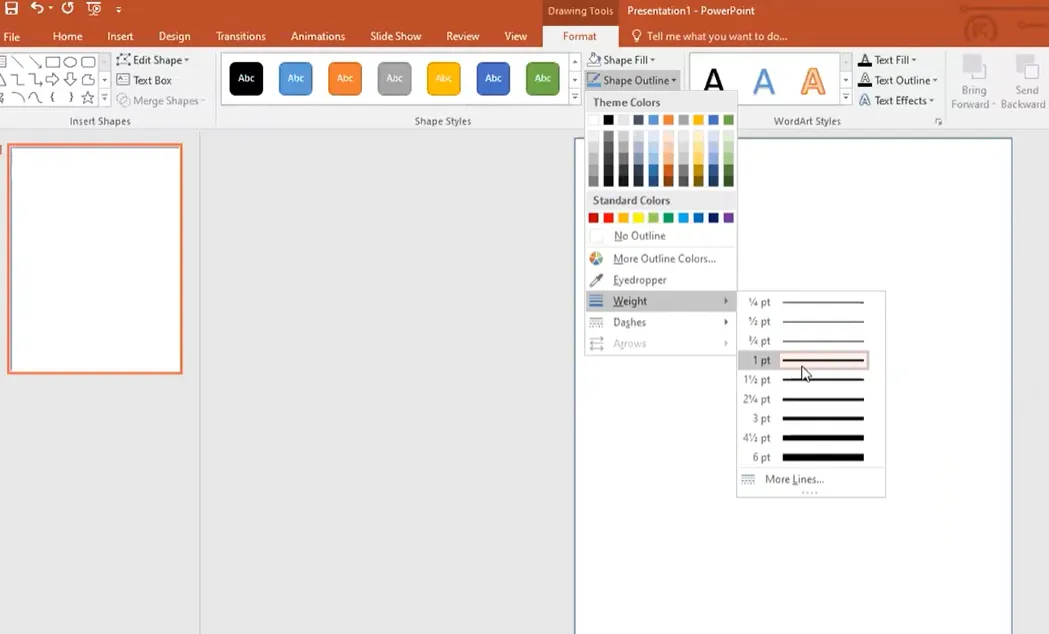
Delete those default text boxes—you won’t need them. Insert a rectangle shape and stretch it across your entire slide. Then comes the clever part: set the fill to no fill, so you can see through it, but give it a visible border. Make it about 2.25 to 3 points thick, and choose a dash style that speaks to you. Some teachers use different dash styles to organize their materials: dotted for homework, dashed for activities, solid for tests.
Now add your text boxes: one for “Name:” with a line, and another for your title. This is where personality comes in. Choose fonts that feel right—many teachers swear by KG fonts for that clean, readable look—and make your title big and bold. You’re creating something students will actually want to look at, remember?
Step 3: Design Your Matching Cards
Here’s where things get interesting. Go to Insert > Shapes and select the rounded rectangle. These will become your matching cards. Draw one out, then format it: no fill, black outline, about 2.25 points thick. Add a text box inside and label it “Card A.”
Now comes the magic of efficiency: highlight both the shape and the text box, right-click, and select Group. This turns them into a single unit you can copy and paste. Press Ctrl+C, then Ctrl+V, and you’ve got Card B. Keep going until you have 4-8 cards on the left side—any more than that and it gets overwhelming.
Those faint red dotted lines that appear when you’re positioning? They’re your best friend. They show you when cards are perfectly aligned and evenly spaced. Use them religiously if you want that professional look.
The Animation Method: Drag and Drop Magic
This is where PowerPoint transforms from a simple presentation tool into an interactive game. The animation method creates a true drag-and-drop experience that students find genuinely engaging. But I’ll be honest with you: it’s a bit tedious to set up. The payoff? Absolutely worth it.
The Duplication Dance
Start by duplicating your slide. Right-click on it in the slide panel and choose Duplicate Slide. This gives you a backup of your original design. On this new slide, you’ll layer shapes over your answer column (the right side with the matches).
Draw rectangles over each answer option on the right. These shapes need to be sent to the back so they sit behind your text. Right-click each one and select Send to Back. This positioning is crucial—it’s what makes the animation reveal work properly.
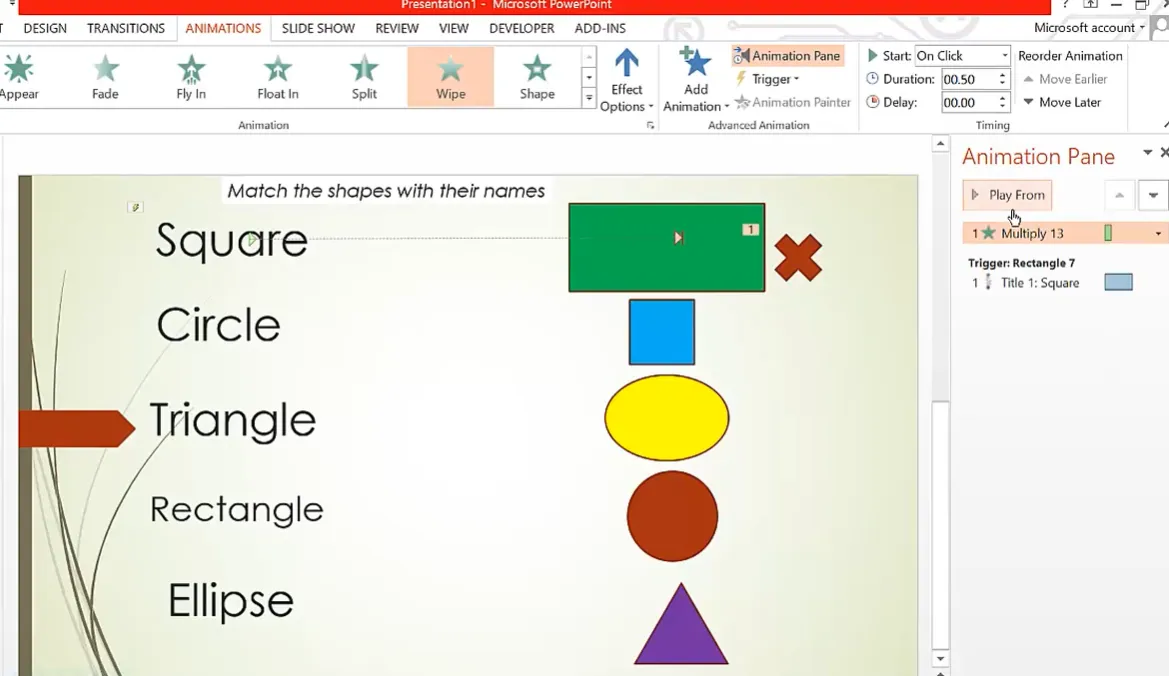
Setting Up Animations and Triggers
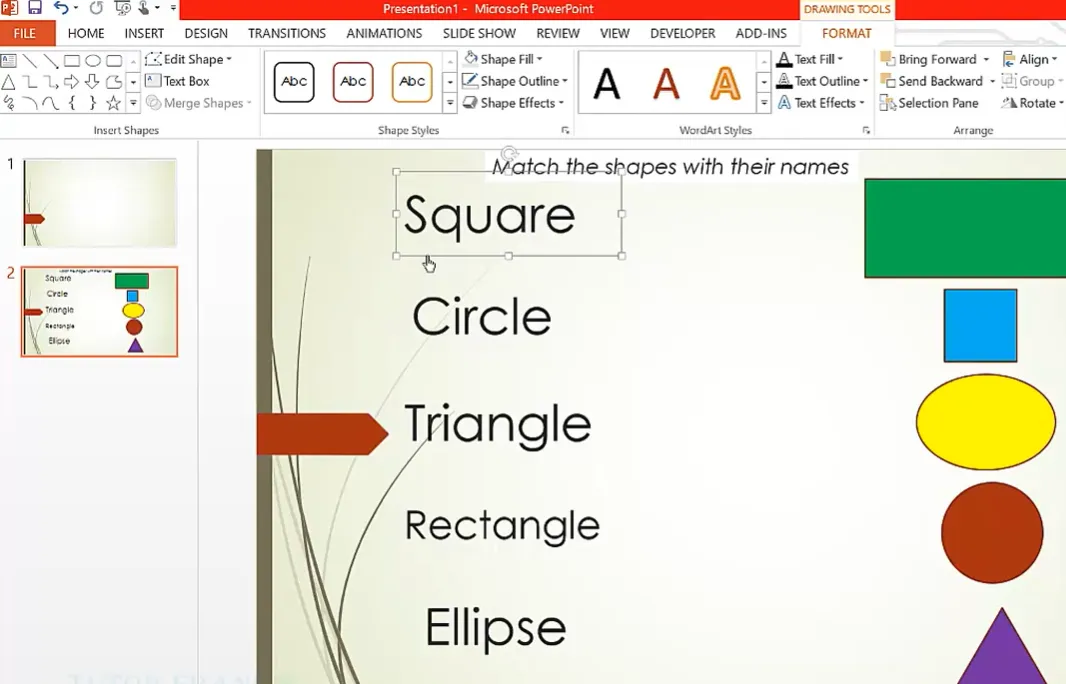
This is where patience pays off. Select one of your answer shapes on the right, then head to the Animations tab. Choose an entrance animation like Wipe—it creates that satisfying reveal effect when students make a correct match.
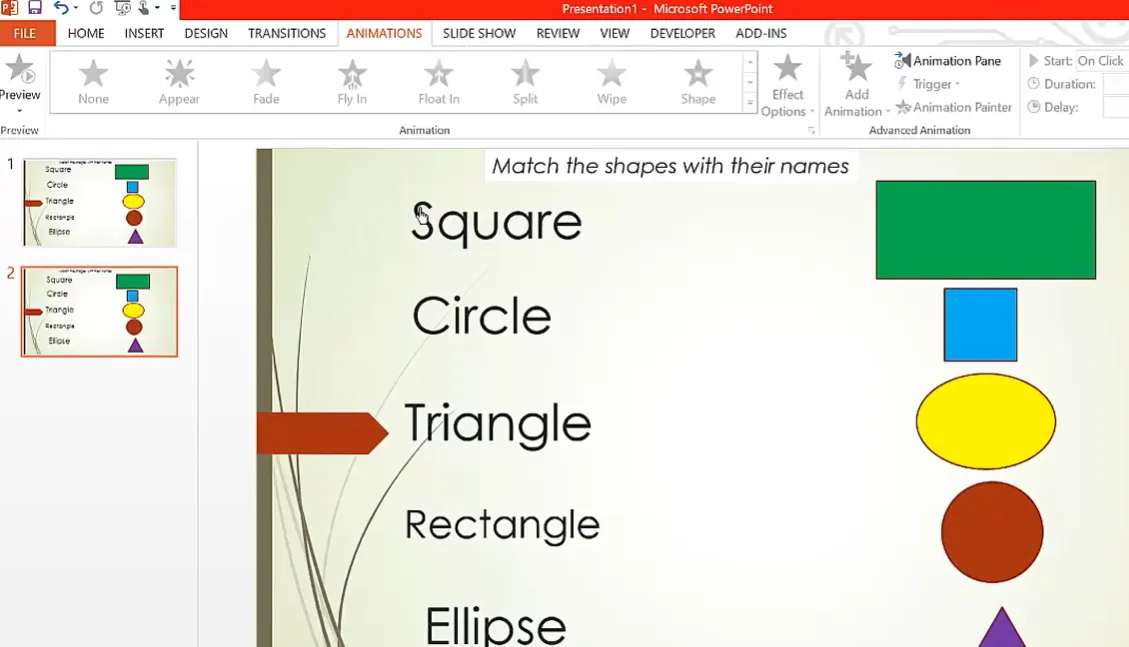
But here’s the critical part: go to Trigger > On Click Of, and select the specific shape from your left column that should trigger this animation. For example, if Card A (a circle) matches with the definition of “circle” on the right, you’d set the circle definition to appear when Card A is clicked.
OnlineExamMaker: Make Advanced Matching Quizzes with AI
Now, let’s talk about taking this to the next level. PowerPoint is fantastic for in-class activities and self-paced learning, but what if you need automatic grading? Or detailed analytics on which pairs students struggle with most? Or the ability to randomize questions?
This is where OnlineExamMaker enters the conversation.
Why Consider OnlineExamMaker?
While PowerPoint gives you creative freedom, OnlineExamMaker’s matching quiz feature brings professional assessment capabilities to the table. It’s purpose-built for educators who need more than just interactive activities—they need data, efficiency, and scalability.
Think about it: with PowerPoint, you’re manually checking student responses or relying on them to self-assess. With OnlineExamMaker, everything happens automatically. Students complete the matching quiz, get instant results, and you get a detailed breakdown of their performance. No grading at 10 PM. No wondering if students actually understood the material.
Create Your Next Quiz/Exam with OnlineExamMaker
Creating Interactive Feedback Systems
A matching quiz without feedback is just a guessing game. Students need to know immediately whether they got it right or wrong. This instant gratification is what makes digital quizzes so much more engaging than paper ones.
Adding Correct Match Feedback
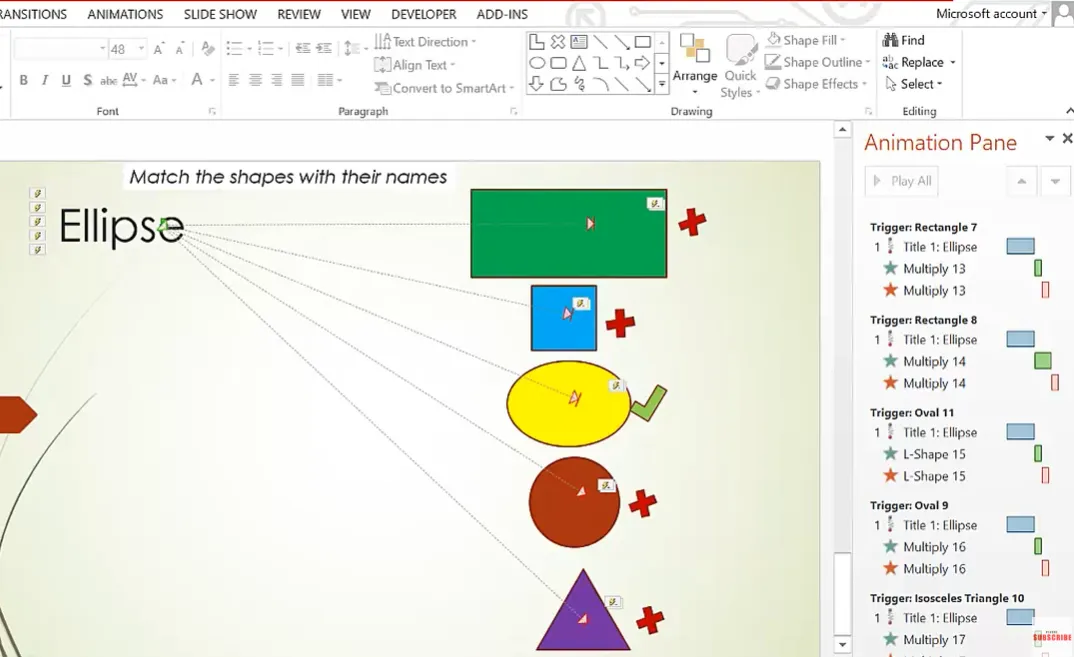
When a student makes a correct match, something needs to happen. Insert a shape—maybe a checkmark or a simple text box that says “Correct!” Color it green, make it pop. Then animate it to appear after the previous animation (the one that revealed the correct answer).
Set this feedback animation to After Previous in the animation pane, so it appears automatically once the correct match is revealed. Then—and this is clever—add a Fade exit animation so the feedback disappears after a few seconds, ready for the next attempt. Set this to start after previous as well, with maybe a 2-3 second delay.
Wrong Answer Handling
For incorrect matches, you want different feedback. Create a shape that says “Try Again” or “Incorrect” in red or orange. Position it where students will see it clearly. The animation setup is similar, but the trigger is different—it activates when students click on a wrong pairing.
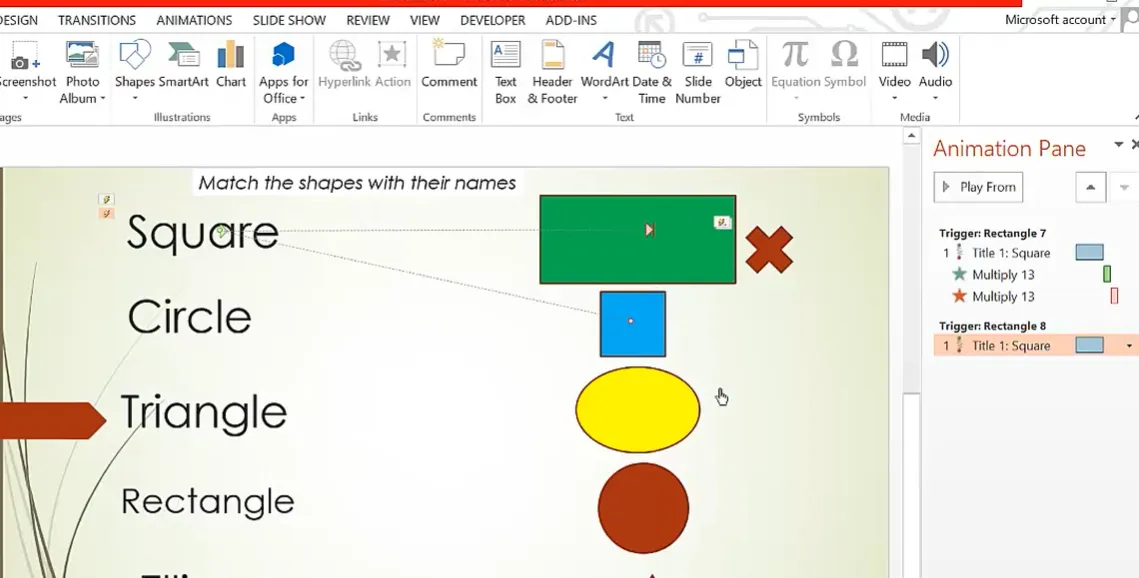
You’ll need to set up these wrong-answer triggers for every incorrect combination. If Card A should match with Answer 2, then clicking Card A when trying to match with Answers 1, 3, or 4 should all trigger the “incorrect” feedback. This is the tedious part I mentioned earlier—but once it’s done, it’s done.
The Hyperlink Alternative: Click-Based Matching
Maybe the animation method sounds like too much work. Fair enough. There’s another approach that’s simpler to set up: the hyperlink method. It’s less flashy but still interactive, and some teachers actually prefer it for its straightforwardness.
Building the Hyperlink Structure
Convert your right-column items into shapes (if they aren’t already). Then, for each correct match, hyperlink it to a slide that shows “Correct!” with a connecting line drawn between the matched pair. For wrong answers, hyperlink them to a “Try Again” slide.
Here’s how: Select a shape, go to Insert > Hyperlink > Place in This Document, and choose which slide it should jump to. Add a screen tip (that little popup text) that says “Click to match” or “Click to select.” This gives students guidance on what to do.
Navigation and Kiosk Mode
The brilliance of this method is in the setup. Create multiple slides: your main matching screen, a “Correct” slide, and a “Try Again” slide. Add a button on each feedback slide that says “Drag a New Shape” or “Try Another” that hyperlinks back to your main matching slide.
Then—and this is crucial for preventing cheating or accidental clicks—go to Slide Show > Set Up Slide Show and select Browsed at a Kiosk. This locks down the navigation so students can’t just click randomly around the slide or advance with arrow keys. They must click on your hyperlinked elements.
Teacher Hack: In kiosk mode, clicking anywhere outside of hyperlinks does nothing. This means students can’t accidentally skip ahead or mess up the quiz flow. It also makes it feel more like a real game or app rather than just a presentation.
How to Create Matching Quizzes in OnlineExamMaker?
Create Your Next Quiz/Exam with OnlineExamMaker
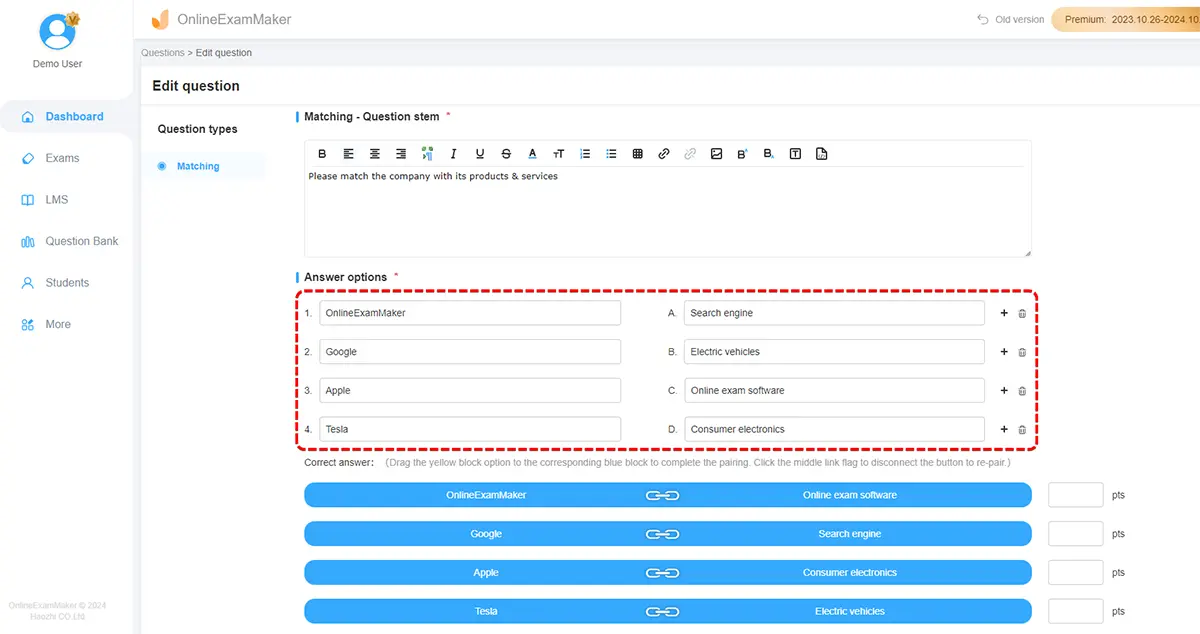
The process is remarkably straightforward. Log into OnlineExamMaker, navigate to your question bank, and click New Question > Matching. You’ll see two columns just like in PowerPoint, but instead of shapes and animations, you’re working with a clean interface specifically designed for matching questions.
Add your premise items (the questions or terms to match) in the left column and your response options (the answers or definitions) in the right column. The system automatically handles the pairing logic, randomization if you want it, and scoring. You can even add images to either column, making it perfect for visual matching activities.
Key Features of OnlineExamMaker Matching Quizzes:
- Automatic grading: Students get instant feedback, you get instant data
- Randomization: Prevent cheating by showing options in different orders
- Analytics: See which pairs students miss most often to identify learning gaps
- Mobile-friendly: Students can take quizzes on any device, anywhere
- Time limits: Add pressure or pace for different assessment goals
According to the OnlineExamMaker matching quiz guide, educators can create professional matching assessments in under 10 minutes—a fraction of the time needed for animated PowerPoint quizzes. But here’s the nuance: speed isn’t everything. PowerPoint gives you artistic control and works offline. OnlineExamMaker gives you assessment power and scalability.
When to Use Which Tool?
Use PowerPoint when you want:
- Classroom activities with visual flair and custom design
- Offline resources that don’t require internet
- Physical materials students can print and cut out
- Complete creative control over every visual element
- Self-paced review activities without formal assessment
Use OnlineExamMaker when you need:
- Formal assessments with automatic grading and tracking
- Data and analytics on student performance
- Large-scale deployment across multiple classes
- Remote or hybrid learning scenarios
- Integration with your learning management system
Many savvy teachers use both: PowerPoint for engaging practice activities in class, OnlineExamMaker for formal assessments and homework. It’s not either-or; it’s strategically using each tool for its strengths.
Testing and Fine-Tuning Your Quiz
You’ve built your quiz. Now comes the moment of truth: does it actually work? Testing isn’t optional—it’s where you catch the little quirks that can frustrate students (or make your quiz completely unusable).
Running Through Different Scenarios
Start your slideshow from the beginning. Try every possible combination. Click Card A with Answer 1, then Answer 2, then Answer 3. Does the correct feedback appear for the right match? Does the wrong feedback show up for incorrect matches? Are animations smooth or do they lag?
Pay special attention to the animation pane. Those little numbered boxes show you the order of animations. If something appears before it should or after, you can drag those boxes up or down to reorder them. It’s finicky work, but precision here makes the difference between a smooth quiz and a confusing mess.
Common Issues and Quick Fixes
Problem: Feedback appears before the match animation completes.
Fix: Change the feedback animation to “After Previous” instead of “With Previous.”
Problem: Students can click through slides accidentally.
Fix: Enable Kiosk Mode in Slide Show settings.
Problem: Animations trigger from the wrong shapes.
Fix: Double-check your triggers—PowerPoint sometimes assigns them to the wrong object if you’ve been copying and pasting.
Problem: Text doesn’t fit in your cards.
Fix: Either resize your cards or break long terms into shorter phrases. Sometimes “less is more” makes better quizzes anyway.
Tips for Maximum Student Engagement
Here’s what separates a good matching quiz from a great one: the details that make students actually want to participate. You’ve done the technical work—now let’s talk about the human element.
Visual Design Matters
Students respond to aesthetics. Use colors strategically: green for correct feedback, red for incorrect, maybe blue or purple for your main cards. Keep it consistent across all your materials so students develop visual associations. That custom font you downloaded? Use it everywhere. Branding your materials makes them feel cohesive and professional.
Don’t overload the slide. Four to six pairs is the sweet spot for most matching activities. More than that and students feel overwhelmed. Less than that and it feels too easy or not worth the effort.
Instructions Must Be Crystal Clear
Never assume students will intuitively know what to do. Add a text box at the top with simple, direct instructions: “Click each letter and drop it on the matching number” or “Match each term on the left with its definition on the right.” If you’re using the animation method, tell them they can try multiple times until they get it right.
Differentiation Built In
Create multiple versions of the same quiz at different difficulty levels. Version 1 might have obvious matches with simple vocabulary. Version 2 includes trickier pairs that require deeper thinking. Version 3 might use all technical terms with no hints. Save these as separate files and assign based on student need.
Or go the other direction: create one master quiz with 8 pairs, but tell struggling students they only need to match 4. This invisible differentiation lets everyone work on the same material without highlighting who needs extra support.
Recording Sheets for Accountability
For some teachers, the digital quiz is just the start. Create a recording sheet (like the table method shown earlier) where students write down their matches after completing the interactive version. This serves multiple purposes: it creates a paper trail for grading, forces students to commit to their answers thoughtfully, and provides a study guide they can reference later.
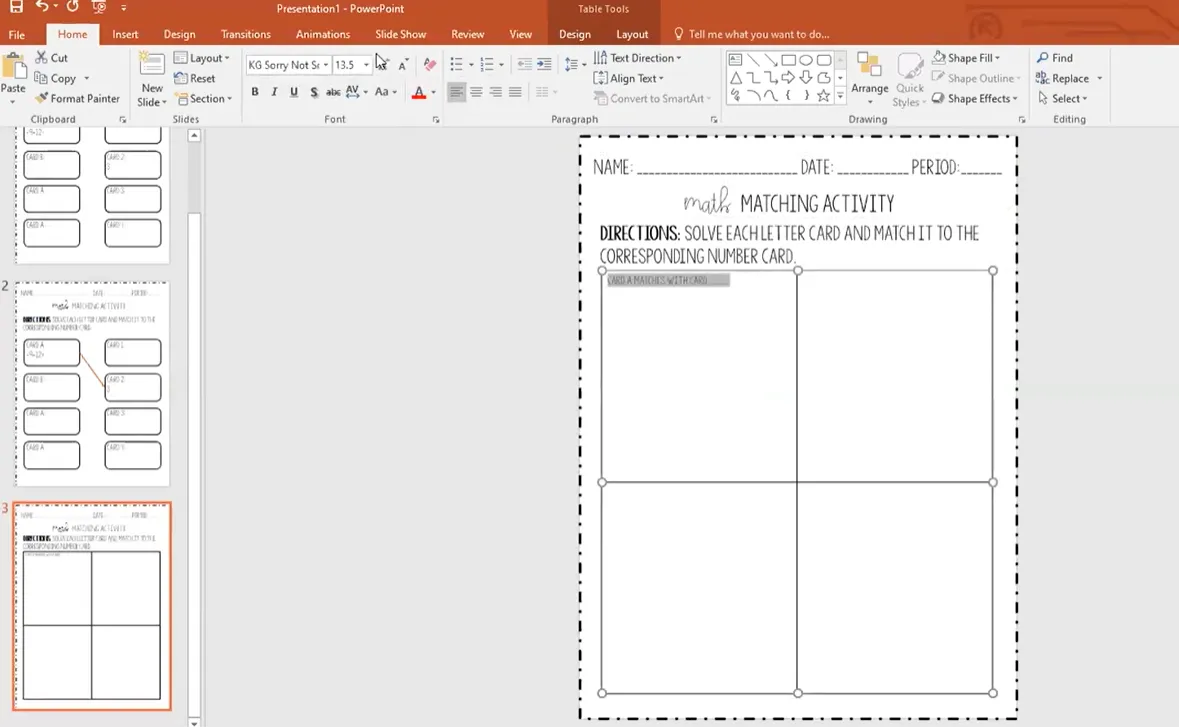
The table approach is simple: two-by-two or three-by-two grid, each cell says “Card A matches with Card __” with space for work shown below. Students complete the interactive quiz, then transfer their final answers to the recording sheet with explanations of how they figured out each match.
The Iteration Mindset
Here’s something they don’t tell you in professional development: your first matching quiz probably won’t be perfect. Maybe the animations lag on older computers. Maybe students find a pairing confusing. Maybe your font choice isn’t as readable as you thought.
That’s okay. Save your quiz as a template. Next time, you’ll adjust. You’ll add clearer instructions. You’ll fix that one animation that always hiccups. You’ll change the wording on that tricky pair everyone misses. This iterative improvement is how good resources become great resources.
Beyond the Quiz: Classroom Applications
Matching quizzes aren’t just for assessment. Use them for:
- Vocabulary review before a reading assignment
- Warm-up activities to activate prior knowledge
- Station work where students rotate through different matching activities
- Exit tickets to quickly gauge understanding at the end of class
- Study guides for test prep that students actually enjoy using
- Partner challenges where teams compete for accuracy and speed
One clever teacher I know creates matching quizzes for every vocabulary unit, then lets students access them at home for self-directed practice. The quiz never gets “used up” because students can try it multiple times until they master it. The result? Vocabulary scores up across the board because students were actually practicing instead of just staring at word lists.
The Accessibility Question
Let’s address something important: not all matching quiz methods are equally accessible. The drag-and-drop animation method can be challenging for students with motor control difficulties. The hyperlink method is generally more accessible because it requires only single clicks, not dragging precision.
Consider creating both versions if you have students with varying needs. Or use PowerPoint’s accessibility checker (File > Info > Check for Issues > Check Accessibility) to identify potential problems. Adding alt text to your shapes and ensuring sufficient color contrast aren’t just best practices—they’re how you ensure every student can engage with your materials.
Creating matching quizzes in PowerPoint transforms what could be a boring worksheet into an interactive experience that students genuinely enjoy. Whether you use the animation method for that game-like feel, the hyperlink approach for simplicity, or OnlineExamMaker for professional assessment capabilities, the key is choosing the method that fits your teaching style and your students’ needs.
Start simple. Create one matching quiz using whichever method feels most comfortable. Test it with a small group. Refine it based on what works and what doesn’t. Then build your template library from there. Before you know it, you’ll have a collection of engaging, interactive resources that make review sessions something students look forward to instead of dread.
And here’s the beautiful part: once you’ve invested the time to create these materials, they’re yours forever. Use them year after year, improving them incrementally, sharing them with colleagues who marvel at how professional they look. That initial time investment pays dividends for years to come.
So go ahead. Open PowerPoint. Set up that portrait slide. Start building your first matching quiz. Your students—and your future self—will thank you.