Creating quizzes with embedded video and audio isn’t just about technical skills—it’s about understanding how humans learn best. When you see a learner’s face light up because a video made a complex concept suddenly clear, or when audio feedback makes them smile after getting an answer right, you realize these tools aren’t just fancy additions.
- Why Media Matters in Modern Quizzes?
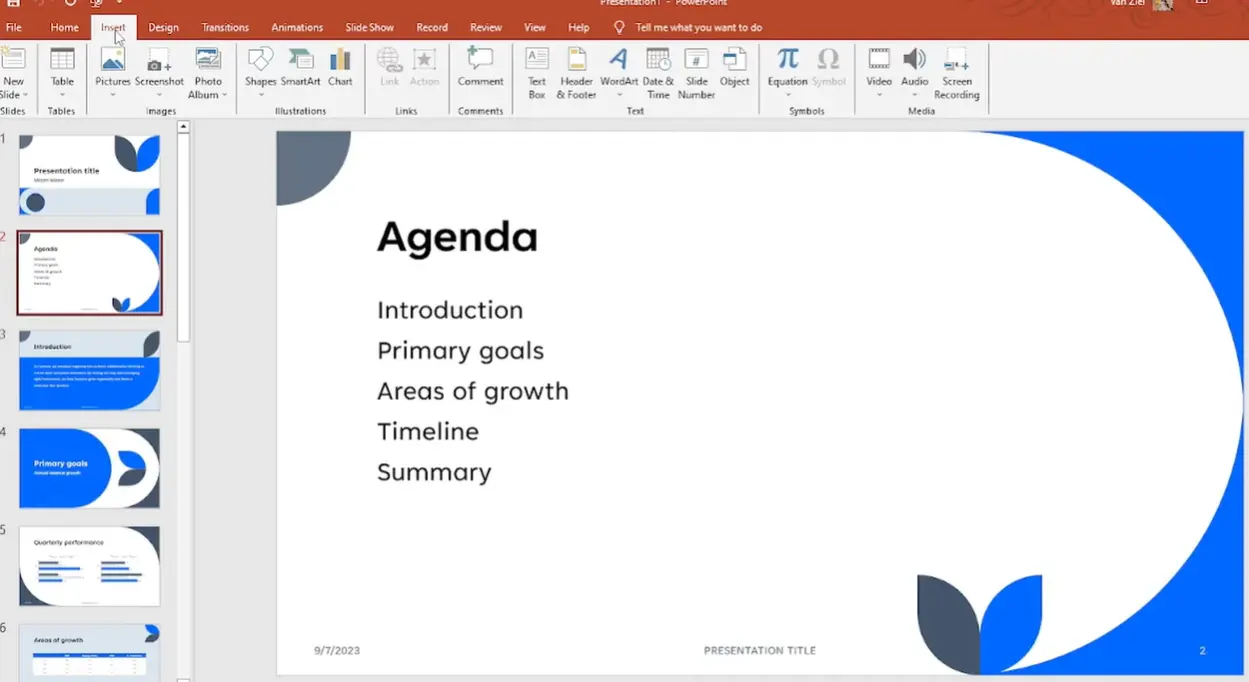
- Embedding Local Video Files in PowerPoint Quizzes
- Adding Online Videos (YouTube & Vimeo) to Quiz Slides
- Incorporating Audio Prompts and Feedback
- Using OnlineExamMaker for Video-Enhanced Quizzes
- Keeping Your Media Files Working When Sharing
- Testing and Troubleshooting Common Issues
Why Media Matters in Modern Quizzes?
If you’re sitting through another quiz, and it’s just text. Black letters on white slides. Your mind starts to wander. Now imagine that same quiz, but suddenly a video clip appears—something visual, something that makes the question real. That’s the difference multimedia makes.

Here’s the thing most people miss—embedding video and audio into PowerPoint quizzes isn’t just about making things prettier. It’s about creating moments where learners actually feel something. When a correct answer triggers a cheerful audio chime, or when a video demonstrates exactly what the question is asking about, you’re not just testing knowledge. You’re creating an experience that sticks.
The secret sauce? It’s all in how you embed the media. Not just linking to it (that’s amateur hour), but actually making it part of the slide so it plays reliably, offline, without breaking when you move files around. Think of it like baking a cake—you want all the ingredients mixed in properly, not just sitting on top.
Embedding Local Video Files in PowerPoint Quizzes
Let’s get practical. You’ve got a video on your computer, and you want it living inside your quiz. Not linked, not referenced—actually embedded. Here’s how the pros do it.
First, navigate to the slide where your video needs to appear. Could be a question slide, could be part of the answer reveal. Click that Insert tab at the top—it’s your gateway to multimedia magic. From there, select Video, then choose “This Device” or “Video on My PC” depending on your PowerPoint version.
Why does this matter? Because when you embed directly from your device, the video file gets packed into the PowerPoint file itself. It’s like putting the engine inside the car instead of towing it behind. Everything travels together. No broken links when you present on a different computer. No “file not found” nightmares five minutes before class starts.
Once your video appears on the slide, you’ll want to resize and position it thoughtfully. Don’t just plop it in the center and call it a day. Ask yourself: does this video need to be the star of the show, or should it complement the question text? You can drag the corners to resize (hold Shift to keep proportions perfect), and position it so your quiz text remains clearly visible.
Controlling When Your Video Plays
Here’s where it gets interesting. Click on your embedded video, and a new Playback tab appears at the top. This is your control center. Set “Start” to “When Clicked” if you want quiz-takers to play it themselves—great for scenarios where the video contains clues they might need to review multiple times. Choose “Automatically” if the video is the question, starting the moment the slide appears.
Want to go full screen? There’s a checkbox for that too. Perfect for immersive questions where the video needs to dominate attention completely.
Adding Online Videos (YouTube & Vimeo) to Quiz Slides
Sometimes the perfect video isn’t sitting on your hard drive—it’s living on YouTube or Vimeo. Maybe it’s a documentary clip, a news segment, or a demonstration video that updates regularly. Good news: PowerPoint speaks fluent streaming video.
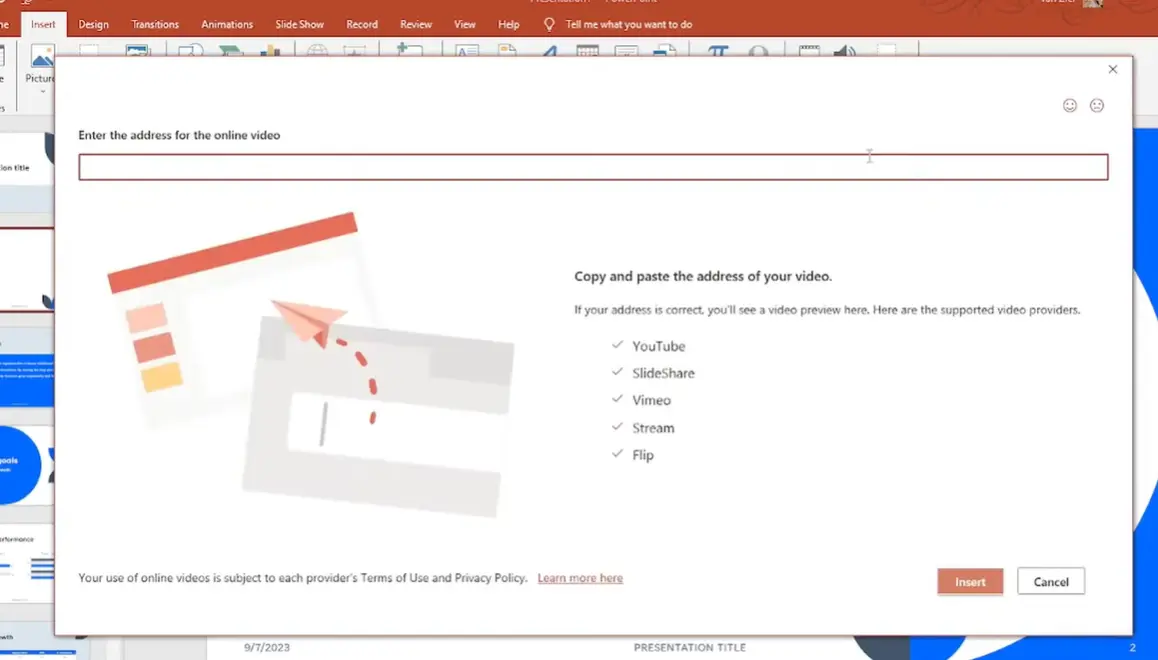
The process feels almost identical to local embedding. Hit Insert, click Video, but this time choose “Online Video.” You’ll see a dialog box asking for a URL or embed code. Copy the link from your YouTube video (just grab it from the address bar), paste it in, and boom—the video preview appears right there in the dialog box.

PowerPoint plays nice with several platforms: YouTube, Vimeo, SlideShare, Microsoft Stream, and Flip. If you’re using something else, you might need to download the video and embed it locally instead.
One critical heads-up: online videos are like houseplants that need water. They require a stable internet connection to play during your quiz. Nothing worse than getting to the crucial question video and watching the buffering wheel spin endlessly. Always—and I mean always—test on the actual network you’ll use for the quiz. School WiFi behaves differently than your home connection. Conference center internet is its own special adventure.
Incorporating Audio Prompts and Feedback
Video gets all the glory, but audio? Audio is the unsung hero of engaging quizzes. A well-placed sound effect can turn a basic multiple-choice question into something that feels alive.
Think about it: when someone clicks the correct answer and hears a pleasant chime, their brain releases a tiny hit of dopamine. When they click wrong and hear a gentle “try again”
prompt, it feels supportive rather than punishing. According to research on multimedia learning, audio feedback can
improve retention by up to 40% compared to visual-only cues.
Adding Audio Files That Work
Navigate to Insert, then Audio, and choose either “Audio on My PC” to add a sound file you already have, or “Record Audio” to create narration on the spot. Both methods embed the audio directly into the presentation—no external files to manage.
The magic happens in the Playback tab. Set “Start: On Click” for sounds that should only play when learners interact with specific answer buttons. Use “Automatically” for spoken instructions that begin when the question slide appears—perfect for audio-based questions or learners who prefer auditory information.
Here’s a clever trick: combine short audio clips with answer buttons. Record a cheerful “That’s right!” for correct answers and a gentle “Not quite—try again” for incorrect ones. Then use PowerPoint’s trigger animations to play the appropriate sound based on which answer gets clicked.
Using OnlineExamMaker for Video-Enhanced Quizzes
Let’s be honest—PowerPoint is powerful, but it requires manual setup for every single interaction. If you’re creating quizzes regularly, or if you need features like automatic grading, detailed analytics, or the ability to share quizzes online without sending massive PowerPoint files around, you might want a specialized tool.
Enter OnlineExamMaker, an AI-powered exam creation platform that makes video and audio integration feel effortless. Think of it as PowerPoint’s more sophisticated cousin who went to business school.
Why OnlineExamMaker Changes the Game
The platform understands modern assessment needs. Video questions? Built in. Audio prompts? Native support. Automatic grading? Of course. But here’s what really sets it apart: OnlineExamMaker generates detailed analytics showing exactly which questions learners struggled with, how long they spent on each, and which media elements they interacted with most.
Create Your Next Quiz/Exam Using AI in OnlineExamMaker
Creating a Quiz with video in OnlineExamMaker: Step by Step
Step 1: Sign Up or login
Visit OnlineExamMaker and create a free account. The platform offers all-in-one tools to help you make interactive quizzes.
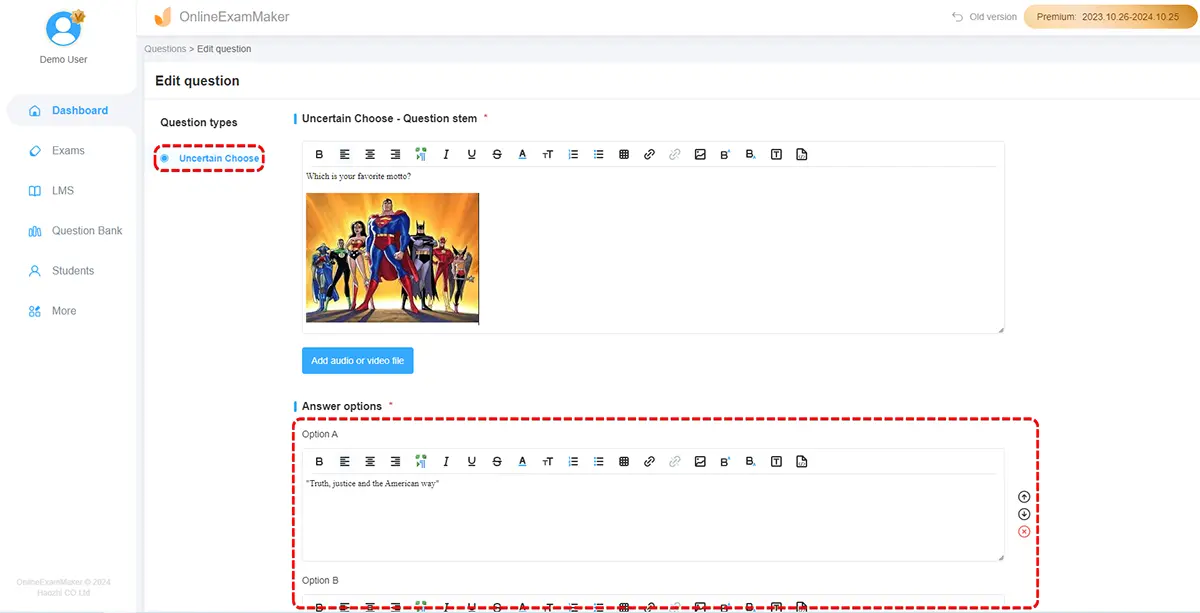
Step 2: Add Your Video Content
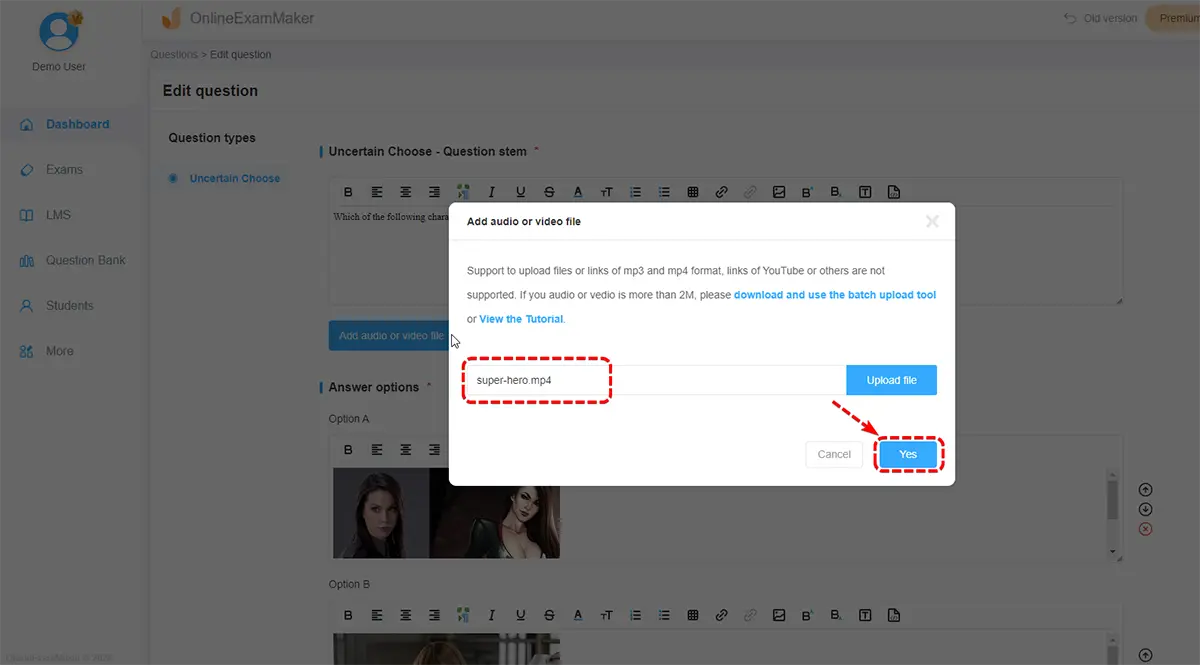
Click “Add Question” and select the video question type. Here’s where OnlineExamMaker shines—you can upload video files directly (it handles all common formats: MP4, MOV, AVI, WebM), or paste a YouTube link. The platform automatically generates a clean, responsive player that works on any device.
Step 3: Configure Your Question Settings
For each question, you can set whether learners must watch the full video before answering (prevents guessing), whether they can replay it (great for complex scenarios), and
whether to show correct answers immediately or only at the end.
Audio works similarly—upload your audio prompt, and OnlineExamMaker embeds it with a clean player interface. You can even add audio feedback that plays based on whether answers are correct or incorrect.
Step 4: Enable AI Features
Here’s where things get interesting. OnlineExamMaker’s AI can analyze your video content and automatically suggest relevant questions. Upload a 5-minute lecture video, and the AI proposes 10-15 comprehension questions based on key points discussed. You can accept, reject, or modify these suggestions—it’s like having a teaching assistant who never sleeps.
Step 5: Publish and Share
When your quiz is ready, OnlineExamMaker generates a shareable link. No files to email, no version control headaches. Learners access the quiz through any web browser. The platform tracks every interaction—who took it, when, how long they spent, which questions they struggled with, and their final scores.
OnlineExamMaker vs. PowerPoint: When to Use What
PowerPoint excels when you need complete creative control, when you’re presenting in person and want that slideshow feel, or when you’re already comfortable with PowerPoint’s ecosystem. It’s great for one-off quizzes in classroom settings.
OnlineExamMaker wins when you need scalability, remote access, automatic grading, detailed analytics, or when creating many quizzes over time. It’s purpose-built for assessment, which means features like randomized question order, time limits, and cheat prevention come standard.
Many educators use both—PowerPoint for in-class interactive presentations, OnlineExamMaker for homework assignments and formal assessments.
Keeping Your Media Files Working When Sharing
Ever sent someone a PowerPoint quiz, only to have them email back saying half the videos won’t play? Yeah, we’ve all been there. It’s preventable.
The golden rule: keep your PowerPoint file and any external media in the same folder from day one. When you first insert a video or audio file, PowerPoint creates a link to that file’s location. Move the video to a different folder later? That link breaks. Rename the file? Broken. Email just the PowerPoint without the media folder? You guessed it—broken.
The Folder System That Actually Works
Create a project folder. Name it something obvious like “Biology Quiz – Cell Division.” Inside that folder, put your PowerPoint file and create a subfolder called “Media” where all your video and audio files live. When you insert media, grab it from that Media subfolder.
Now when you need to share the quiz, zip up the entire project folder—PowerPoint file, Media subfolder, everything. The recipient unzips it, and all the links still work because the relative file paths remained intact.
Even better: use embedded video and audio (as discussed earlier) whenever possible. When media is truly embedded, it travels inside the PowerPoint file itself. No separate files to manage. The presentation file gets larger, yes, but it becomes self-contained and bulletproof.
Testing and Troubleshooting Common Issues
Murphy’s Law applies double to presentations with multimedia. If something can go wrong during your quiz, it probably will—unless you test thoroughly beforehand.
The Pre-Quiz Testing Checklist
Run the complete quiz on the actual computer you’ll use for presentation. School computers often have different codecs installed than your personal laptop. What plays perfectly at home might throw codec errors on campus.
Test on the actual network you’ll use. If your quiz relies on online videos, load it on the school WiFi, not your home connection. Bandwidth varies wildly, and nothing deflates a quiz faster than watching YouTube’s buffering circle spin for 30 seconds.
Check audio output. Will you use the computer’s built-in speakers, or connect to a classroom sound system? Test with the actual setup to ensure volume levels work and connections are solid.
Practice your timing. Click through the quiz at presentation speed. Make sure videos don’t run too long for the available class time, and that audio prompts are clear and audible.
Common Problems and Quick Fixes
Video won’t play: Usually a codec issue. Install VLC Media Player (it’s free) or the K-Lite Codec Pack to ensure Windows can decode most video formats. Or convert your video to MP4 H.264—it’s the most universally compatible format.
Audio is silent: Check if PowerPoint has muted the audio track. Click the audio icon on your slide, go to Playback, and ensure the volume slider isn’t at zero. Also verify your system volume isn’t muted.
Online video shows “Cannot play video”: Either the internet connection failed, or the video was removed/made private on YouTube. Always have a backup plan—keep a downloaded copy of critical videos.
Video quality looks terrible: PowerPoint sometimes compresses video aggressively. Go to File → Info → Compress Media and choose “Presentation Quality” or “Full HD” instead of “Internet Quality.”