Google Forms has a built-in feature that lets you release quiz scores instantly, the moment someone hits that submit button. No manual grading marathons. No anxious learners refreshing their inboxes. Just immediate, automatic feedback that keeps everyone engaged and moving forward.
Whether you’re a teacher running pop quizzes, a trainer conducting assessments, or an HR manager evaluating new hires, this guide will walk you through the exact steps to set up instant score release—plus some tricks the documentation doesn’t always mention.
- Why Immediate Display Score to Participants?
- Setting Up Automatic Score Release: The Step-by-Step Process
- Essential Prerequisites You Can’t Skip
- What Your Respondents Will See
- Troubleshooting Common Issues
- OnlineExamMaker: A Better Way to Create Quizzes and Release Scores
Why Immediate Display Score to Participants?
Let’s be honest—waiting for results is torture. And in educational psychology, we know that immediate feedback is one of the most powerful learning tools available.
When learners see their scores right away, something magical happens. They can connect their performance to the material while it’s still fresh. Mistakes become learning opportunities instead of forgotten errors. Correct answers reinforce understanding in real-time.
But there’s more to it than pedagogy. Instant scoring also saves you countless hours. No more manually reviewing responses at midnight. No more tracking down who submitted what. The system handles it all, freeing you to focus on what actually matters: teaching, training, and helping people grow.
Setting Up Automatic Score Release: The Step-by-Step Process
Ready to turn on the magic? Here’s how to configure Google Forms to release scores immediately after each submission.
Step 1: Access Your Form Settings
First things first—open the Google Form you want to configure. Look up at the top-right corner of your screen. See “Settings” button? That’s your gateway to form settings. Click it.
A settings panel will slide open from the right side of your screen. Don’t panic if you see multiple tabs—we’re heading somewhere specific.
Step 2: Navigate to the Quizzes Tab
Once you’re in settings, you’ll notice several tabs at the top. Click on the one labeled “Quizzes.”
If you don’t see a Quizzes tab, here’s a quick reality check: your form might not be set up as a quiz yet. You’ll need to toggle the “Make this a quiz” switch first. More on that in the prerequisites section below.
Step 3: Select “Immediately after each submission”
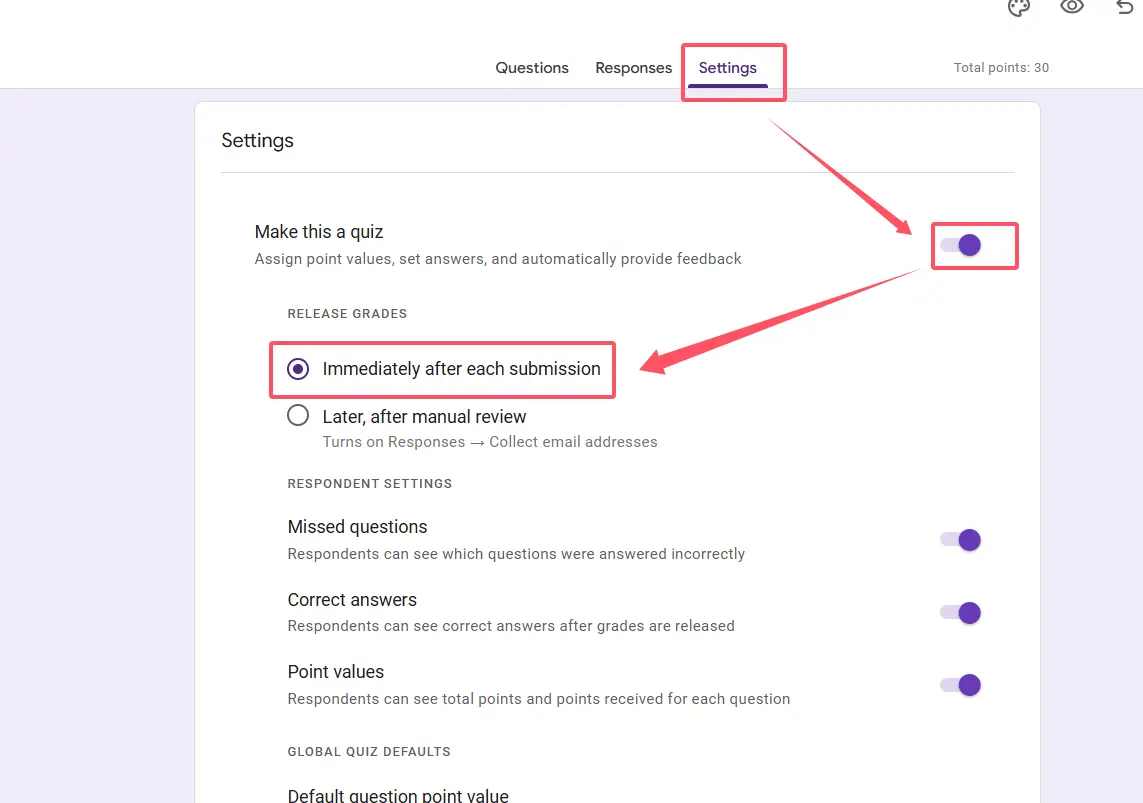
Now we’re getting to the good stuff. Under the “Release grades” section, you’ll see two options:
- Immediately after each submission – This is what we want
- Later, after manual review – The old-school way that creates bottlenecks
Click the radio button next to “Immediately after each submission.” Feel that? That’s the sound of hours of your life being reclaimed.
Step 4: Configure What Respondents Can See
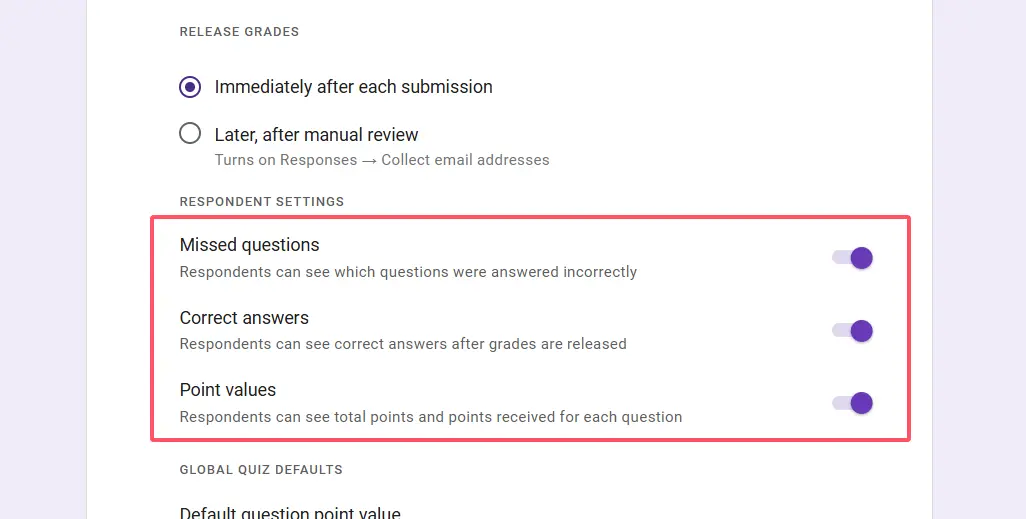
Right below the release timing options, you’ll find checkboxes that control what information respondents receive. Here’s what each one does:
- Missed questions – Shows which questions they got wrong
- Correct answers – Displays the right answers for comparison
- Point values – Reveals how much each question was worth
Choose wisely. If you’re running a certification exam, you might want to hide correct answers to prevent answer-sharing. For a learning assessment? Show everything. Transparency builds trust and accelerates learning.
Step 5: Save Your Changes
Don’t forget this crucial final step. Click the “Save” button at the bottom of the settings panel. I’ve seen too many well-intentioned educators configure everything perfectly, then close the panel without saving. Don’t be that person.
Essential Prerequisites You Can’t Skip
Here’s where things get real. Immediate score release won’t work if your form isn’t properly configured. Think of these as the foundation—skip them, and your entire setup crumbles.
Quiz Mode Must Be Enabled
This seems obvious, but you’d be surprised how often it’s overlooked. Your Google Form must be designated as a quiz. Go to Settings → Quizzes, and toggle “Make this a quiz” to ON. If that switch is off, none of the automatic scoring features will activate.
Answer Keys and Point Values Are Non-Negotiable
Every single question needs an answer key with assigned points. Google Forms isn’t psychic—it needs to know what constitutes a correct answer and how much it’s worth.
For multiple-choice questions, click the answer key icon at the bottom of each question. Select the correct answer(s) and assign point values. For short answer questions, you’ll need to manually review those later unless you use exact match criteria.
Here’s a harsh truth: if even one question lacks an answer key, your automatic scoring will be incomplete. Double-check everything.
Email Collection (Highly Recommended)
Technically, you can release scores without collecting emails. But why would you? Email collection serves multiple purposes:
- Prevents anonymous submissions (reducing fraud)
- Allows respondents to view their scores later
- Enables you to track who submitted what
- Facilitates follow-up communication
To enable email collection, go to Settings → General, and check “Collect email addresses.” Simple, effective, essential.
| Requirement | Where to Find It | Why It Matters |
|---|---|---|
| Quiz Mode Enabled | Settings → Quizzes | Activates all auto-grading features |
| Answer Keys Set | Each question’s answer key icon | Enables automatic scoring |
| Point Values Assigned | Answer key configuration | Determines total score calculation |
| Email Collection | Settings → General | Tracks submissions and enables score retrieval |
What Your Respondents Will See
So you’ve configured everything perfectly. What happens next?
The moment a respondent clicks “Submit,” they’re greeted with a confirmation screen. And right there, front and center, is a “View score” button. Click it, and they see:
- Their total score (e.g., “8 out of 10”)
- A percentage grade
- Which questions they missed (if you enabled that option)
- The correct answers (if you enabled that too)
- Any feedback you added to individual questions
It’s clean, clear, and—most importantly—instant. No waiting. No guessing. Just straightforward results that learners can act on immediately.
Troubleshooting Common Issues
Even with perfect setup, things can go sideways. Here are the most common problems and their solutions.
Scores Aren’t Appearing Automatically
First, check the obvious: did you actually save your settings? Seriously, go back and verify.
If settings are saved but scores still aren’t releasing, examine your answer keys. Are all questions properly configured? Even one missing answer key can cause issues.
Respondents Can’t Find Their Scores
If email collection is disabled, respondents won’t receive a score email—they’ll only see the score on the confirmation screen immediately after submission. If they navigate away, that score is gone.
Solution? Enable email collection. Google Forms will automatically send score summaries to respondents’ email addresses, creating a permanent record.
Partial Scoring Problems
Short answer and paragraph questions can’t be auto-graded unless you set up exact match criteria—and even then, it’s limiting. If your quiz relies heavily on open-ended questions, you’ll need to review them manually.
The workaround? Stick to multiple-choice, checkboxes, and dropdown questions for auto-graded assessments. Save open-ended questions for formative assessments where immediate scoring isn’t critical.
Verification: The Responses Tab
Want to confirm everything’s working? Switch to the Responses tab at the top of your form. You should see a summary of all submissions, complete with automatically calculated scores.
If you see blank score columns, something’s broken. Go back and troubleshoot using the steps above.
OnlineExamMaker: A Better Way to Create Quizzes and Release Scores
Google Forms is powerful, free, and accessible. But let’s address the elephant in the room—it has limitations.
What if you need advanced question types? Randomized question banks? Detailed analytics that go beyond basic scoring? Proctoring features to ensure test integrity? Custom branding that reflects your organization?
OnlineExamMaker is a comprehensive assessment platform designed specifically for educators, trainers, and HR professionals who need more than basic quiz functionality. It offers everything Google Forms provides for score release—instant grading, automatic feedback, email notifications—plus capabilities that take your assessments to the next level.
Create Your Next Quiz/Exam Using AI in OnlineExamMaker
Why Choose OnlineExamMaker?
Here’s what makes it stand out:
- Advanced Question Types: Go beyond multiple choice. Create matching questions, fill-in-the-blanks, hotspot questions, and more.
- Randomized Question Banks: Pull questions randomly from a pool to prevent cheating and create unique exams for each test-taker.
- Comprehensive Analytics: See not just scores, but performance trends, time spent per question, and detailed breakdowns of strengths and weaknesses.
- Instant Score Release with Customization: Just like Google Forms, but with granular control over what information is shared and when.
- Proctoring and Security: Built-in features to maintain test integrity, including browser lockdown and monitoring tools.
- Professional Branding: White-label your assessments with custom logos, colors, and domains.
The platform is intuitive enough for beginners but robust enough for enterprise use. Whether you’re running certification programs, employee onboarding assessments, or classroom quizzes, OnlineExamMaker scales to meet your needs.
And yes—it releases scores to exam takers immediately, just like Google Forms. But it does so with far more flexibility and control.
Bottom Line: If you’re serious about assessment—if you need reliability, security, and insights that go beyond basic scoring—OnlineExamMaker is worth exploring. It’s the difference between a screwdriver and a power drill. Both turn screws, but one does it with significantly more efficiency and capability.