Think of file management as the unsung hero of online teaching. When done right, it’s invisible. Students find what they need without hunting through seventeen folders or deciphering your cryptic naming system. When done wrong? Chaos. Emails at midnight. “I can’t find the study guide” messages that make you question your career choices.
The good news? Schoology gives you multiple strategic locations to place files, each designed for different teaching moments. PDFs, videos, calendars, reference sheets—they all have a home. Let’s figure out where.
- Understanding Where Files Actually Live in Schoology
- Adding Files to Course Folders: Your Home Base
- How Students Experience PDFs in Schoology
- Using Course Updates to Share Files Quickly
- Files in Assignments: The Worksheet Workflow
- Adding Files to Events: The Overlooked Option
- Creating Interactive Assessments with OnlineExamMaker
- Quick Reference: Where to Put Your Files
Understanding Where Files Actually Live in Schoology
First, let’s clear up a common misconception that trips up even experienced teachers: you cannot embed files directly inside folder descriptions. Tried it? Yeah, it doesn’t work. Schoology treats folder descriptions like text-only zones—great for context, useless for actual file storage.
But here’s where it gets interesting. You’ve got four main neighborhoods where files can actually live:
- Course folders – Your permanent resource library
- Updates – Quick announcements with attached files
- Assignments – Worksheets students need to complete
- Events – Information sharing without the grading component
Each location serves a different purpose, and choosing wisely makes the difference between a smooth-running course and digital pandemonium. Think of it like organizing your kitchen: cereal goes in the pantry, milk in the fridge, coffee maker on the counter. Same logic applies here.
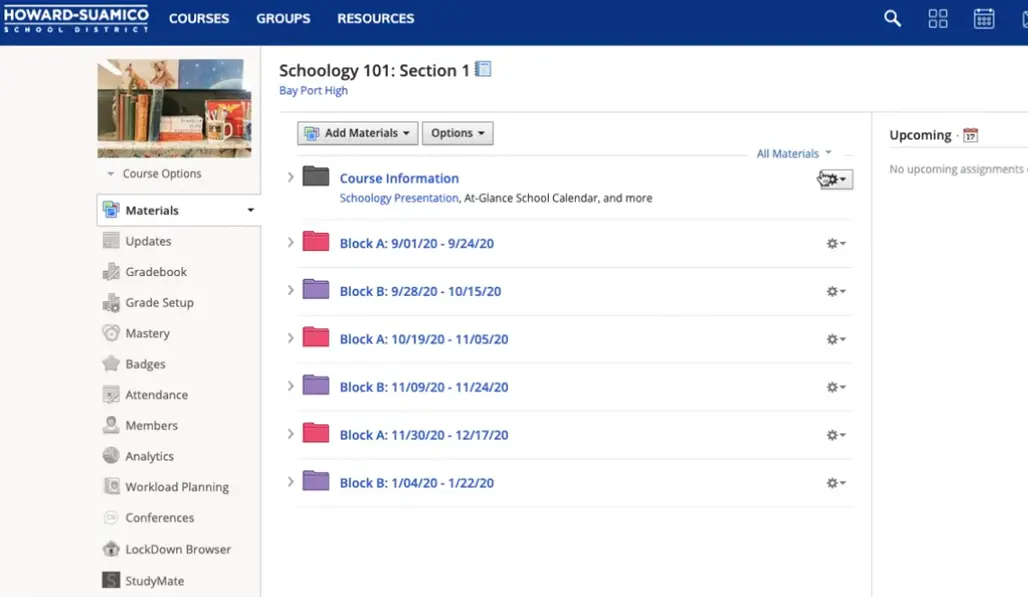
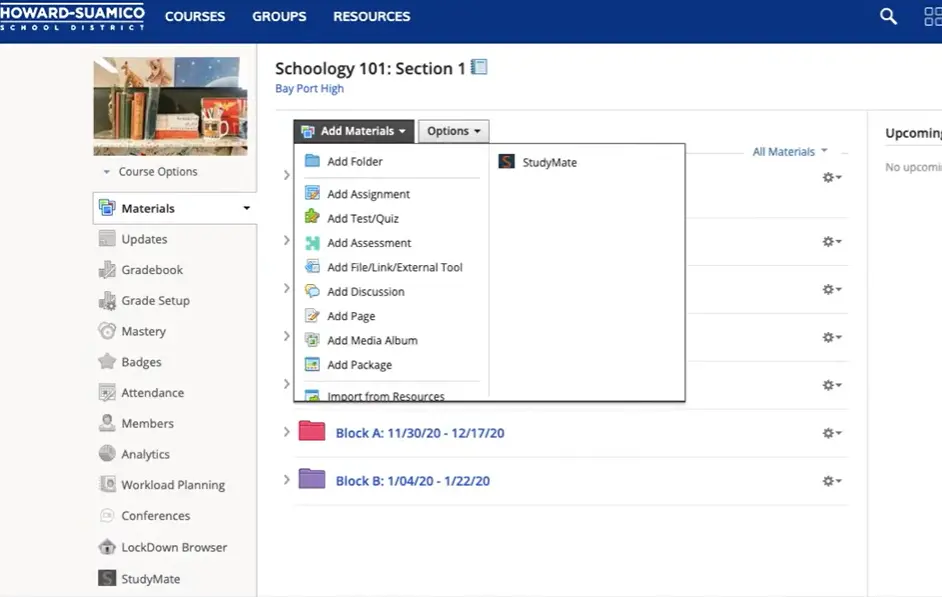
Adding Files to Course Folders: Your Home Base
Folders are where most of your permanent resources should live. That district calendar? The semester syllabus? Reference materials students might need all year? Folders are calling.
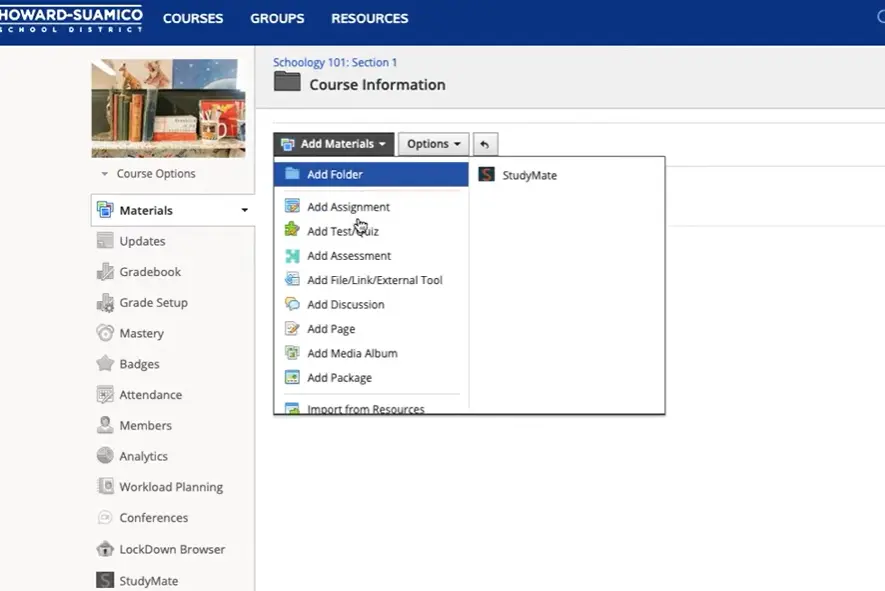
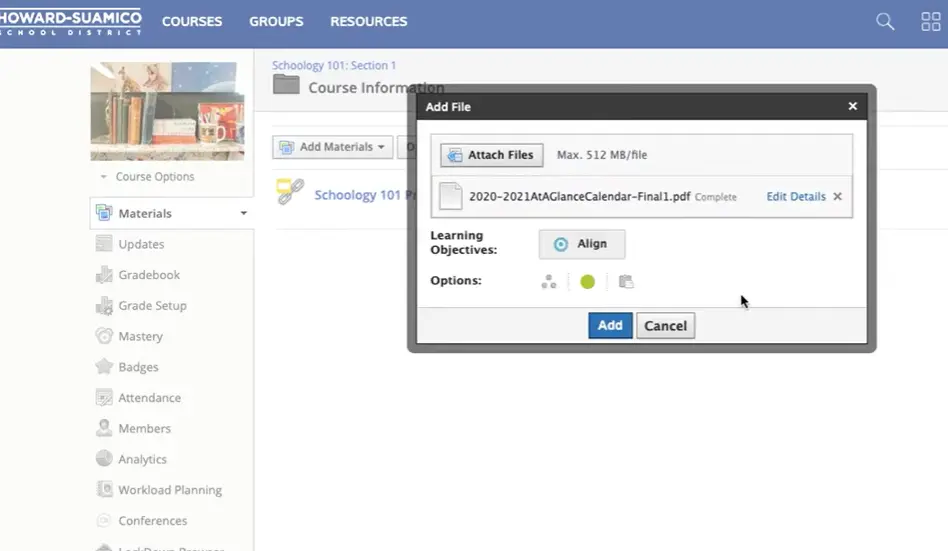
Here’s the play-by-play, and it’s simpler than you think:
- Navigate to the folder where you want the file to appear
- Click “Add File/Link/External Tool”
- Select “File” from the options
- Choose your PDF or video file from your computer
- Decide whether to copy to other courses or publish immediately
- Click “Add” and watch the magic happen
The beauty of this approach? Files appear as distinct items in your content list, making them impossible to miss. Students scroll down, see “District Calendar.pdf,” click it, done. No archeological expedition required.
Pro tip: Use descriptive file names before you upload. “Calendar.pdf” is okay. “2024-2025_District_Calendar.pdf” is better. Your future self—and your students—will thank you.
How Students Experience PDFs in Schoology
Ever wonder what happens on the other side when a student clicks that PDF you uploaded? Spoiler: it’s actually pretty elegant.
Schoology has a built-in document viewer that loads PDFs in a dedicated window. No downloading required, no external apps needed. Students get a clean interface with some genuinely useful options:
- Print – For those who still like paper (they exist)
- Download – Save it locally for offline access
- Expand to full screen – Maximize reading real estate
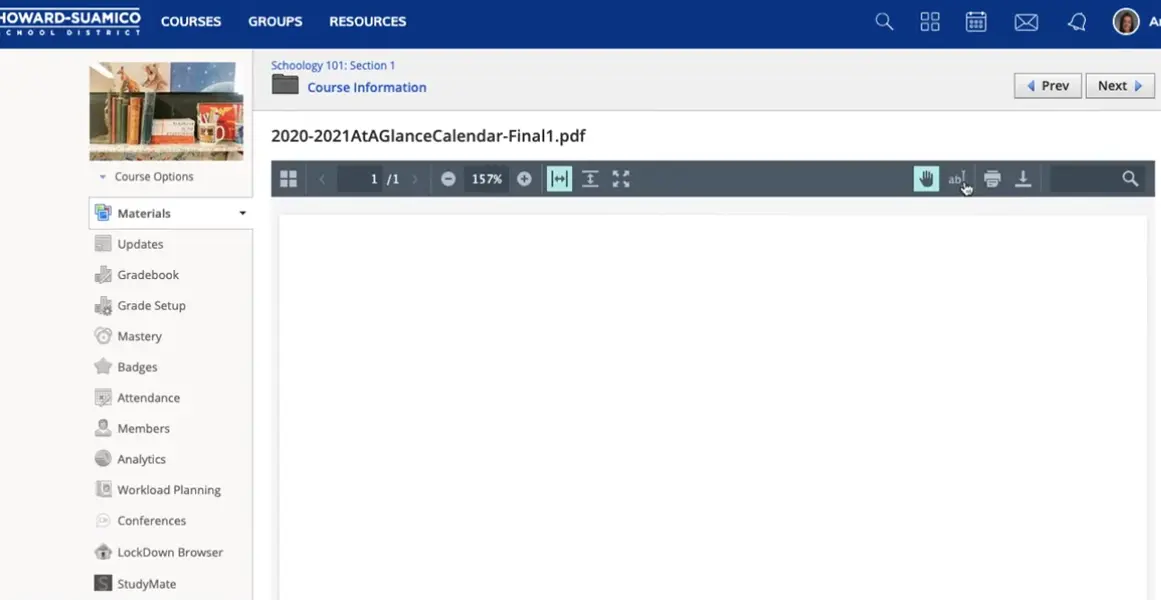
Here’s the clever part: this viewer mirrors what teachers see when grading assignments. Same interface, same functionality. That consistency reduces confusion and creates a predictable user experience across the platform. When everything looks familiar, students spend less time figuring out buttons and more time actually learning.
The full-screen option deserves special mention. Students can immerse themselves in the document without distractions, which is particularly valuable for dense reading materials or detailed diagrams. It’s a small feature that makes a big difference.
Using Course Updates to Share Files Quickly
Sometimes you don’t need permanence—you need speed. The fire drill schedule changed. There’s a last-minute reminder about tomorrow’s lab. The guest speaker sent their bio sheet late. Enter: course updates with file attachments.
![]()
Updates live at the top of your course feed, ensuring maximum visibility. Attaching a file is dead simple—look for the page-upon-page icon in the update composer. Click it, select your file, post. The whole process takes maybe thirty seconds.
When to use updates instead of folders? Think of updates as your announcement board. They’re perfect for:
- Time-sensitive documents that have an expiration date
- One-off resources that don’t belong in your permanent library
- Quick reference sheets for upcoming activities
- Corrections or revisions to previously shared materials
The tradeoff? Updates eventually get buried as new posts appear. That’s by design—they’re meant to be timely, not timeless. For resources students might need to reference weeks or months later, stick with folders.
Files in Assignments: The Worksheet Workflow
Here’s where theory meets practice for most teachers. You’ve got a worksheet. Students need to print it, complete it by hand, and submit it. This is assignment territory.
When you create a new assignment, you’ll see the option to attach files right in the assignment creation screen. This is the standard workflow for distributing materials students need to complete and turn in.
Why attach files to assignments rather than just linking to folder content? Context. When the file lives inside the assignment itself, students don’t have to hunt for it. Everything they need is in one place: instructions, rubric, attached worksheet. It’s workflow efficiency at its finest.
This approach particularly shines for differentiation. You can attach different versions of a worksheet to the same assignment and use Schoology’s individual assignment feature to send specific students the version they need. Boom—differentiated instruction without announcing it to the whole class.
Adding Files to Events: The Overlooked Option
Events are Schoology’s secret weapon, and most teachers never touch them. That’s a shame, because they’re perfect for specific scenarios.
Think of events as informational gatherings that don’t require student submissions. Study sessions. Club meetings. Optional review opportunities. Chemistry club meetups, as the tutorial mentions. Anywhere you want to share information without the weight of grades attached.
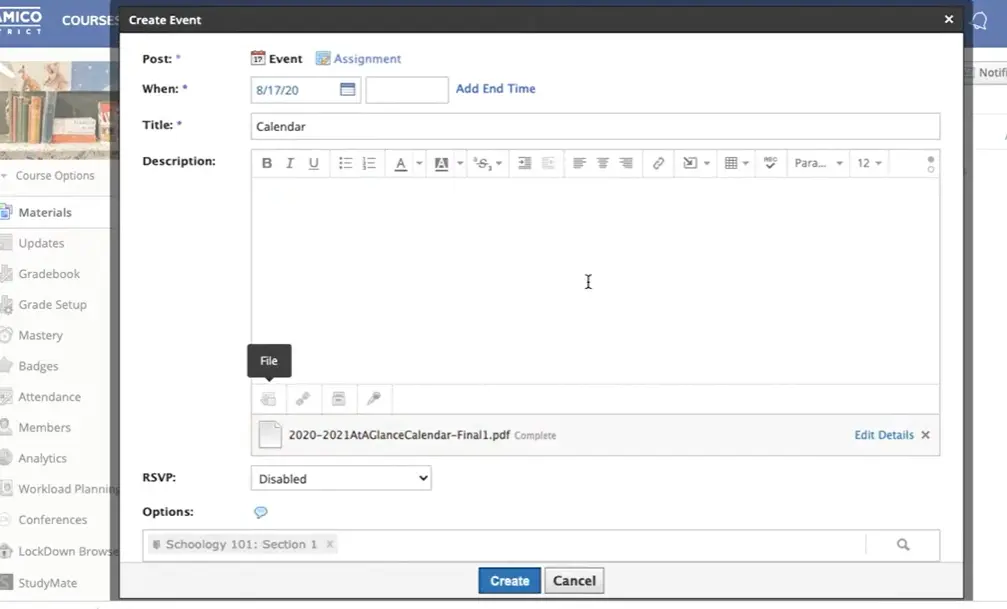
Adding files to events works the same way as other locations—select your file, attach it, create the event. What makes events unique is their optional nature. Students can RSVP, signaling interest without formal commitment. The file lives within the event details, accessible to anyone who wants it but not mandatory for everyone.
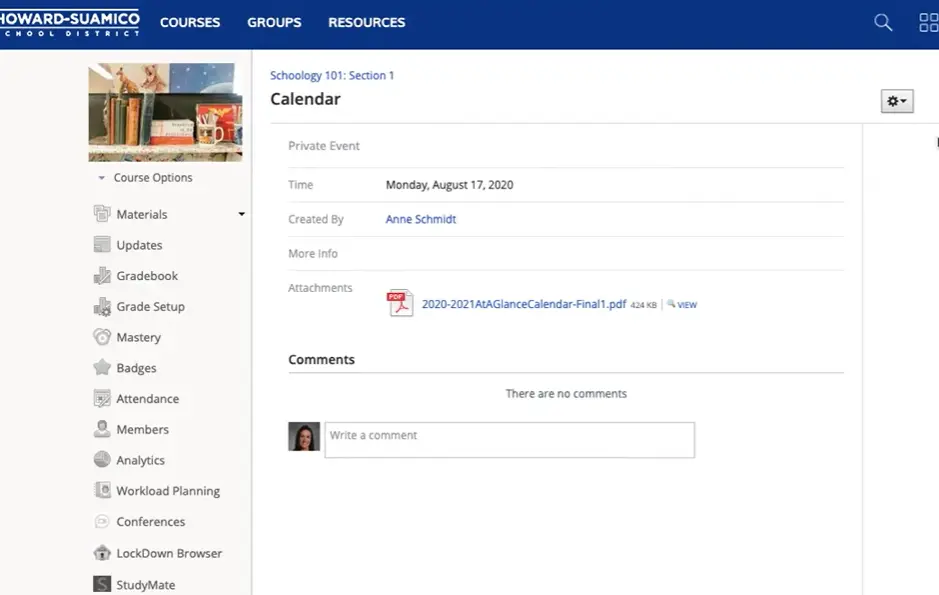
When students click the attached file in an event, they get the same viewer experience as everywhere else. But there’s also a direct download option that feels more casual, more “grab this if you want it” rather than “you’re required to engage with this content.”
Events particularly shine for extracurricular activities, enrichment opportunities, or bonus resources. They keep your course organized without cluttering your assignment list with non-graded items.
Creating Interactive Assessments with OnlineExamMaker
While Schoology excels at file distribution, let’s talk about what happens next: assessment. You’ve shared your PDFs, students have accessed the materials, and now you need to know whether they actually learned anything. This is where many teachers hit a wall—creating engaging, effective assessments that go beyond static PDFs.
Enter OnlineExamMaker, a platform that transforms traditional assessment into something actually interactive. Think of it as upgrading from paper worksheets to dynamic, responsive evaluation tools that adapt to how students actually learn in 2024.
Create Your Next Quiz/Exam with OnlineExamMaker
The AI Advantage
Here’s what makes OnlineExamMaker genuinely useful: the AI Question Generator doesn’t just save time—it saves your sanity. Upload your teaching materials or topic outlines, and the system generates relevant questions automatically. Multiple choice, true/false, short answer—the AI handles the heavy lifting while you maintain editorial control.
No more spending Sunday nights crafting the same types of questions for the fifteenth time. The AI learns patterns from educational best practices and generates questions that actually test understanding, not just memorization.
Grading Without the Pain
Remember grading 150 worksheets by hand? OnlineExamMaker’s Automatic Grading feature makes that a distant memory. The system scores objective questions instantly and provides immediate feedback to students. Even better, it generates analytics showing which concepts students struggle with, giving you actionable data for reteaching.
The grading engine handles everything from simple multiple-choice to complex question types, freeing you to focus on the subjective responses that genuinely require human judgment. It’s efficiency without sacrificing educational value.
Maintaining Academic Integrity
Let’s address the elephant in the virtual room: online assessment comes with trust issues. OnlineExamMaker’s AI Webcam Proctoring monitors test-takers through their webcams, flagging suspicious behavior without requiring you to watch 30 students simultaneously. The AI detects things like multiple faces, looking away from the screen, or using prohibited materials.
Is it perfect? No surveillance system is. But it creates accountability without turning your classroom into a dystopian nightmare. Students know they’re being monitored, which alone deters most academic dishonesty.
Additional OnlineExamMaker Features Worth Exploring:
- Question Management Bank – Build a reusable library of vetted questions organized by topic, difficulty, and learning objective. Stop recreating the wheel every semester.
- Learning Management System – If you’re juggling multiple platforms, OnlineExamMaker’s integrated LMS consolidates course materials, assessments, and student tracking in one place.
The integration between passive resource sharing (Schoology PDFs) and active assessment (OnlineExamMaker quizzes) creates a complete learning ecosystem. Students access materials, study them, and demonstrate understanding—all within a coherent digital workflow.
Quick Reference: Where to Put Your Files
Still deciding where that PDF should live? Here’s your cheat sheet:
| Location | Best For | Student Experience |
|---|---|---|
| Course Folders | Permanent reference materials, syllabi, semester-long resources | Easy to find in content list, always accessible |
| Updates | Time-sensitive announcements, quick reminders, temporary documents | High visibility initially, gets buried over time |
| Assignments | Worksheets requiring completion and submission, graded materials | Contextual—file appears with instructions and rubric |
| Events | Optional activities, club meetings, study sessions, enrichment | Casual access, RSVP functionality, feels less mandatory |
The pattern emerges when you look at your actual teaching workflow. Permanent resources go in folders. Timely announcements go in updates. Graded work goes in assignments. Optional extras go in events. Master that logic, and file organization becomes intuitive rather than frustrating.