Ever felt like you’re drowning in a sea of quiz responses? You’ve just wrapped up a student assessment, your Google Form is bursting with submissions, and now you’re staring at that mountain of data wondering: “What now?” The truth is, Google Forms collects responses beautifully, but analyzing them? That’s where things get interesting.
Whether you’re a teacher tracking student progress, a trainer measuring competency, or an HR manager evaluating candidate skills, you need more than just raw responses. You need insights. Patterns. Actionable intelligence that helps you actually improve outcomes. And that starts with getting your quiz data out of Google Forms and into a format where you can work your analytical magic.
- Why Exporting Quiz Data Actually Matters?
- Method 1: Connect Your Quiz to Google Sheets
- Method 2: Download Responses Directly as CSV
- How to Make Sense of Your Exported Data?
- The Smart Alternative: OnlineExamMaker’s Automated Solution
- How OnlineExamMaker AI Grader Works
- Building Your First Auto-Graded Exam with OnlineExamMaker
Why Exporting Quiz Data Actually Matters?
Let’s be real for a second. You didn’t create that quiz just to watch responses pile up in a digital filing cabinet. You created it because you need to know something: Did your students master that concept? Are your employees ready for certification? Which job candidates show the most promise?
The raw responses sitting in Google Forms are like unrefined ore. They contain value, sure, but you can’t use them in that state. You need to extract them, process them, and transform them into something meaningful. Maybe that’s calculating class averages, identifying knowledge gaps, comparing performance across different groups, or tracking improvement over time.
Here’s what makes data export so crucial: Google Forms gives you basic summaries, but sophisticated analysis requires dedicated tools. You might want to run statistical tests, create custom visualizations, merge quiz data with other datasets, or build longitudinal performance reports. None of that happens inside Forms itself.
Method 1: Connect Your Quiz to Google Sheets
Think of this as creating a live pipeline between your quiz and your analysis workspace. It’s the method I’d recommend for most educators and trainers because it gives you flexibility without the headache of manual downloads.
Here’s how it works: Open your quiz in Google Forms, then navigate to the Responses tab at the top. You’ll spot a green Sheets icon—that’s your gateway. Click it, and Google will ask whether you want to create a new spreadsheet or link to an existing one. For most purposes, creating a fresh spreadsheet keeps things tidy and organized.
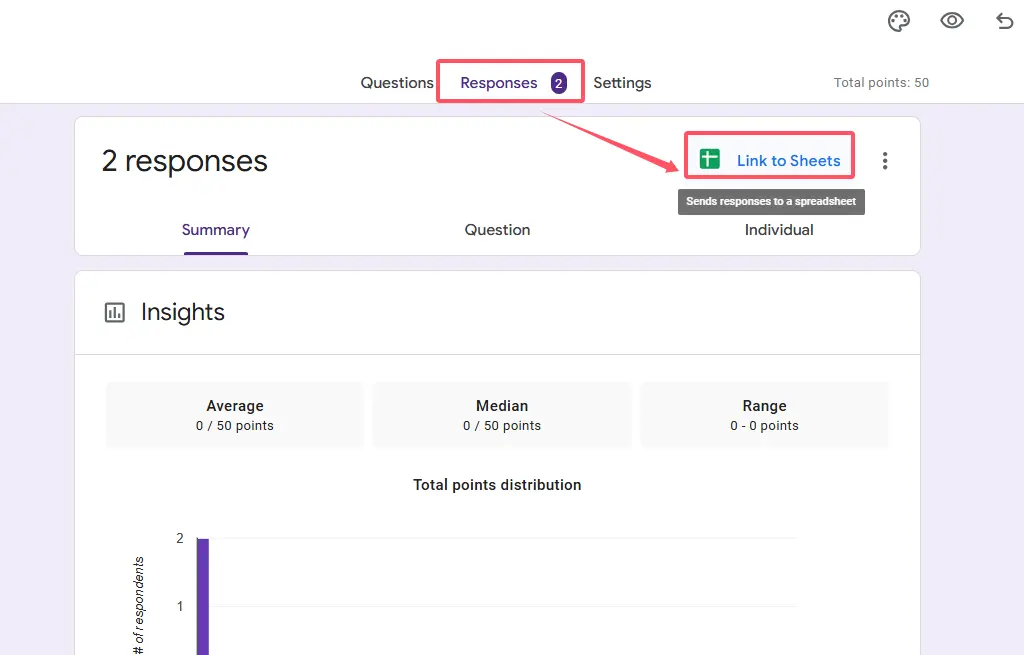
Once you click Create, something magical happens. Every single response that comes in—past, present, and future—automatically flows into that Google Sheet. No manual intervention required. Each submission becomes a row, with columns for timestamp, respondent email (if you collected it), individual question responses, and the all-important score.
The beauty of this approach? Your data stays dynamic. Students submit late assignments at midnight? No problem—they appear in your Sheet automatically. You can build formulas that calculate percentiles, create pivot tables that break down performance by topic, or use conditional formatting to highlight struggling students instantly.
When you’re ready to move your analysis elsewhere, Google Sheets makes export simple. Just go to File → Download, then choose your format: Microsoft Excel (.xlsx) for compatibility with Excel or SPSS, or CSV (.csv) for Python, R, or database imports.
Why This Method Shines
- Real-time updates: Your spreadsheet refreshes automatically as new responses arrive
- Collaborative analysis: Share the Sheet with colleagues for team-based grading review
- Formula power: Add calculated fields like letter grades, performance bands, or custom scoring
- Version control: Google Sheets tracks changes, so you can always revert if needed
Method 2: Download Responses Directly as CSV
Sometimes you don’t need a living, breathing data connection. You just need a snapshot—a moment frozen in time that you can analyze independently. That’s where direct CSV downloads come in handy.
The process couldn’t be simpler: Open your quiz, head to the Responses tab, then click those three vertical dots in the top-right corner. Select “Download responses (.csv)” from the dropdown menu. Your browser downloads a comma-separated values file containing every response submitted up to that exact moment.

What’s in that CSV? Everything. Timestamps showing when each person submitted. Their email addresses (if collected). Every single answer they provided. Their scores (assuming you set up the quiz with point values). It’s the complete, unvarnished dataset.
This approach makes perfect sense when: You’re conducting a one-time assessment that’s now closed, you need to archive data for compliance or record-keeping, you’re moving your analysis to specialized software like SPSS or Tableau, or you want a clean baseline before making changes to your grading rubric.
The CSV format opens in virtually anything—Excel, LibreOffice, Google Sheets, statistical packages, even plain text editors. It’s the universal language of data, which means you’re never locked into a specific tool or platform.
A Quick Reality Check
Here’s the catch with CSV exports: they’re static. Download your file at 2pm, and any responses that trickle in at 3pm won’t be included. You’d need to download again. For active, ongoing assessments, the Google Sheets method usually makes more sense. But for closed exams or final snapshots? CSV is your friend.
How to Make Sense of Your Exported Data?
Okay, you’ve got your data. Now what? Here’s where many educators hit a wall. Because exporting is just the beginning—the real work happens when you start asking questions of that data.
First, clean it up. Check for duplicate submissions, look for obviously invalid responses (like someone who finished a 50-question quiz in 30 seconds), and standardize any text entries that might have variations. Did some students write “Correct” while your answer key says “True”? You’ll need to reconcile those differences.
Then, structure your analysis. Create separate columns for different metrics. Maybe you calculate what percentage each student scored, or you assign letter grades based on your rubric. If you’re analyzing by topic, you might group questions together and calculate subtopic averages.
| Analysis Type | What It Reveals | Useful For |
|---|---|---|
| Item-level analysis | Which specific questions students struggle with most | Improving curriculum, identifying confusing questions |
| Student performance tracking | Individual growth trajectories over multiple assessments | Intervention planning, progress reporting |
| Cohort comparisons | How different groups perform relative to each other | Evaluating teaching methods, identifying equity gaps |
| Time-based patterns | Whether earlier test-takers score differently than later ones | Detecting potential cheating, understanding fatigue effects |
The challenge? All of this requires time. Significant time. If you’re managing a single classroom, maybe that’s acceptable. But if you’re running a training program with hundreds of participants, or an HR department processing candidate assessments weekly, the manual work becomes unsustainable pretty quickly.
The Smart Alternative: OnlineExamMaker’s Automated Solution
Here’s where we need to talk about a fundamental shift in how modern assessment works. Because while Google Forms serves its purpose, it was never really designed for serious, high-stakes testing. It’s a survey tool that happens to support quizzes, not a dedicated assessment platform.
Enter OnlineExamMaker—an exam creation platform that flips the entire workflow on its head. Instead of creating a quiz, manually grading it, exporting data, and then analyzing results in separate tools, OnlineExamMaker handles everything in one integrated ecosystem.
What makes it different? Think about your current process. You spend hours setting up questions in Google Forms, then more hours configuring correct answers and point values. When results come in, you export to Sheets and build formulas to calculate grades. Then you create separate documents to share feedback. It’s death by a thousand clicks.
OnlineExamMaker streamlines this entire chain. You build your exam once using their question bank system (which supports everything from multiple choice to fill-in-the-blanks to essay questions). The platform automatically grades objective questions the moment students submit. And here’s the kicker: it generates detailed performance reports instantly, without you lifting a finger.
Create Your Next Quiz/Exam Using AI in OnlineExamMaker
How OnlineExamMaker AI Grader Works?
Let’s get specific about what “AI grading” actually means in practice, because there’s a lot of hype around AI in education, and not all of it delivers.
OnlineExamMaker’s AI Exam Grader automatically grades exams after student submission and generates insights to optimize teaching. Here’s how the system actually functions behind the scenes:
Immediate Objective Assessment: The moment a student clicks “Submit,” the AI evaluates all multiple choice, true/false, and fill-in-the-blank responses against your answer key. This happens in milliseconds. Students see their scores instantly—no waiting days for results.
Intelligent Report Generation: But scoring is just the start. The platform’s exam reports include details such as test date, exam duration, scores, pass rate, and score ranking. These reports don’t just show you numbers; they reveal patterns. Which questions tripped up 80% of students? Which topics need reinforcement? The AI identifies these trends automatically.
Adaptive Feedback Loops: More sophisticated than simple right/wrong indicators, the system can provide customized feedback based on answer patterns. Did a student consistently miss questions about photosynthesis but ace the ones about cellular respiration? The report flags that specific knowledge gap.
What about essay questions and open-ended responses? Here’s where OnlineExamMaker gets honest: those still require human judgment. Teachers can choose between automatic or manual grading depending on question types. The platform handles what computers do best (processing structured data at scale) while preserving educator expertise where it matters most (evaluating critical thinking and complex reasoning).
Building Your First Auto-Graded Exam with OnlineExamMaker
Let me walk you through creating an exam in OnlineExamMaker, because understanding the workflow helps you see why this approach might save you countless hours.
Step 1: Navigate to exam creation. From your OnlineExamMaker dashboard, click “Exams” in the left sidebar, then “Exams List,” then the “+ New Exam” button. You’re greeted with a clean interface that asks for basic exam details: title, category, description.
Step 2: Configure exam parameters. This is where things get interesting. Click “Advanced Settings” to unlock powerful options. You can set time limits (per question or for the entire exam), enable proctoring features (webcam recording, screen monitoring), configure anti-cheating measures (question randomization, answer shuffling), and determine grading policies (partial credit, negative marking for wrong answers).
Step 3: Add questions with AI assistance. Here’s where OnlineExamMaker’s AI Question Generator becomes a serious time-saver. Instead of manually typing every single question, you provide the platform with your topic and learning objectives. The AI technology automatically generates questions for any topic. You review, edit, refine—but the heavy lifting is done.
Of course, you can also upload questions in bulk from existing Word documents or Excel spreadsheets. Or manually create them one by one if you prefer that control. The system supports multiple question types simultaneously in the same exam.
Step 4: Assign point values. Each question gets a point value that you determine. Want conceptual questions to be worth more than recall questions? Easy. The platform remembers these values and uses them for automatic scoring.
Step 5: Publish and distribute. Save your exam, then choose how to deploy it. You can generate a public link (anyone with the URL can access), create private invitations (only specific email addresses can attempt), embed it on your website or learning management system, or schedule it for specific date/time windows.
The AI Exam Creator Advantage
What sets OnlineExamMaker apart from traditional quiz platforms isn’t any single feature. It’s the integration. Everything lives in one ecosystem: question creation, student management, delivery, proctoring, grading, reporting, and certification. You’re not constantly jumping between tools or manually transferring data.
And the AI components—question generation and automated grading—eliminate the most time-consuming parts of assessment. A teacher who previously spent six hours creating and grading a 50-question exam might complete the same task in under an hour with OnlineExamMaker’s assistance.