PowerPoint quizzes don’t have to be stuck in the Stone Age. With a bit of VBA magic (and I promise it’s less scary than it sounds), you can transform your static slides into an interactive scoring machine that tracks correct answers, calculates percentages, and even assigns letter grades. All automatically.
- Why Bother with VBA for Quiz Scoring?
- Planning Your Scoring System
- Setting Up Your PowerPoint Environment
- Creating the Scoreboard Controls
- Writing Your First VBA Scoring Macros
- Making It Bulletproof: Preventing Multiple Answers
- Adding Percentage and Grade Calculations
- Connecting Macros to Your Quiz Slides
- The Modern Alternative: OnlineExamMaker
- Tips and Troubleshooting on Making Automatic Grading Assessment in Excel
- Frequently Asked Questions
Why Bother with VBA for Quiz Scoring?
Let me be honest with you—VBA isn’t exactly the cool kid at the programming party anymore. But when it comes to PowerPoint quizzes, it’s still remarkably effective. Think of it as that reliable old friend who always shows up when you need them.
The beauty of VBA-powered quizzes lies in their simplicity. No internet connection required. No external software. No subscription fees. Just PowerPoint doing what it does best, but with a brain upgrade. Your learners click an answer, and boom—instant feedback, updated scores, all happening right there on the slide.
Sure, there are fancier tools out there (we’ll get to those), but if you’re already living in the PowerPoint ecosystem, why not make it work harder for you?
Planning Your Scoring System
Before you dive into code, take a breath. The worst thing you can do is start writing VBA without a plan. Trust me, I’ve been there, and it’s like trying to assemble IKEA furniture without looking at the instructions—technically possible, but unnecessarily painful.
Decide What to Track
At minimum, you’ll want to track a basic score. But why stop there? Consider tracking:
- Correct Answers (CA) – How many they got right
- Wrong Answers (WA) – Mistakes made along the way
- Total Questions (TQ) – Keep count of everything
- Percentage (P) – The all-important success rate
- Grade (G) – That satisfying letter at the end
Now here’s where it gets interesting. Do you want these stats visible throughout the quiz, or only at the end? Some trainers prefer the suspense of hiding scores until the final reveal. Others like real-time feedback. Neither approach is wrong—it depends on your audience and goals.
Choose Your Display Strategy
You’ve got two main options:
Option 1: Results slide only – Keep learners in suspense, show everything at the end. Clean, focused, no distractions during the quiz.
Option 2: Persistent scoreboard – Display scores on every slide using the slide master. This gives constant feedback but requires a bit more setup work.
Setting Up Your PowerPoint Environment
Alright, time to get your hands dirty. First things first—you need to enable the Developer tab. It’s like unlocking the secret level in a video game, except instead of bonus points, you get access to VBA.
Enabling the Developer Tab
Here’s the drill:
- Go to File → Options
- Click Customize Ribbon
- Check the box next to Developer
- Click OK and feel like a hacker
Congratulations! You now have a shiny new Developer tab in your ribbon. This is your gateway to VBA wonderland.
Save It Right
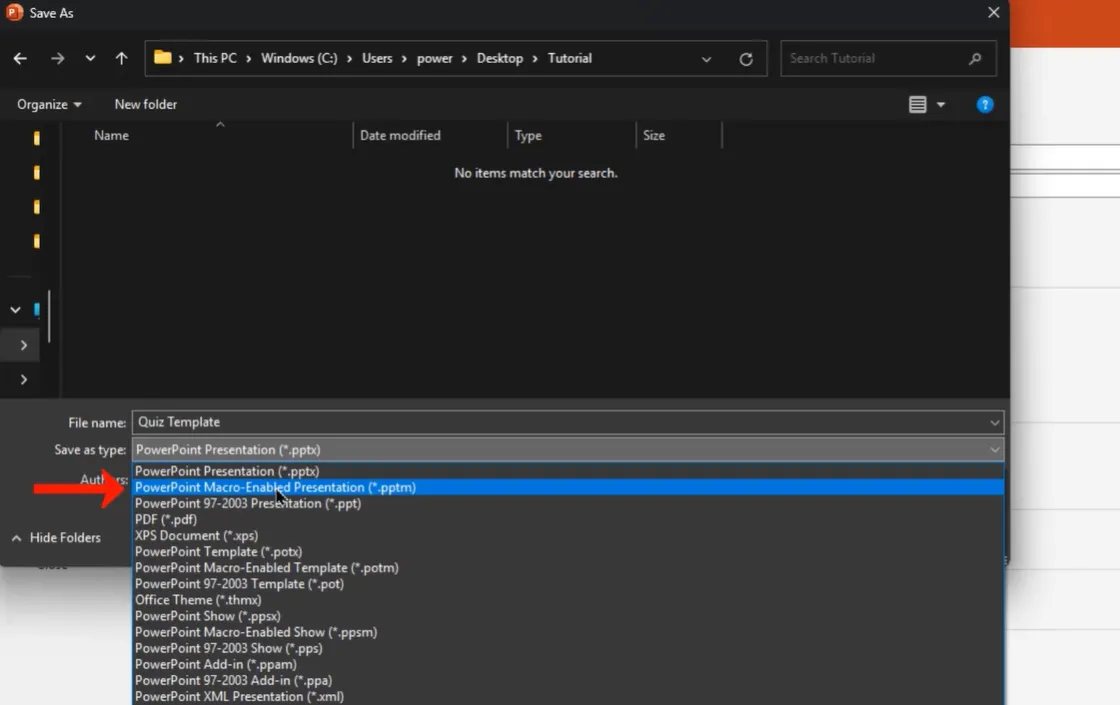
Here’s something that’ll save you from future heartbreak: save your presentation as a macro-enabled file. That means using the .pptm extension instead of the regular .pptx.
Go to File → Save As, name it something memorable like “Quiz_Template”, and under “Save as type,” select PowerPoint Macro-Enabled Presentation. If you skip this step, all your beautiful VBA code will vanish into the digital ether when you close the file. Don’t say I didn’t warn you.
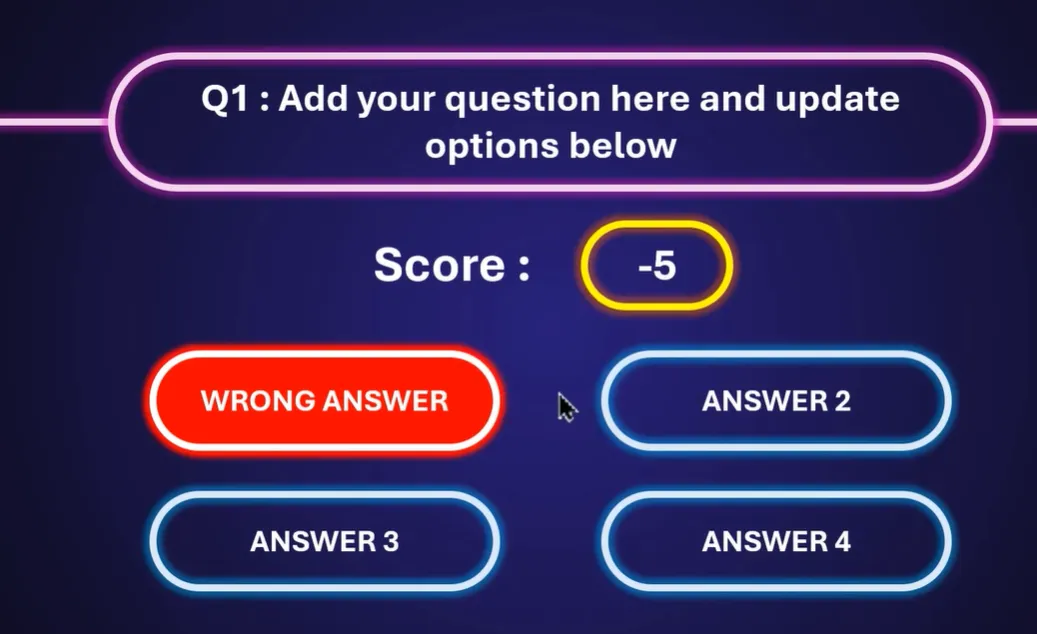
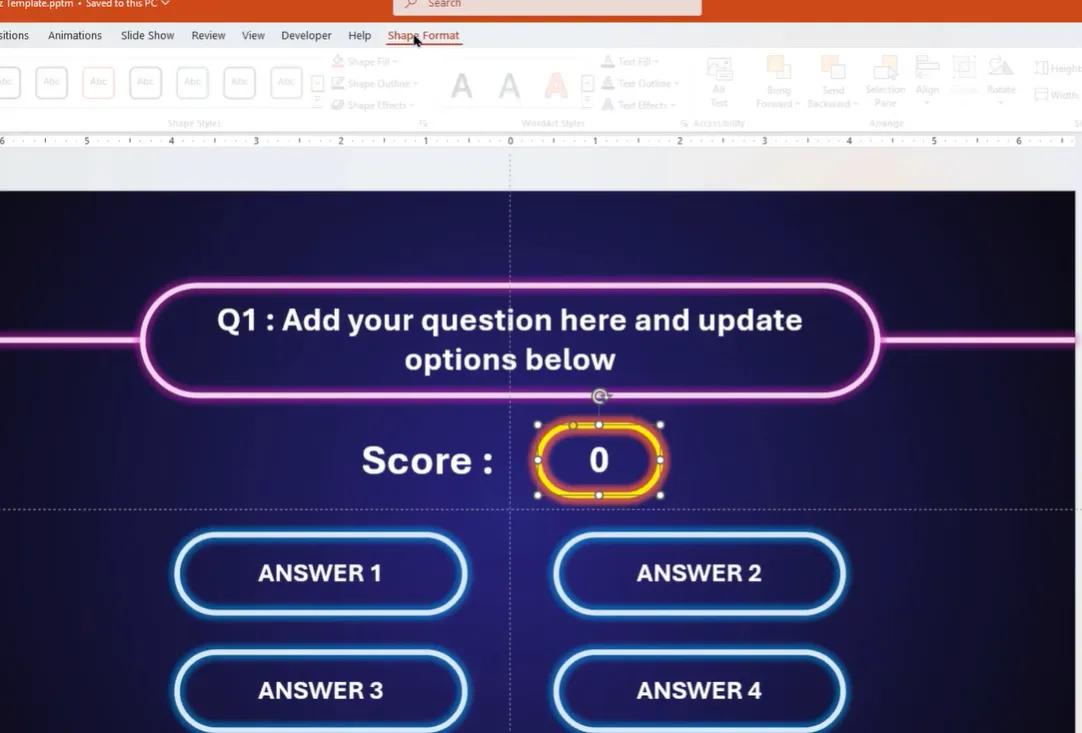
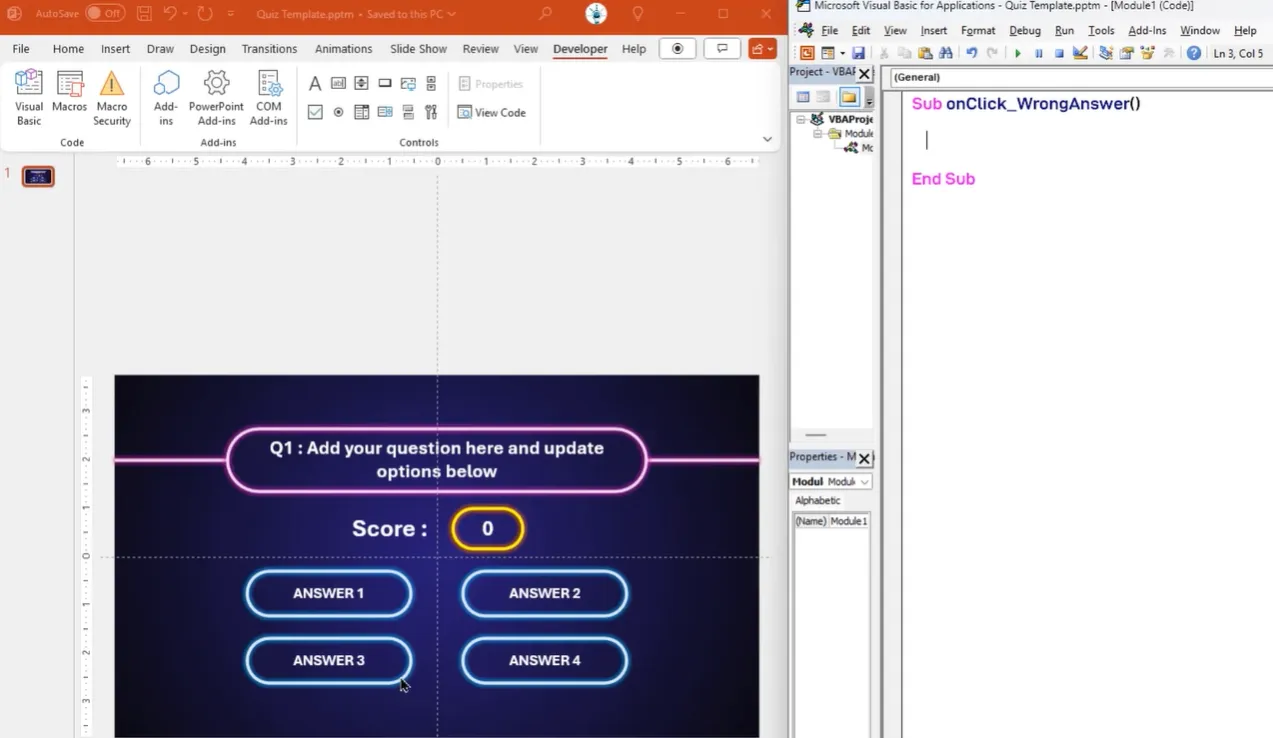
Creating the Scoreboard Controls
Now we’re cooking. You need somewhere to display those scores, right? This is where label controls come into play. Think of them as little text boxes that VBA can update on the fly.
Adding Label Controls
Head over to your Developer tab → Insert → Label. You’ll notice the cursor changes. Now click and drag on your slide to create a label. Do this for each metric you want to track—score, correct answers, wrong answers, you name it.
But here’s the crucial part: you need to rename these labels. Why? Because referring to “Label1” and “Label2” in your code is about as helpful as naming your kids “Child1” and “Child2.” Your future self will thank you for using descriptive names.
Renaming Your Controls
Select a label, then open the Selection Pane (found under the Format tab or Home tab). Find your label in the list and rename it to something sensible:
- Score display →
Points - Correct answers →
CA - Wrong answers →
WA - Percentage →
P - Grade →
G
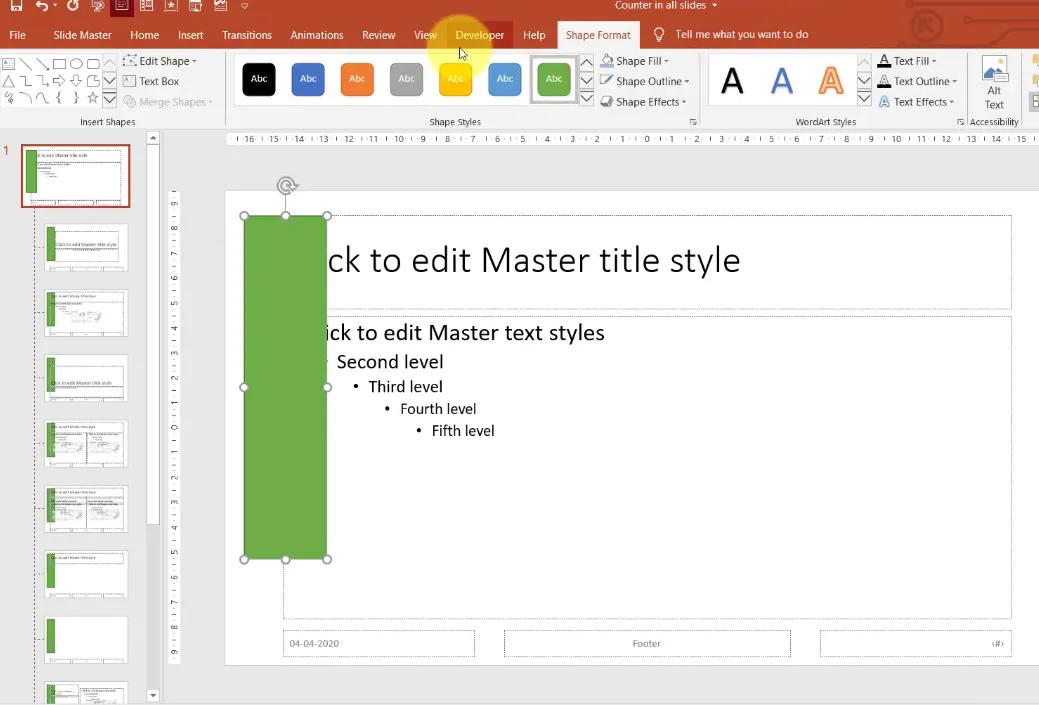
If you want these controls to appear on every slide (the persistent scoreboard approach), place them on the Slide Master instead of individual slides. Access this through View → Slide Master.
Writing Your First VBA Scoring Macros
Deep breath. This is where the magic happens. Don’t worry—VBA isn’t as intimidating as it looks. It’s basically just giving PowerPoint very specific instructions in a language it understands.
Opening the VBA Editor
Click Developer → Visual Basic. A new window opens—this is the VBA editor, your coding playground. Go to Insert → Module to create a new module. This is where you’ll write your code.
Creating the “Correct Answer” Macro
Let’s start with the fun one—the macro that fires when someone clicks a correct answer. Here’s the basic structure:
Sub Correct()

  Points.Caption = Points.Caption + 10

  CA.Caption = CA.Caption + 1

  MsgBox "Correct! Well done."

  ActivePresentation.SlideShowWindow.View.Next

End Sub
What’s happening here? Simple. The code adds 10 points to the score, increments the correct answer counter by 1, shows a congratulatory message, and moves to the next slide. Clean and effective.
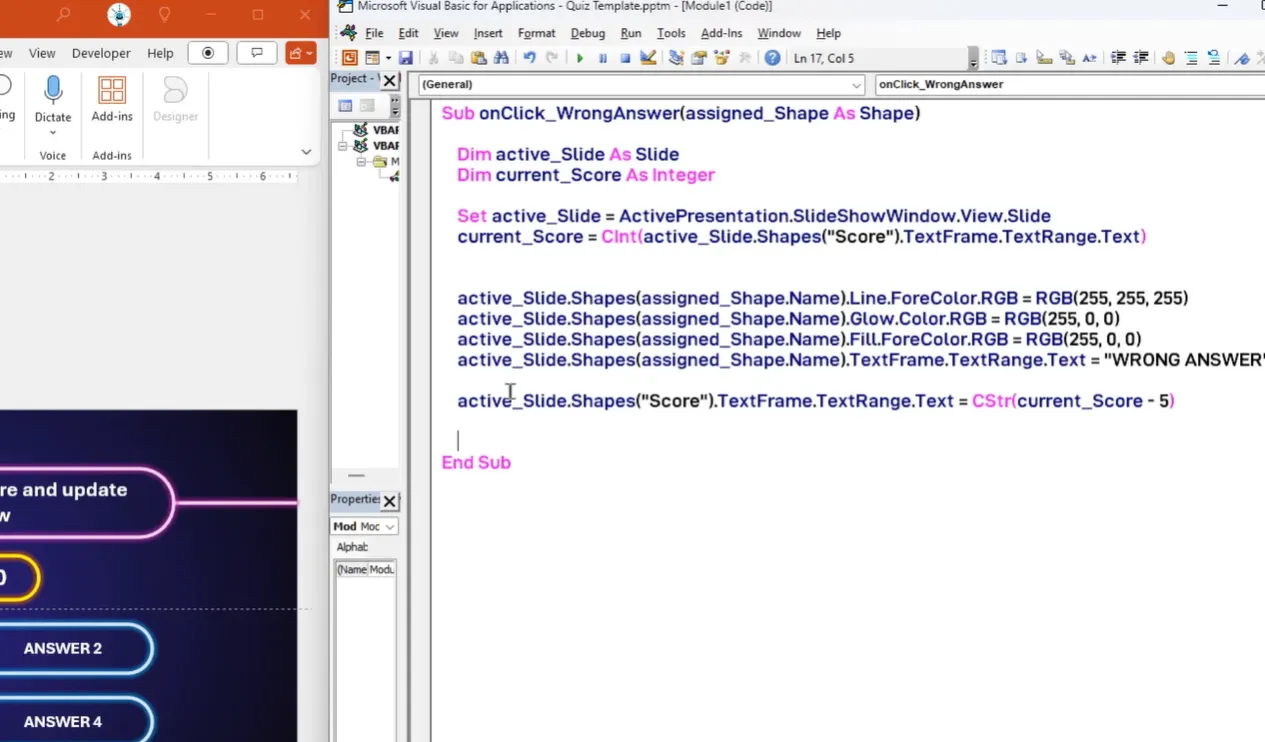
The “Wrong Answer” Macro
Now for the less fun one (but equally important):
Sub Wrong()

  Points.Caption = Points.Caption - 5

  WA.Caption = WA.Caption + 1

  MsgBox "Oops! Try again next time."

  ActivePresentation.SlideShowWindow.View.Next

End Sub
This deducts 5 points (because mistakes should hurt a little), increments the wrong answer counter, delivers a gentle letdown, and moves forward.
Making It Dynamic with Variables
Here’s where things get sophisticated. The code above works, but it’s rigid. What if you want to track scores across multiple slides? You need to store the current slide reference in a variable:
Dim activeSlide As Slide

Set activeSlide = ActivePresentation.SlideShowWindow.View.Slide
Now you can reference any shape on the current slide dynamically. This is crucial when you have 10, 20, or 50 quiz slides. You’re essentially teaching VBA to be smart about context.
Making It Bulletproof: Preventing Multiple Answers
Imagine this nightmare scenario: a learner clicks the correct answer. Score goes up. Then they click it again. Score goes up again. And again. Suddenly someone has 10,000 points from one question.
Yeah, we need to fix that.
The Boolean Flag Solution
Enter the Boolean flag—a simple true/false variable that acts like a bouncer at a club. Once someone’s answered the question, the flag flips to “true” and blocks any further scoring attempts.
Dim QA As Boolean

QA = False
Sub Correct()
If QA = False Then
Points.Caption = Points.Caption + 10
CA.Caption = CA.Caption + 1
QA = True
Else
MsgBox "You've already answered this question!"
End If
End Sub
But wait—there’s more. When you move to the next question, you need to reset this flag. Create a NextQuestion macro that sets QA = False and advances the slide. Problem solved.
Using Tags for Persistence
For even more robust protection, use PowerPoint’s built-in tagging system:
activeSlide.Tags.Add "answered", "true"
Then check this tag before processing any answer. Tags persist with the slide, making them perfect for preventing gaming the system.
Adding Percentage and Grade Calculations
Numbers are nice, but percentages and letter grades? That’s what people really want to see. Let’s give the learners what they crave.
The Percentage Macro
This one requires a tiny bit of math (don’t run away):
Sub Percentage()

  Dim C As Integer

  Dim W As Integer

  Dim TQ As Integer

  Dim Percent As Double
C = CInt(CA.Caption)
W = CInt(WA.Caption)
TQ = C + W
Percent = Round((C / TQ) * 100, 1)
P.Caption = Percent & "%"
End Sub
The CInt function converts text to integers (because you can’t do math on words), and Round keeps things tidy at one decimal place.
The Grade Assignment Macro
Now for the grand finale—converting that percentage into a letter grade:
Sub Grade()

  Dim score As Double

  score = CDbl(Replace(P.Caption, "%", ""))
If score >= 90 Then
G.Caption = "A"
ElseIf score >= 80 Then
G.Caption = "B"
ElseIf score >= 70 Then
G.Caption = "C"
ElseIf score >= 60 Then
G.Caption = "D"
Else
G.Caption = "F"
End If
End Sub
Adjust those thresholds to match your grading scale. Some people are generous with A’s; others believe in tough love.
Connecting Macros to Your Quiz Slides
You’ve written beautiful code. Now it’s time to wire it up. This is the moment where your quiz comes alive.
Assigning Macros to Shapes
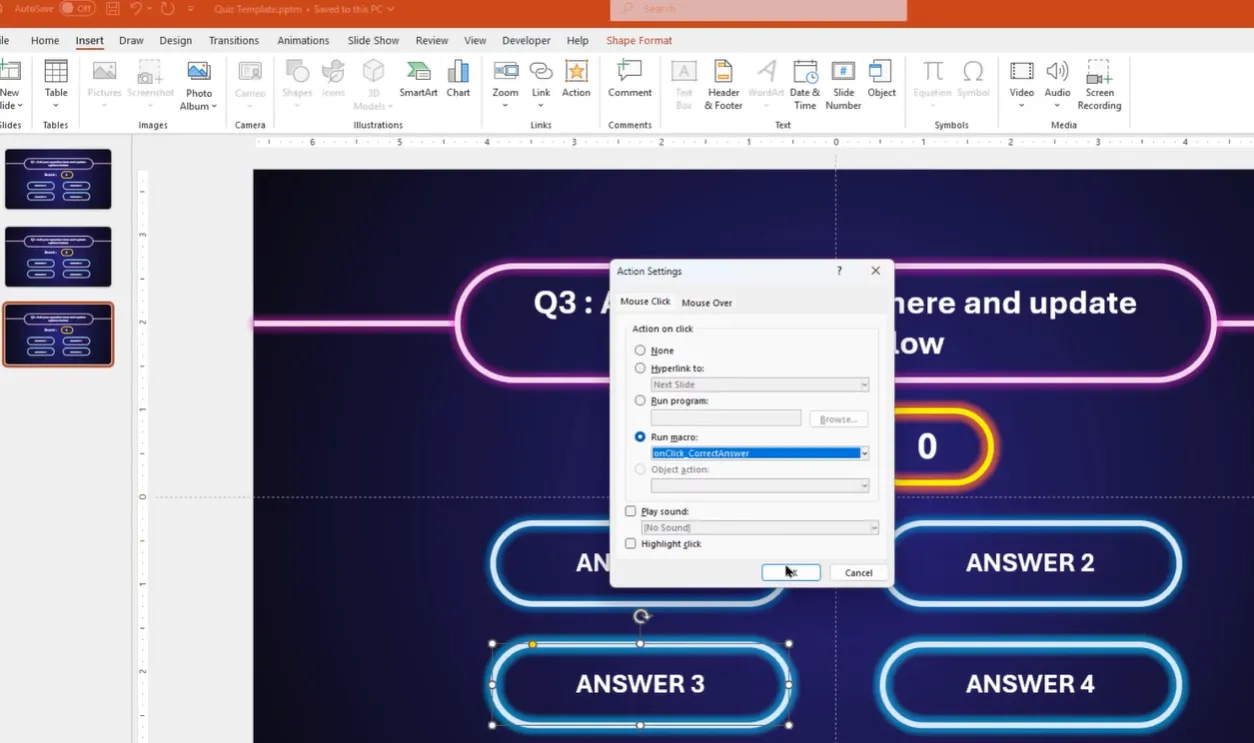
Select an answer shape (a rectangle, button, whatever you’re using). Go to Insert → Action. Choose Run Macro from the dropdown. Pick your Correct or Wrong macro. Click OK.

Repeat for every answer on every slide. Yes, it’s tedious. Yes, there are probably better ways to spend your afternoon. But the payoff is worth it when you see that quiz scoring itself in real-time.
Creating a Results Slide
On your final slide, add buttons that trigger your Percentage and Grade macros. Maybe throw in a ResetAllCaptions macro that sets everything back to zero for the next learner. Give them a “Calculate Final Score” button that feels satisfying to click.
The Modern Alternative: OnlineExamMaker AI Exam Making Software
Now, let’s talk about the elephant in the room. Everything I’ve just taught you works brilliantly—if you’re comfortable with VBA, have time to set it up, and don’t mind the occasional debugging session at 2 AM before your training.
But what if I told you there’s a faster way?
OnlineExamMaker: AI-Powered Assessment Made Simple
Enter OnlineExamMaker, a cloud-based exam platform that makes VBA look like ancient hieroglyphics. Here’s what makes it compelling:
AI Automatic Grading – This is the game-changer. OnlineExamMaker’s AI doesn’t just score multiple-choice questions (yawn, VBA can do that). It intelligently evaluates essay responses, short answers, and even complex problem-solving questions. The AI analyzes answer patterns, keywords, and context to assign accurate scores without human intervention.
Think about that for a second. You can ask open-ended questions like “Explain the three main principles of effective leadership” and the AI will grade it. Consistently. Instantly. That’s not just convenient—it’s revolutionary for trainers who’ve spent hours reading through identical essay responses.
Create Your Next Quiz/Exam with OnlineExamMaker
Other Notable Features:
- Zero Setup Time – Create a quiz in minutes, not hours
- Automatic Report Generation – Detailed analytics on learner performance
- Mobile-Friendly – Works on any device without PowerPoint
- Question Banks – Build libraries of reusable questions
- Real-Time Monitoring – Watch learners progress as they take the exam
- Certificate Generation – Auto-issue certificates to passing learners
The AI grading feature alone saves trainers an estimated 70% of their assessment time. Instead of manually reviewing 50 essay responses, you review the AI’s scoring decisions and make adjustments only when necessary. It’s like having a teaching assistant who never gets tired, never plays favorites, and doesn’t need coffee breaks.
Don’t get me wrong—VBA-powered PowerPoint quizzes have their place. They’re great for offline training, maintaining full control, and avoiding subscription costs. But if you’re managing large groups, need detailed analytics, or want to reclaim your evenings, OnlineExamMaker deserves a serious look.
Tips and Troubleshooting on Making Automatic Grading Assessment in Excel
Common Pitfalls to Avoid
Forgetting to enable macros – When you open the file, PowerPoint will warn you about macros. You must click “Enable Content” or nothing will work.
Hardcoding shape references – Always use variables and parameters. Hardcoding “Shape 3” will haunt you when you rearrange slides.
Not testing on the actual delivery computer – Macro security settings vary. Test where it matters.
Skipping the .pptm save – I mentioned this earlier, but it bears repeating. Regular .pptx files strip out all VBA code. Save as macro-enabled or cry later.
Making Your Quiz Look Professional
VBA handles the brain work, but don’t neglect the visual design. Use consistent colors for correct/incorrect feedback. Add smooth transitions. Include encouraging messages. Make wrong answers educational, not just punitive.
Consider adding sound effects for right and wrong answers (just don’t make them annoying—you’re not designing a slot machine). Subtle visual feedback like color changes or glow effects can significantly enhance the experience.
Frequently Asked Questions
Can I use VBA scoring with PowerPoint Online?
Unfortunately, no. VBA macros only work in desktop versions of PowerPoint. PowerPoint Online doesn’t support macro execution for security reasons. If you need cloud-based functionality, that’s where tools like OnlineExamMaker come in handy.
How do I reset scores between learners?
Create a ResetAllCaptions macro that sets all your label captions back to zero. Add a “Reset Quiz” button on your final slide that runs this macro. Alternatively, closing and reopening the file resets everything to initial values.
Can I export quiz results to Excel?
Yes, but it requires additional VBA code to write data to an external file. It’s doable but complex. If you need robust data export, consider using dedicated quiz platforms that handle this automatically.
My macros aren’t running. What’s wrong?
Check these things in order: (1) Did you save as .pptm? (2) Did you enable macros when opening the file? (3) Are you in slideshow mode? (Macros only run during presentations, not in edit mode.) (4) Is your macro security set too high? Check File → Options → Trust Center → Macro Settings.
How many questions can I include?
Technically, there’s no limit. Practically, 20-30 questions is the sweet spot. Beyond that, file size bloats, performance can lag, and learner attention spans start wandering. If you need longer assessments, consider breaking them into multiple presentations or using a dedicated platform.
Can I track individual learner results?
Not easily with standard VBA in PowerPoint. You’d need to write data to an external file or database, which gets complicated quickly. For tracking multiple learners with individual records, a learning management system or specialized quiz software is the better choice.
Final Thoughts
Learning how to use VBA to score PowerPoint quizzes automatically is like learning to drive a manual transmission car. It requires patience, practice, and occasionally stalling out in traffic. But once you master it, you gain a level of control and understanding that automatic alternatives can’t quite match.
Is it the most efficient method in 2025? Probably not. AI-powered platforms like OnlineExamMaker have raised the bar significantly, especially with features like automatic essay grading that would require days of VBA coding to approximate.
But VBA has its charms. It’s free (if you already have PowerPoint). It works offline. It gives you complete control. And honestly? There’s something deeply satisfying about building a scoring system from scratch, watching it work flawlessly, and knowing you made it happen with your own code.
So choose your weapon. If you’re a DIY enthusiast with time to invest, VBA offers a rewarding challenge. If you’re a busy trainer who needs results yesterday, modern quiz platforms are calling your name. Either way, the days of manual score tallying are blissfully behind us.
Now go forth and create quizzes that score themselves. Your future self—the one who isn’t hunched over a spreadsheet calculating percentages at midnight—will thank you.