Digital exams in Canvas aren’t just about going paperless. They’re about reclaiming your time, supporting your students better, and actually enjoying the assessment process.
Whether you’re a Canvas newbie or a seasoned LMS veteran looking to level up your exam game, this guide walks you through everything you need to know.
- Why Bother With Digital Finals in Canvas?
- Planning Your Exam Before You Build It
- Choosing the Right Canvas Tool for Your Exam
- Step-by-Step: Creating Your Exam in Canvas
- Building Smart Question Banks
- Grading and Feedback Made Easy
- Alternative AI-Powered Solution: OnlineExamMaker
Why Bother With Digital Finals in Canvas?
Moving your finals online isn’t just about following trends—it’s about solving actual problems.
First, there’s consistency. When you teach multiple sections of the same course, digital exams ensure everyone gets the same experience. No more “Professor Smith’s exam was easier” whispers in the hallway.
Then there’s grading speed. Multiple-choice and true/false questions? Canvas grades those instantly. That means you can spend your precious time on the essay questions that actually need your expertise, not tallying up bubble sheets like it’s 1995.
And here’s the kicker: accommodation support. Students who need extended time or alternate formats? Canvas handles that seamlessly through its moderation features. No separate paper exams, no complicated logistics—just click a few buttons and you’re done.
But here’s where strategy matters: not all exams should be high-stakes finals. Sometimes a low-stakes practice exam serves your students better. High-stakes means one shot, serious security measures, and significant grade weight. Low-stakes means multiple attempts, immediate feedback, and learning-focused design. Choose wisely.
Planning Your Exam Before You Build It
Here’s a secret that experienced instructors know: the best exams are designed before you ever open Canvas. Jumping straight into the Quiz tool is like starting a road trip without checking the map first—you might get somewhere, but probably not where you intended.
Map Your Learning Outcomes to Question Types
Different question types test different cognitive levels. Want to assess recall? Multiple-choice questions work great. Testing higher-order thinking? You’ll need essays or file upload assignments.
| Learning Outcome Level | Best Question Type | Why It Works |
|---|---|---|
| Remember/Understand | Multiple Choice, True/False | Quick recall, easy to auto-grade |
| Apply/Analyze | Matching, Fill-in-the-Blank | Tests connections and application |
| Evaluate/Create | Essay, File Upload | Requires synthesis and original thinking |
Your Pre-Build Checklist
Before you touch Canvas, answer these questions:
- Time limit: How long should students have? (Pro tip: add 50% more time than you think they need—stress slows people down.)
- Number of questions: Aim for roughly one point per minute of exam time.
- Open or closed book? In 2025, closed-book exams online are basically impossible to enforce without serious proctoring. Design accordingly.
- Allowed tools: Calculator? Notes? The entire internet? Be explicit.
- Academic integrity strategy: Question banks? Lockdown browser? Honor code? Pick your battles.
Choosing the Right Canvas Tool for Your Final Exam
Here’s where Canvas gets a bit quirky. You’ve got options, and each one suits different exam styles.
Canvas Quizzes (The Classic Choice)
The Quiz tool in Canvas—what many institutions call “Classic Quizzes”—remains the workhorse for most digital exams. It handles auto-graded questions beautifully and offers decent security options.
Best for: Traditional exams with multiple-choice, true/false, matching, and short answer questions.
Auto-graded question types: Multiple choice, true/false, matching, fill-in-the-blank (if you set acceptable answers)
Manual grading required: Essay questions, file uploads
New Quizzes
Some Canvas instances have migrated to “New Quizzes,” which offers enhanced question types and better item bank features. It’s sleeker but has a learning curve if you’re used to Classic Quizzes.
Assignments-as-Exams
Sometimes the best “exam” isn’t a quiz at all. Take-home essays, projects, or file upload exams work better through the Assignments tool.
Best for: Open-ended assessments, portfolio submissions, complex projects
Trade-off: Everything requires manual grading, but you get more authentic assessment of real-world skills.
Step-by-Step: Creating Your Exam in Canvas
Alright, enough theory. Let’s build this thing.
Step 1: Navigate and Create
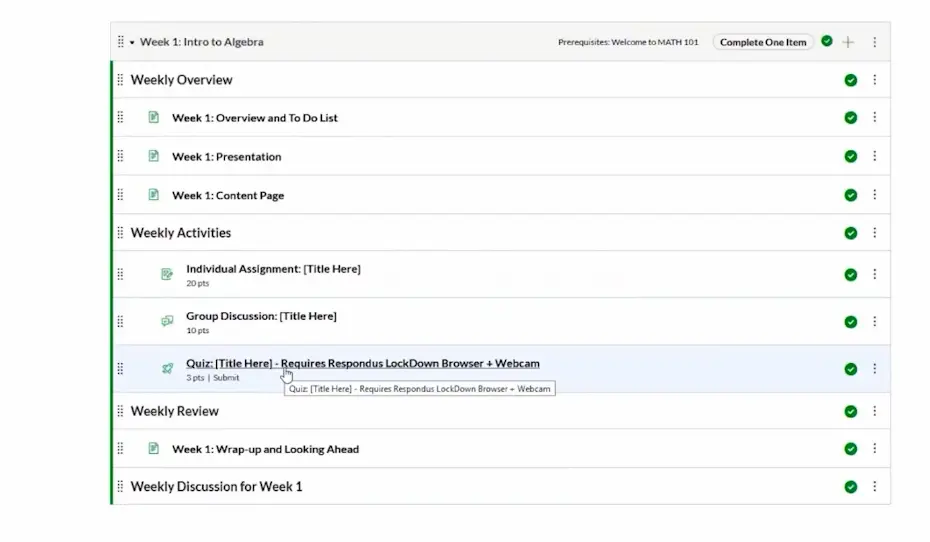
From your Canvas course, click Quizzes in the left sidebar. Hit the + Quiz button in the upper right.
Give your exam a clear, specific name. “Final Exam” works, but “Biology 101 Final Exam – Fall 2025” is better. Students taking multiple finals will thank you.
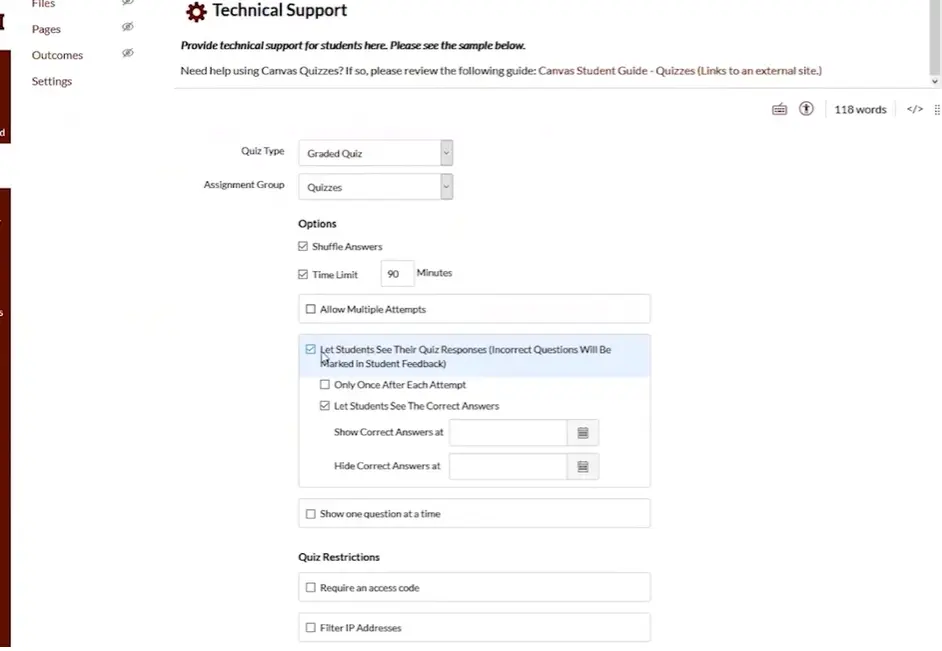
Step 2: Configure Basic Settings
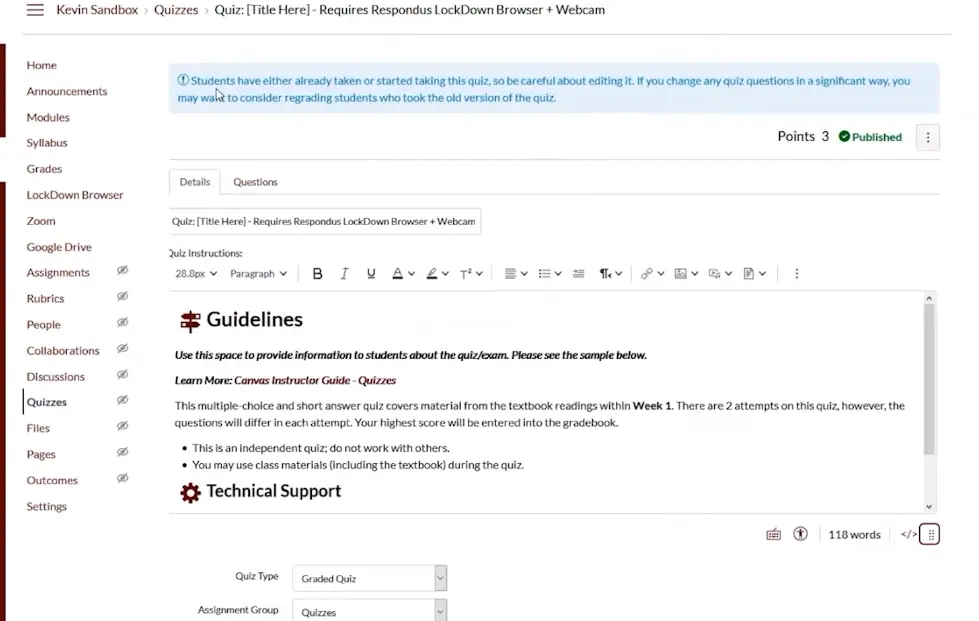
The Details section is where you set the foundation. Let’s break it down:
Quiz Type: Select “Graded Quiz” for a final exam. (The other options—Practice Quiz, Graded Survey, Ungraded Survey—serve different purposes.)
Assignment Group: Choose the appropriate category. Most courses have an “Exams” or “Quizzes” group.
Shuffle Answers: Turn this ON. It randomizes answer order for multiple-choice questions, reducing the effectiveness of answer-sharing.
Time Limit: Set your limit in minutes. For a comprehensive final, 90-120 minutes is typical. Canvas will auto-submit when time expires, so communicate this clearly to students.
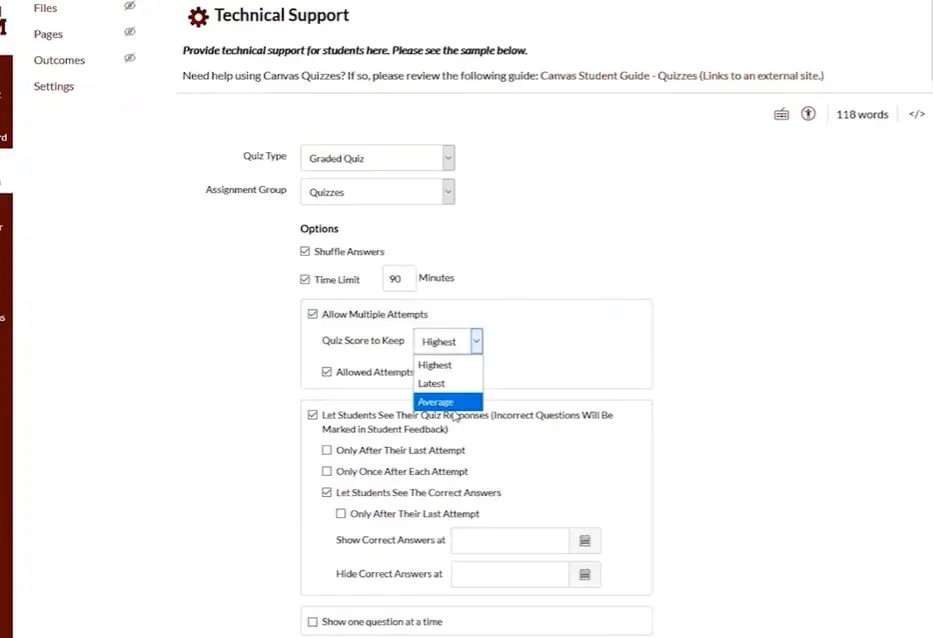
Step 3: Configure Attempt and Display Settings
Multiple Attempts: For high-stakes finals, keep this at one attempt. If you allow multiple attempts, Canvas can automatically keep the highest score—but for a final exam, that’s usually not appropriate.
Let Students See Their Quiz Responses: This is strategic. Some instructors hide responses until after grades are posted to prevent answer-sharing between exam sessions. Others show responses immediately to support learning.
Show Correct Answers: You can display correct answers after a specific date or keep them hidden entirely. For finals, many instructors wait until after the grade appeal period.
One Question at a Time: This setting prevents students from seeing the entire exam at once. It’s useful for reducing screenshot-sharing but can frustrate students who like to skip around. Balance security with user experience.
Step 4: Set Availability Windows
This is critical for finals. Use the “Available from” and “Until” dates to create a tight exam window.
Example: If your final is scheduled for December 18, 2025, from 2:00 PM to 4:00 PM, set:
- Available from: December 18, 2025 at 2:00 PM
- Until: December 18, 2025 at 4:00 PM
- Due: December 18, 2025 at 4:00 PM
This creates a synchronous exam experience even in an online environment.
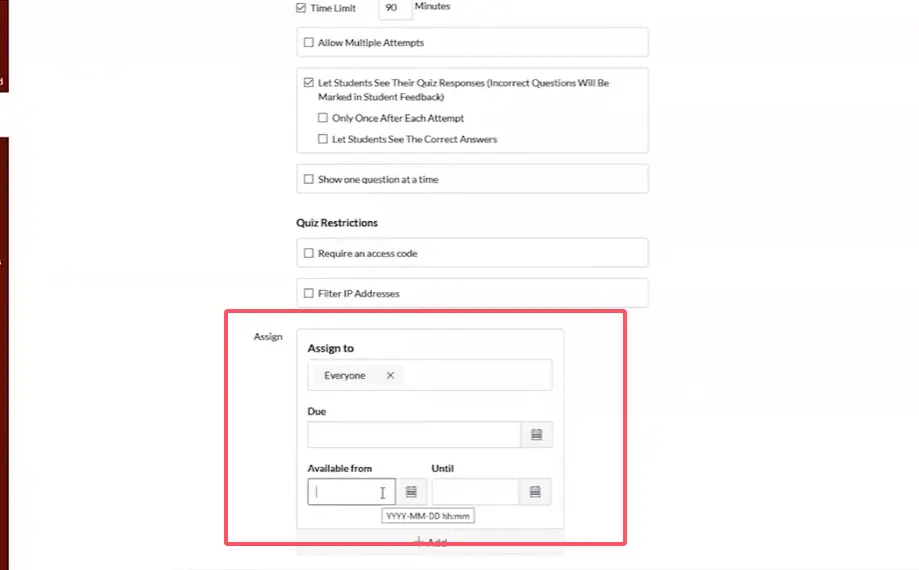
Step 5: Handle Accommodations
Students with documented accommodations need different settings. Canvas makes this straightforward:
Click “+ Add” under the “Assign to” section. You can create separate assignment parameters for individual students or groups.
Example: If a student needs time-and-a-half, and your exam is 90 minutes, give them a 135-minute time limit or extend their “Until” time by 45 minutes.
This differentiation happens invisibly—other students never know accommodations were provided.
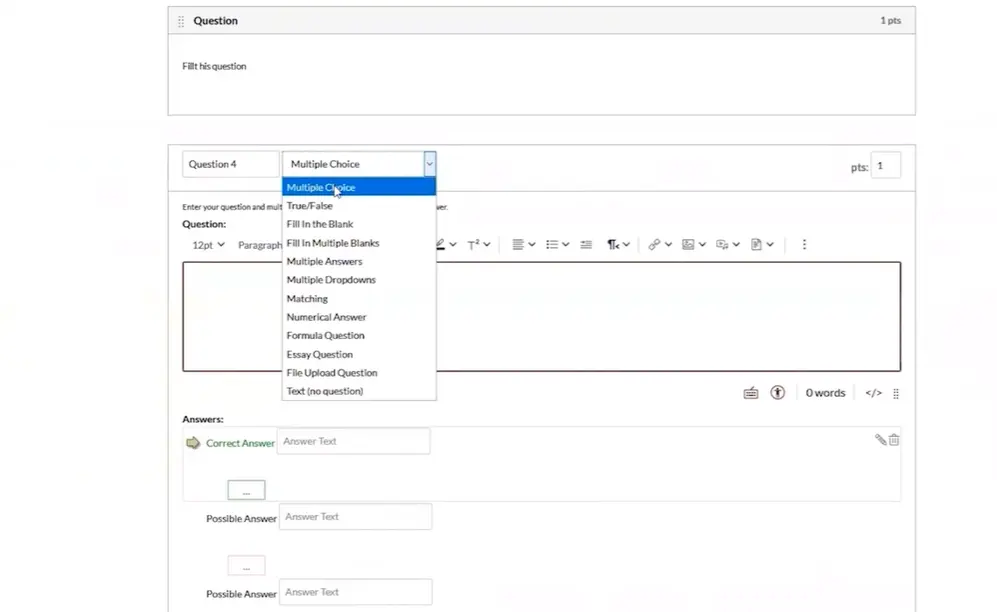
Step 6: Add Your Questions
Click the Questions tab. This is where your exam comes to life.
Hit “+ New Question” and you’ll see a dropdown menu with question type options:
- Multiple Choice: The classic. Include 4-5 answer options for best effectiveness.
- True/False: Simple but limited—50% chance of guessing correctly.
- Fill in the Blank: Tests specific knowledge but requires exact answer matching (tricky!).
- Multiple Answers: Like multiple choice but students can select multiple correct options.
- Matching: Great for testing relationships and connections.
- Essay Question: Requires manual grading but tests higher-order thinking.
- File Upload: Students submit documents, images, or other files.
- Text (No Question): Use this to insert instructions, diagrams, or formula sheets that students can reference throughout the exam.
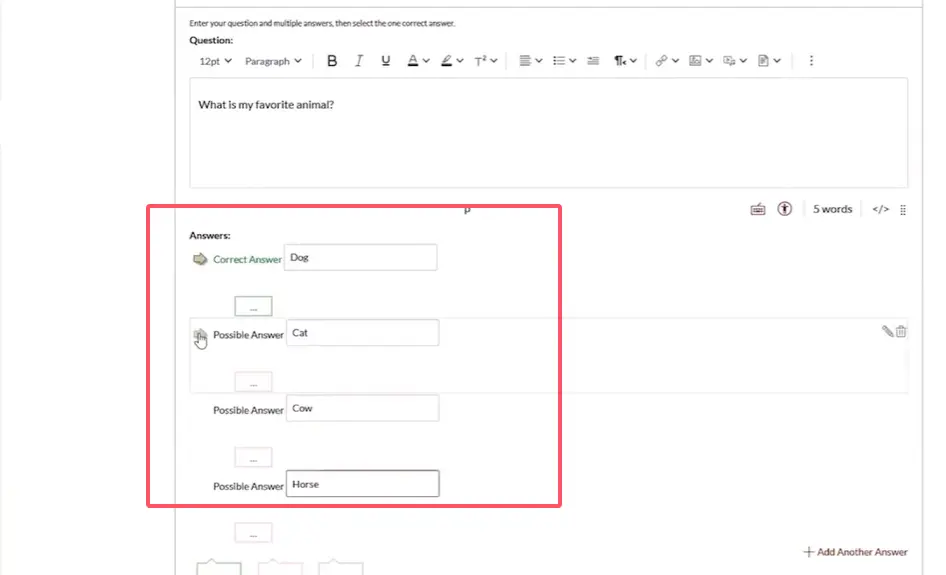
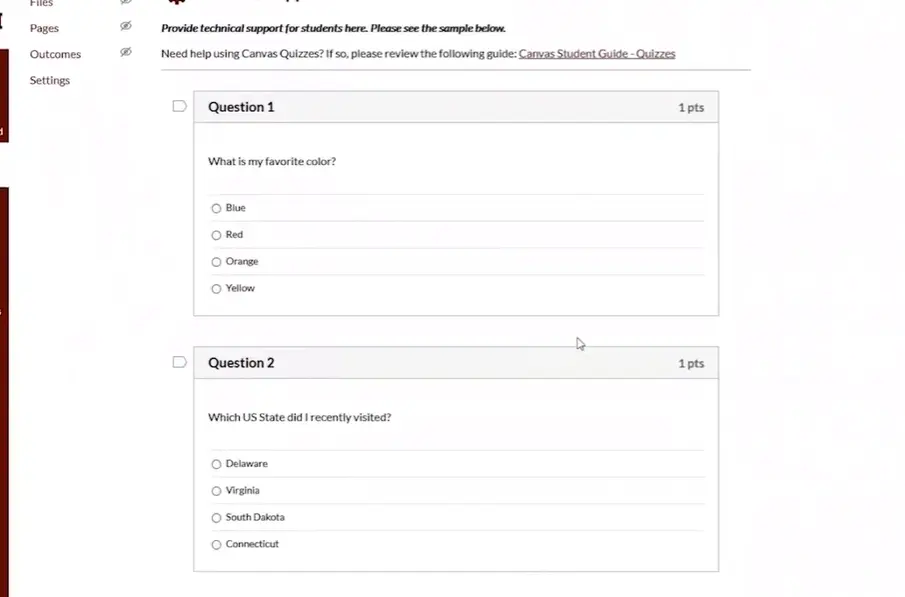
Step 7: Build a Sample Question
Let’s create a multiple-choice question together.
Question Text: Type your question in the rich content editor. “What is the capital of France?”
Answer Choices: Enter your options:
- London
- Berlin
- Paris (mark this as correct with the green arrow)
- Madrid
Feedback (Optional): You can add feedback for correct and incorrect answers. For example, “Good job!” for correct answers and “Try again—think about European geography” for incorrect ones.
Step 8: Assign Point Values
Each question has a point value. Most instructors use 1-5 points per question, depending on difficulty and importance.
Pro tip: Make your total exam points a round number (100, 200, etc.) for easier grade calculation.
Step 9: Update and Save
After creating or editing each question, click “Update Question” at the bottom of the question editor. This is easy to forget—don’t lose your work!
When you’ve finished all questions, click Save at the bottom of the page.
Step 10: Preview Before Publishing
Always—always—preview your exam before publishing it to students.
Click the Preview button and take your own exam. This catches typos, broken images, unclear questions, and technical glitches before they affect students.
Bonus tip: Have a colleague or TA preview it too. Fresh eyes catch issues you’ll miss after staring at questions for hours.
Step 11: Publish
Once you’re satisfied, click Publish. The exam is now live (within the availability window you set).
Building Smart Question Banks
Here’s where Canvas separates the amateurs from the pros: question banks.
Instead of creating one static set of questions, question banks let you create pools of questions that Canvas randomly selects from. This means Student A and Student B get different versions of the same exam.
Why Question Banks Matter
In the age of group chats and screenshot-sharing, having 50 students all take the exact same exam is asking for trouble. Question banks mitigate this by:
- Randomizing which questions each student receives
- Reducing the value of answer-sharing (students have different questions)
- Allowing you to reuse good questions across semesters without recycling entire exams
How to Create Question Banks
From the Questions tab, look for “Question Banks” or “Item Banks” (terminology varies by Canvas version).
Create banks organized by topic or difficulty level. For example:
- Bank 1: Cell Biology Basics (20 questions)
- Bank 2: Genetics Concepts (20 questions)
- Bank 3: Evolutionary Theory (20 questions)
Then, when building your exam, pull 10 random questions from each bank. Each student gets 30 questions, but not the same 30 questions.
Balancing Randomization and Fairness
Here’s the catch: if you’re pulling random questions, ensure they’re roughly equal in difficulty. You don’t want one student getting all easy questions while another gets the hardest ones.
Tag questions by difficulty level and pull an equal number of easy, medium, and hard questions for each student.
Grading and Feedback Made Easy
Here’s the payoff for all this digital work: grading becomes significantly faster.
Auto-Grading: The Gift That Keeps Giving
Multiple-choice, true/false, and matching questions? Canvas grades these instantly upon submission. No more bubbling in Scantron sheets.
Canvas calculates scores automatically and enters them into the gradebook. You can immediately see class statistics, question analysis, and item difficulty.
Manual Grading: Essays and File Uploads
Essay questions and file upload responses require your attention. Access them through SpeedGrader, Canvas’s built-in grading interface.
SpeedGrader tips:
- Use rubrics to maintain consistency across students
- Create comment banks for frequently used feedback
- Grade one question at a time across all students (rather than one student at a time) for better consistency
- Use the annotation tools to mark up file uploads directly
Providing Meaningful Feedback
Even with auto-grading, students deserve feedback beyond a number.
Use Canvas’s question-level feedback to explain why answers were correct or incorrect. This transforms an exam from a one-time assessment into a learning opportunity.
For essay responses, aim for actionable feedback: “Your argument about X was strong, but consider incorporating evidence from Y to address the counterargument.”
Using Quiz Statistics
Canvas generates detailed quiz statistics that reveal patterns you might miss otherwise.
Look for:
- Questions with low discrimination indices: These don’t effectively separate high and low performers. Revise them.
- Questions where most students choose the same wrong answer: This often indicates a misconception you should address.
- Questions with very high or very low success rates: Too easy or too hard—adjust difficulty for next time.
Alternative Solution: OnlineExamMaker
While Canvas is robust, it’s not the only game in town. If you’re looking for a dedicated exam platform with advanced AI features, OnlineExamMaker deserves a serious look.
What Makes OnlineExamMaker Different?
OnlineExamMaker isn’t just a quiz tool bolted onto an LMS—it’s purpose-built for creating, delivering, and analyzing exams. Think of it as Canvas Quizzes on steroids, with AI assistance baked in.
Create Your Next Quiz/Exam with OnlineExamMaker
Here’s what catches my attention:
Question Management Bank: Organize thousands of questions with tagging, categorization, and difficulty ratings. More sophisticated than Canvas’s native question banks.
Learning Management System: If you’re not tied to Canvas, OnlineExamMaker includes LMS features for a complete course management solution.
Step-by-Step: Creating an Exam in OnlineExamMaker
Let’s walk through the process of creating a final exam in OnlineExamMaker.
Step 1: Sign Up and Navigate to Dashboard
Create your free account at OnlineExamMaker.com. The dashboard is intuitive—much simpler than Canvas’s sometimes overwhelming interface.
Step 2: Create a New Exam
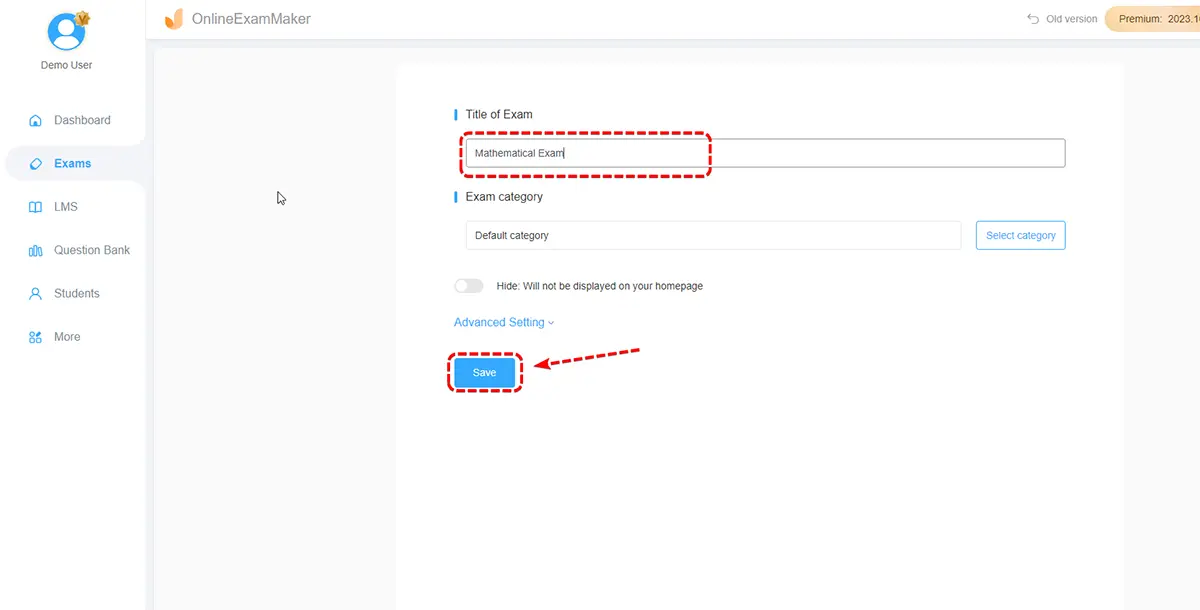
Click “Create New Exam” and give it a title. “Introduction to Psychology – Final Exam” works perfectly.
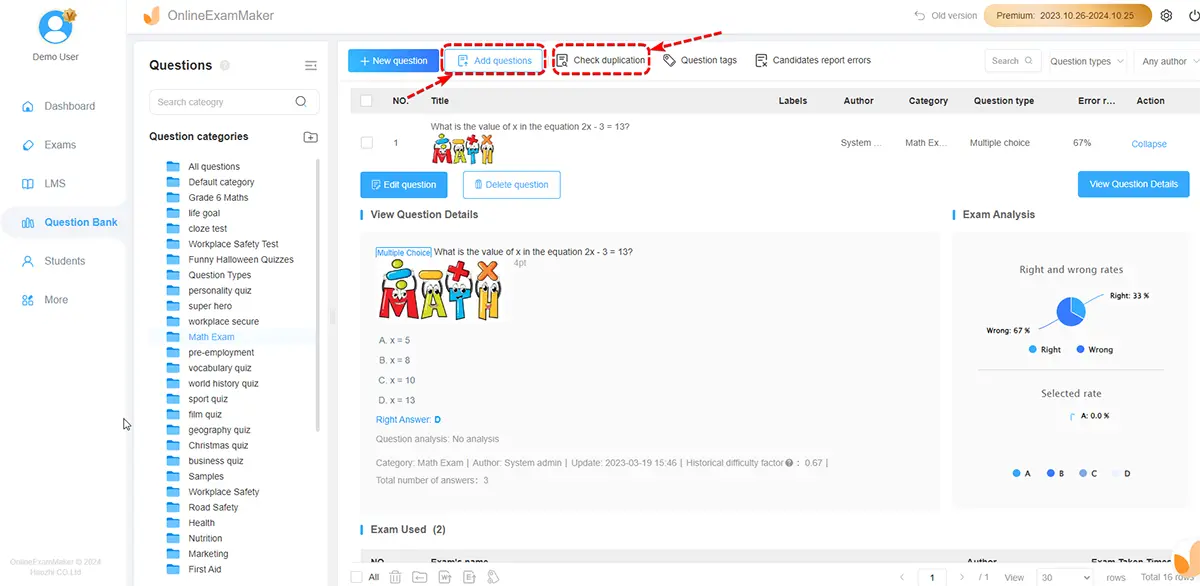
Step 3: Add Questions Using AI

Here’s where it gets interesting. You have several options:
- Manual entry: Type questions individually, just like in Canvas
- Bulk import: Upload a Word document or Excel file with pre-written questions
- AI generation: Upload your course materials and let the AI create questions
For AI generation, upload a PDF of your lecture slides or textbook chapter. The AI analyzes the content and generates multiple-choice, true/false, and short-answer questions aligned with the material.
Review and edit these AI-generated questions carefully—they’re a starting point, not a finished product. The AI occasionally misses nuance or creates ambiguous questions.
Step 4: Organize Questions into Sections
Group related questions together. For a comprehensive final, you might create sections for each unit:
- Section 1: Research Methods (15 questions)
- Section 2: Biological Psychology (15 questions)
- Section 3: Learning and Memory (15 questions)
- Section 4: Social Psychology (15 questions)
Step 5: Configure Exam Settings
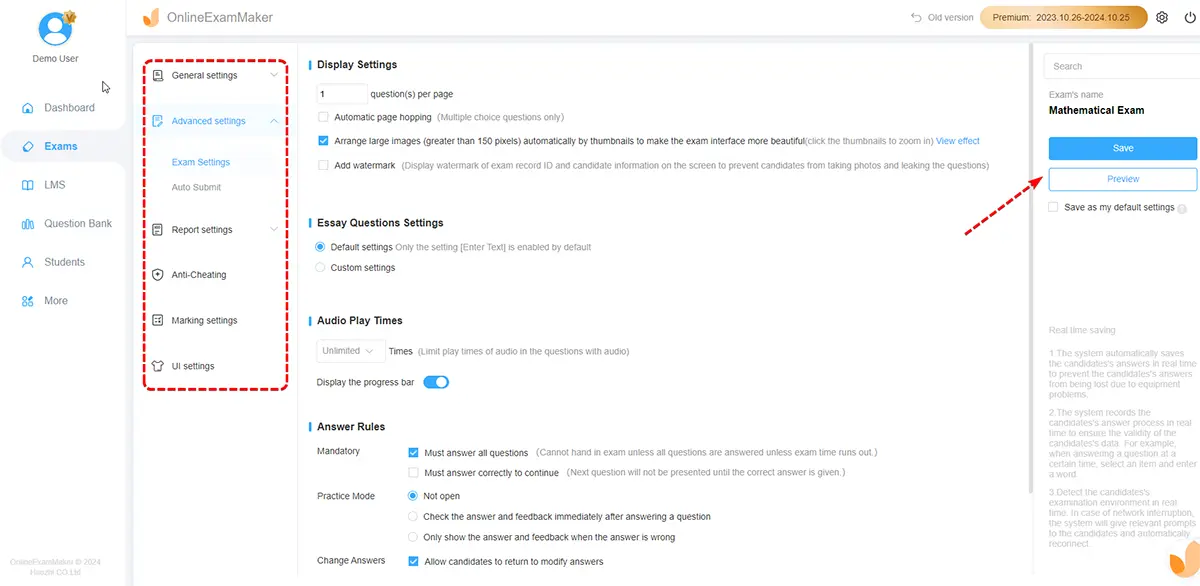
Set your time limit, randomization options, and security settings. OnlineExamMaker’s interface is more streamlined than Canvas—less clicking through tabs.
Enable these security features:
- Shuffle answer choices
- Randomize question order
- One question per page
- Disable copy-paste
- Enable webcam proctoring (if desired)
Step 6: Set Up Proctoring (Optional)
If you’re using AI webcam proctoring, configure what behaviors trigger flags: multiple people in frame, phone usage, looking away from screen for extended periods, or switching applications.
The AI analyzes video in real-time and creates a report of flagged incidents for your review after the exam.
Step 7: Configure Grading Settings
Choose whether to show scores immediately or after a specific date. For essay questions, enable AI-assisted grading with adjustable strictness levels.
Step 8: Publish and Share
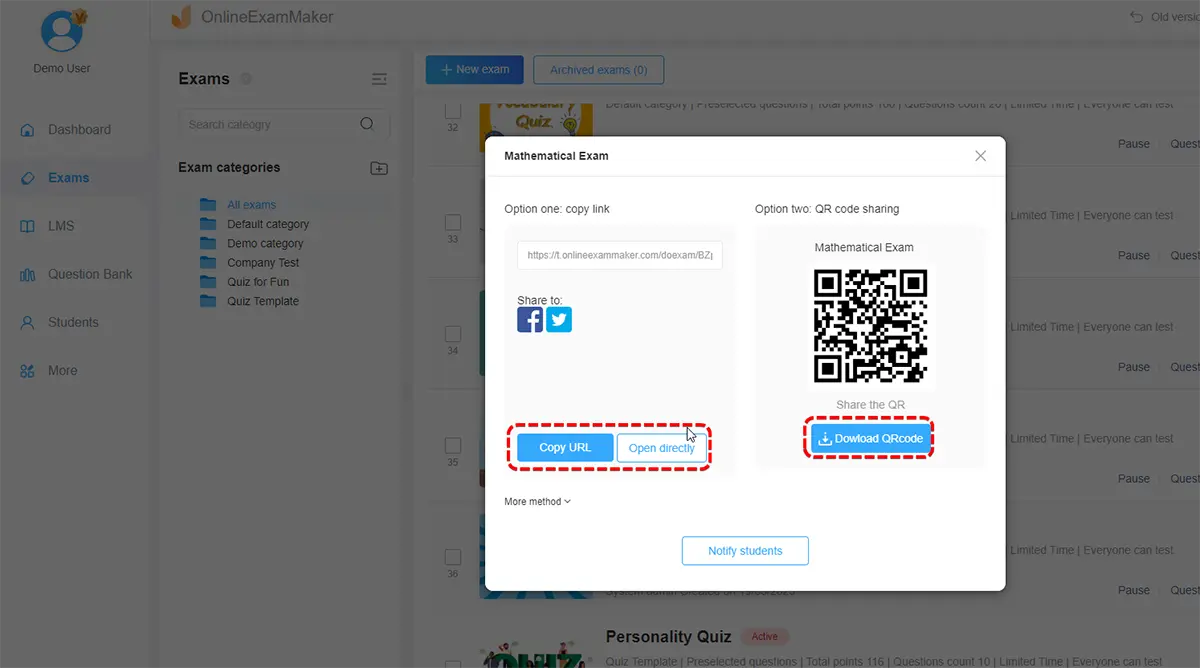
Generate a unique exam link or integrate with your LMS if supported. Students access the exam through the link—no account creation required on their end.
Step 9: Monitor and Grade
During the exam, watch the live dashboard showing who’s currently taking the exam, their progress, and any proctoring flags.
After submission, review AI-graded responses and manually grade any essays or complex short-answer questions.
OnlineExamMaker vs. Canvas: When to Use Which?
Use Canvas Quizzes when:
- You’re already embedded in the Canvas ecosystem
- Your institution requires all assessments in Canvas
- You need tight integration with Canvas gradebook and modules
- You have simple exam requirements (basic question types, minimal security concerns)
Use OnlineExamMaker when:
- You want AI assistance with question generation and grading
- You need sophisticated proctoring without expensive third-party integrations
- You’re managing exams across multiple platforms or institutions
- You want advanced question bank management with detailed analytics
- You need a standalone exam platform independent of your LMS
Honestly? For most instructors in established Canvas environments, Canvas Quizzes will meet your needs. But if you’re creating high-stakes exams frequently, creating questions from scratch repeatedly, or needing advanced proctoring, OnlineExamMaker’s AI features can save substantial time.
Final Thoughts
Creating a digital final exam in Canvas—or any platform—is both art and science.
The science part? That’s the technical setup: configuring settings, creating question banks, enabling security features. This guide has walked you through all of that.
The art part? That’s designing questions that actually assess what matters, creating an exam experience that’s challenging but fair, and building in enough flexibility to handle the inevitable technical hiccup without derailing students’ performance.
Here’s what I hope you take away from this guide:
Design before you build. The best exams start with clear learning outcomes and thoughtful question design, not with clicking buttons in Canvas.
Security is important, but so is trust. Use the security tools that make sense for your context, but don’t turn your exam into a surveillance nightmare. Good question design beats heavy-handed proctoring every time.
Accessibility benefits everyone. Clear language, logical organization, and thoughtful formatting make your exam better for all students, not just those with documented accommodations.
Preview, test, and preview again. The five minutes you spend previewing your exam will save you hours of frustrated emails from confused students.
Technology will fail. Have a backup plan. Know how to grant extensions, offer alternative assessments, and keep calm when Canvas decides to have a bad day (because it will).
Whether you’re using Canvas, OnlineExamMaker, or any other platform, remember: the tool doesn’t make the exam effective. You do. The technology just makes it possible to implement your vision at scale.
Now go build that final exam. Your future self—the one not drowning in paper exams during finals week—will thank you.