Let’s be honest: grading subjective questions is nobody’s favorite task. But here’s the thing—when you’re assessing essays, short answers, or creative responses, there’s simply no substitute for the human touch. Google Forms makes this process surprisingly manageable, though it does require a bit of know-how. Whether you’re a teacher evaluating student essays, a trainer assessing professional development responses, or an HR manager reviewing certification quizzes, mastering manual grading can transform your assessment workflow.
- Understanding Manual Grading in Google Forms
- Setting Up Your Quiz for Manual Grading
- The Two Grading Approaches: Question vs. Individual
- Grading by Question for Consistency
- Grading by Individual for Personalization
- Releasing Scores and Analyzing Results
- OnlineExamMaker: The AI-Powered Quiz Maker Software Alternative
- Creating Auto-Grading Exams with OnlineExamMaker AI
Understanding Manual Grading in Google Forms
Here’s what puzzles many educators: why does Google Forms even need a manual grading feature? After all, isn’t the whole point of digital assessments to automate everything?
Well, not quite. While multiple-choice questions can be auto-graded with perfect accuracy, subjective questions—think essay responses, creative writing, or open-ended problem-solving—demand human judgment. You need to evaluate not just correctness but depth of understanding, creativity, critical thinking, and nuance. That’s where manual grading becomes essential.
Google Forms recognizes this reality and provides a surprisingly robust manual grading system. The platform allows you to assign point values to subjective questions, review responses systematically, provide detailed feedback, and release scores when you’re ready. It’s a middle ground between completely manual paper-based grading and fully automated digital assessment.
Setting Up Manual Grading in Your Google Forms Quiz
Before you can grade anything, you need to configure your Google Form properly. This is where many people stumble right out of the gate.
Enable Quiz Mode
First things first: you need to transform your ordinary Google Form into a quiz. Click the gear icon at the top of your form to access Settings. You’ll see a “Quizzes” tab—toggle on “Make this a quiz.” This single action unlocks all the grading functionality.
But here’s the critical part that trips people up: under “Release grade,” you must select “Later, after manual review.” If you choose the immediate release option, Google Forms will try to auto-grade everything, which defeats the entire purpose for subjective questions. This setting ensures that scores remain hidden until you’ve personally reviewed each response.
Assign Point Values
Next, go through your form and assign point values to each question. For subjective questions like short answers or paragraph text, you’ll see an “Answer key” option when you click on the question. Don’t worry about providing a “correct answer” for open-ended questions—just assign the maximum points possible. This tells Google Forms how many points you can award during manual grading.
The Two Grading Approaches: Question vs. Individual
Once responses start rolling in, you’ll face a fundamental choice: grade by question or grade by individual? This isn’t just a matter of preference—each approach offers distinct advantages.
Think of it like grading a stack of physical exams. You could either go through each complete exam one by one, or you could evaluate everyone’s answer to question one, then everyone’s answer to question two, and so on. Both work, but they feel different and yield different benefits.
| Approach | Best For | Key Advantage |
|---|---|---|
| Grade by Question | Large classes, maintaining consistency | Reduces grading bias, easier to apply uniform standards |
| Grade by Individual | Smaller groups, personalized feedback | Holistic view of each respondent’s performance |
Grading by Question for Consistency
When you grade by question, you’re committing to consistency. Here’s how it works in practice.
Navigate to the Responses tab in your Google Form, then click the “Question” option at the top. You’ll see a dropdown menu listing all your questions. Select a subjective question that requires manual grading.
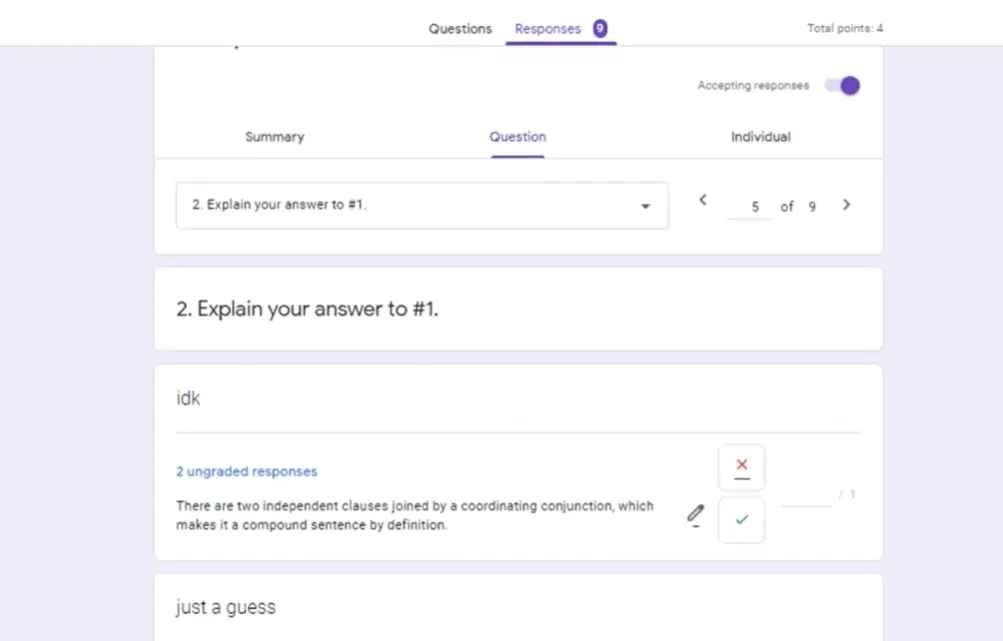
Now here’s where it gets interesting: Google Forms displays all responses to that single question in sequence, and—this is crucial—it hides identifying information by default. You’re looking at anonymous responses, which dramatically reduces unconscious bias. You won’t grade your star student more generously or your struggling student more harshly. Each response stands on its own merits.
For each response, you’ll enter a point value. You have complete flexibility: full points, partial credit, or zero points. The beauty of this system is that you can quickly develop a mental rubric as you review similar responses. Maybe the first three answers show excellent critical thinking and earn full marks. The fourth is decent but lacks depth—perhaps 70% credit. The fifth misses the point entirely—zero points. You’re developing consistency as you go.
Don’t forget the feedback field below each response. This is your opportunity to explain your grading decision, offer encouragement, or point out what was missing. Brief comments work wonders: “Strong analysis but missed the economic implications” tells the respondent exactly what to improve.
Grading by Individual for Personalization
Sometimes you need to see the forest, not just the trees. That’s when grading by individual shines.
Switch to “Individual” in the Responses tab, and you’ll see complete submissions from each respondent. If you’re collecting email addresses (which you should be for any serious assessment), you’ll know exactly whose work you’re reviewing.
This approach excels when you want to understand each person’s overall performance. Maybe someone nailed the conceptual questions but struggled with application. Or perhaps a respondent showed improvement across progressive questions. These patterns become visible when you review holistically.

The workflow is straightforward: review each question in the submission, assign points, add personalized feedback, then use the Previous and Next buttons to navigate between respondents. Don’t forget to save your changes at the bottom of each submission—Google Forms won’t auto-save as you move between respondents.
Here’s a real-world scenario: imagine you’re an HR manager assessing compliance training. Grading by individual lets you see if certain employees are consistently missing questions about specific policies, which might indicate they need additional targeted training. That insight gets lost when you grade question by question.
Releasing Scores and Analyzing Results
You’ve done the hard work of grading. Now what?
Return to the Responses tab and look for the “Release scores” button. This is your moment of truth. When you click it, Google Forms will send email notifications to all respondents (assuming you collected email addresses) with their scores and any feedback you provided.
But before you hit that button, take advantage of the Summary view. This gives you a bird’s-eye perspective: average scores, questions that most people missed, distribution of grades. According to data from educational technology researchers, assessment analytics improve learning outcomes by 15-20% when educators use them to adjust instruction. If 80% of your respondents bombed question seven, that’s not a student problem—that’s a teaching or question design problem.
Once you release scores, respondents can view their results immediately. They’ll see their total score, individual question scores, and all your feedback. This transparency builds trust and helps learners understand exactly where they need to improve.
OnlineExamMaker: The AI-Powered Quiz Maker Software Alternative
What if you could maintain the quality of human-level assessment while dramatically reducing grading time? That’s the promise of OnlineExamMaker AI exam making software.
OnlineExamMaker represents a new generation of assessment tools that leverage artificial intelligence to handle both objective and subjective question grading. Unlike traditional quiz platforms that only auto-grade multiple-choice questions, OnlineExamMaker uses advanced natural language processing to evaluate open-ended responses, essays, and short answers.
The platform learns from your grading patterns and rubrics to provide consistent assessment at scale. Think of it as having an incredibly diligent teaching assistant who never gets tired, never plays favorites, and can grade hundreds of responses in minutes rather than hours.
Key Features That Set OnlineExamMaker Apart
- AI-Powered Subjective Grading: The system evaluates written responses based on customizable rubrics, assessing factors like completeness, accuracy, critical thinking, and writing quality.
- Smart Question Generation: Need to create an exam quickly? OnlineExamMaker’s AI can generate relevant questions based on your content, saving hours of preparation time.
- Adaptive Assessment: The platform can adjust question difficulty based on respondent performance, providing a more accurate measure of competency.
- Comprehensive Analytics: Track performance trends, identify knowledge gaps, and generate detailed reports that go far beyond simple score averages.
- Anti-Cheating Features: Random question order, time limits, browser lockdown, and plagiarism detection help maintain assessment integrity.
Creating Auto-Grading Exams with OnlineExamMaker AI
Ready to experience the efficiency of AI-powered grading? Here’s how to create an auto-grading exam using OnlineExamMaker AI.
Step 1: Set Up Your Exam
Log into OnlineExamMaker and click “Create New Exam.” You’ll choose between starting from scratch, importing questions from a question bank, or using AI generation. For this walkthrough, let’s assume you have content ready to assess.
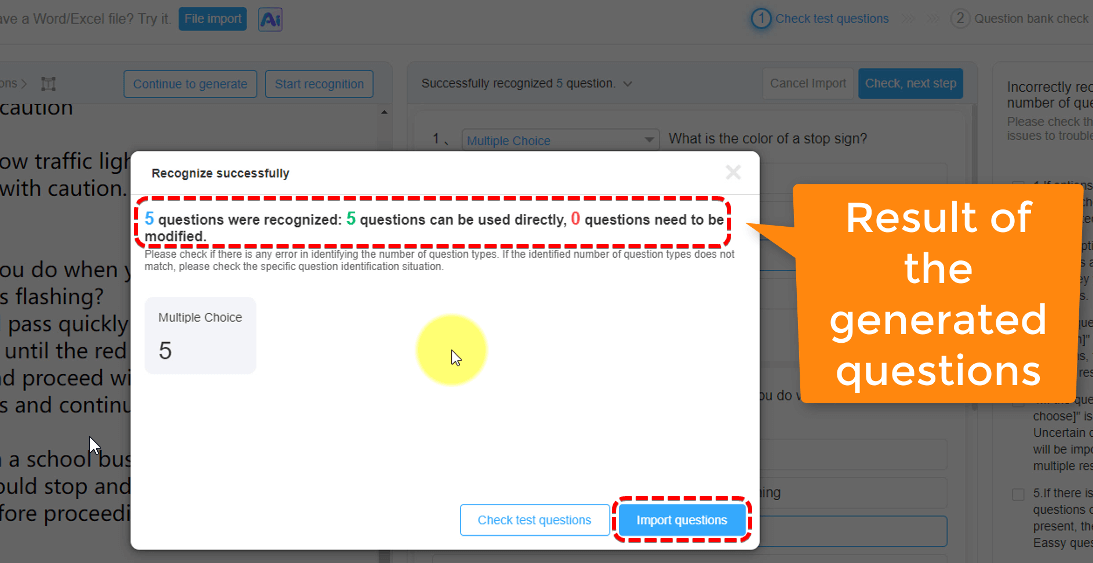
Step 2: Add Questions with AI Assistance
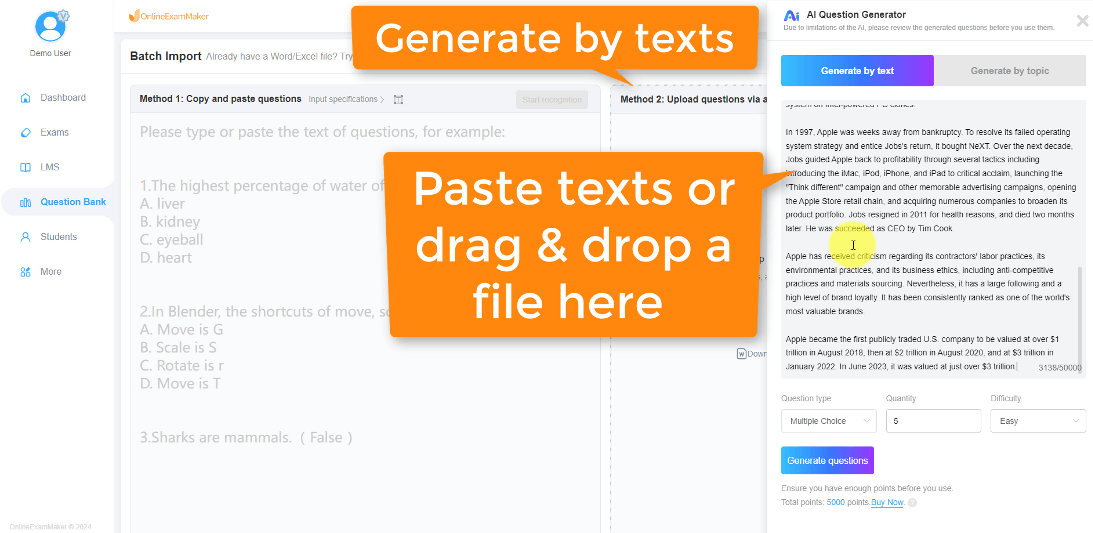
Here’s where it gets clever. For each question, you can select the question type—multiple choice, true/false, fill-in-the-blank, short answer, or essay. For subjective questions, you’ll define a grading rubric.
The rubric is your secret weapon. Specify what constitutes a perfect answer, what elements are essential, and how to weight different components. For example, if you’re asking “Explain the water cycle,” your rubric might specify that responses should mention evaporation (25%), condensation (25%), precipitation (25%), and collection (25%). OnlineExamMaker’s AI will then evaluate responses against these criteria.
Step 3: Configure AI Grading Parameters
OnlineExamMaker lets you fine-tune how strictly the AI grades. You can set it to be more lenient (accepting varied phrasings and explanations) or more rigid (requiring specific terminology and structure). This flexibility ensures the AI aligns with your teaching philosophy and assessment goals.
You can also enable human review for edge cases. If the AI is uncertain about a response (say, confidence below 80%), it can flag it for your manual review. This hybrid approach combines AI efficiency with human judgment where it matters most.
Step 4: Activate and Monitor
Once your exam is ready, activate it and share the link with your respondents. As they complete the exam, OnlineExamMaker grades responses in real-time. Within seconds of submission, respondents can see their results—no waiting days for teacher feedback.
Meanwhile, you’re monitoring the dashboard, watching completion rates, reviewing flagged responses, and analyzing performance trends. When the assessment window closes, you have comprehensive data ready for analysis or export.
The ROI of AI-Powered Grading
Let’s talk numbers. If manual grading takes you five hours for a class of 30, and you give four major assessments per semester, that’s 20 hours of grading time. For a teacher with three classes, that’s 60 hours per semester—more than a full work week devoted solely to grading.
OnlineExamMaker reduces that time by approximately 80% according to user reports. Suddenly you have 48 hours back—time you can invest in lesson planning, one-on-one student support, or professional development. The platform essentially gifts you a week of your life back each semester.
But it’s not just about time. Consistency improves. Every respondent gets evaluated against the same standards without the unconscious biases that creep into human grading when you’re tired, distracted, or influenced by previous knowledge of the student.