Ever taken a quiz that seemed to know exactly what you needed? One that gave you extra help when you stumbled and moved you forward when you nailed it? That’s branching logic at work—and you can build it yourself in Google Forms without writing a single line of code.
Here’s the thing: most online quizzes are about as personalized as a vending machine. Everyone gets the same questions in the same order, whether they’re acing it or completely lost. But what if your quiz could adapt? What if wrong answers triggered helpful explanations instead of just marking students down?
That’s where branching comes in. Think of it like a “choose your own adventure” story, except instead of fighting dragons, your students are mastering fractions. Or verb conjugations. Or whatever you’re teaching this week.
- What Is Branching Logic and Why Should You Care?
- Before You Start: Planning Your Quiz Flow
- Setting Up Your Google Forms Quiz
- Creating Sections: The Foundation of Branching
- Enabling “Go to Section Based on Answer”
- Routing Answers to Different Paths
- Building a Right/Wrong Branch Structure
- OnlineExamMaker: A Better Way to Create Quizzes Using AI

What Is Branching Logic and Why Should You Care?
Branching logic is basically your quiz’s GPS. When someone answers a question, the quiz decides where to send them next based on that answer. Got it right? Great—on to question two. Got it wrong? Hold up, let’s watch this quick video explanation first.
Traditional quizzes are linear. Question 1, question 2, question 3, done. Everyone sees the same thing regardless of how they’re doing. It’s efficient, sure, but it’s also kind of lazy.
Branching quizzes are responsive. They meet learners where they are. If Maria understands photosynthesis, she doesn’t waste time on remedial content. If Jake is confused about mitosis, he gets extra support before moving on. Same quiz, different experiences, better outcomes.
For teachers and trainers, this is gold. You’re essentially building multiple learning paths into one assessment. It’s personalized instruction without the impossible workload of creating dozens of different quizzes.
Before You Start: Planning Your Quiz Flow
Here’s where most people mess up: they jump straight into building without a plan. Don’t be that person.
Grab a piece of paper—yes, actual paper—and sketch out your quiz. What’s the main path? Where do people go when they get stuck? Think through the journey like you’re planning a road trip, not just listing destinations.
Ask yourself these questions:
What happens when someone answers correctly? Usually, they should advance to the next question. Simple enough.
What happens when someone gets it wrong? This is where it gets interesting. Do they see an explanation? Watch a video? Get a second chance with a slightly reworded question? Plan this out now, not later when you’re three sections deep and confused.
How many chances do you want to give? One retry? Two? Infinite until they get it? There’s no right answer here—it depends on your goals. A high-stakes final exam might be one-and-done. A practice quiz for struggling students might be more forgiving.
Sketch it out visually. Draw boxes for questions and arrows showing where each answer leads. It doesn’t need to be pretty; it just needs to make sense. When you can see the flow on paper, building it in Google Forms becomes infinitely easier.
Setting Up Your Google Forms Quiz
Alright, planning done. Now let’s actually build this thing.
Open Google Forms and create a new form. Before you do anything else—seriously, before you add a single question—click that settings cog in the upper right.
Under the General tab, check “Collect email addresses” if you want to track who took the quiz. This is especially useful for classroom settings where you need to record grades.
Now click over to the Presentation tab. Here you can customize your confirmation message—that’s what people see after they submit. Make it friendly. “Great job!” or “Thanks for completing the quiz!” works better than a cold “Your response has been recorded.”
But here’s the critical part: click on the Quizzes tab and toggle on “Make this a quiz.” This unlocks all the grading features you’ll want later—point values, answer keys, automatic scoring, the works.
With that foundation in place, you’re ready to build your branching structure.
Creating Sections: The Foundation of Branching
Here’s something that trips people up: Google Forms can’t jump between individual questions. It can only jump between sections. Sections are like pages or chapters—each one contains one or more questions, and the quiz moves between these sections based on answers.
Think of sections as your building blocks. Each question that triggers branching needs its own section. Each “wrong answer help screen” needs its own section. Each follow-up question needs its own section.
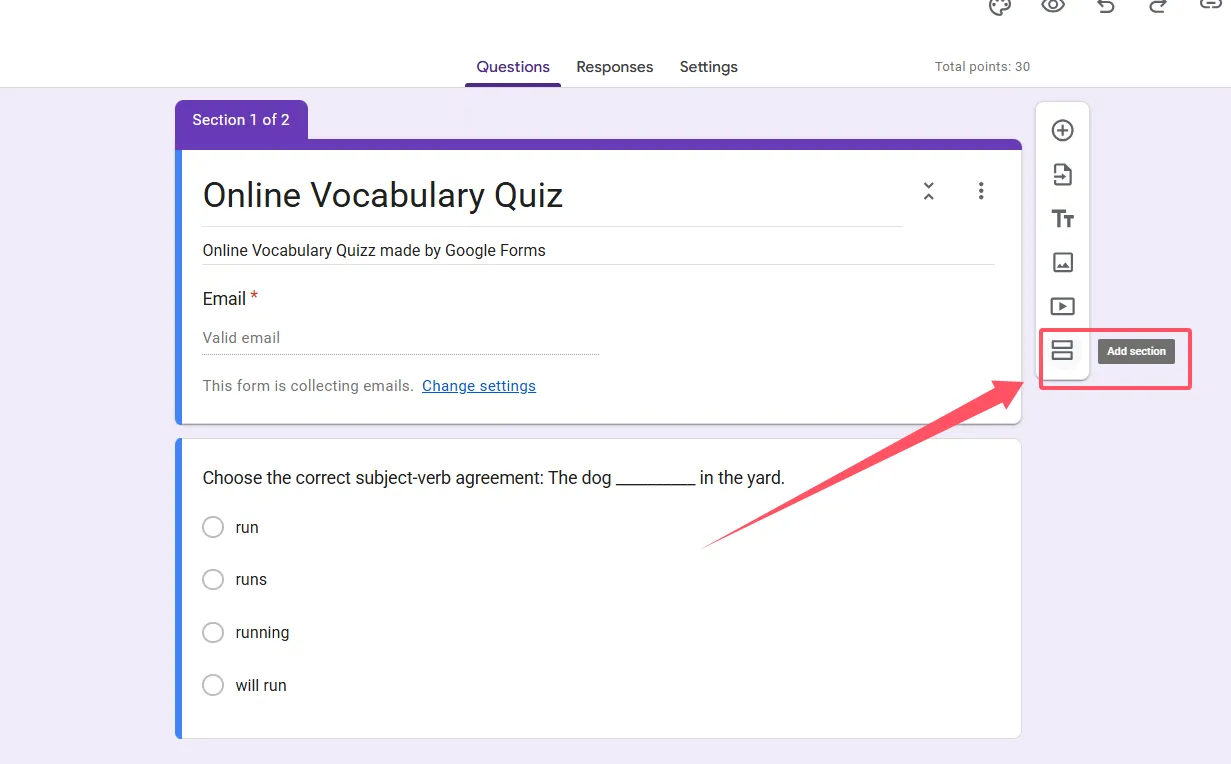
To add a section, look for the icon in the right toolbar that looks like two stacked rectangles. Click it. Boom—new section created.
Now here’s where that planning sketch pays off. Create all your sections upfront, and name them clearly. I’m talking really, genuinely clear. Not “Section 1” and “Section 2″—that’s useless once you have ten sections. Instead, name them “Q1 – Main Path,” “Q1 – Retry Screen,” “Q2 – Main Path,” and so on.
Why name them all first? Because when you’re setting up the branching logic, you’ll choose sections from dropdown menus. If they’re all named clearly, you can actually find what you’re looking for. If they’re all generic “Section 5” nonsense, you’ll be clicking back and forth trying to remember which is which. Trust me on this.
For a basic branching quiz, you might structure it like this:
Section 1: Demographics (collect name, class period, whatever you need)
Section 2: Question 1
Section 3: Question 1 – Retry/Help
Section 4: Question 2
Section 5: Question 2 – Retry/Help
Section 6: End of Quiz
Create them all. Name them all. Then you’re ready to add the actual questions.
Enabling “Go to Section Based on Answer”
This is where the magic happens. But first, let’s be clear about what question types support branching: multiple choice and dropdown. That’s it. If you try to use checkboxes, short answer, or paragraph text, you won’t see the branching option. Google Forms simply doesn’t support it for those types.
So you’ve got your sections set up. Now add a multiple-choice question to the section where you want branching to start—let’s say “Question 1.”
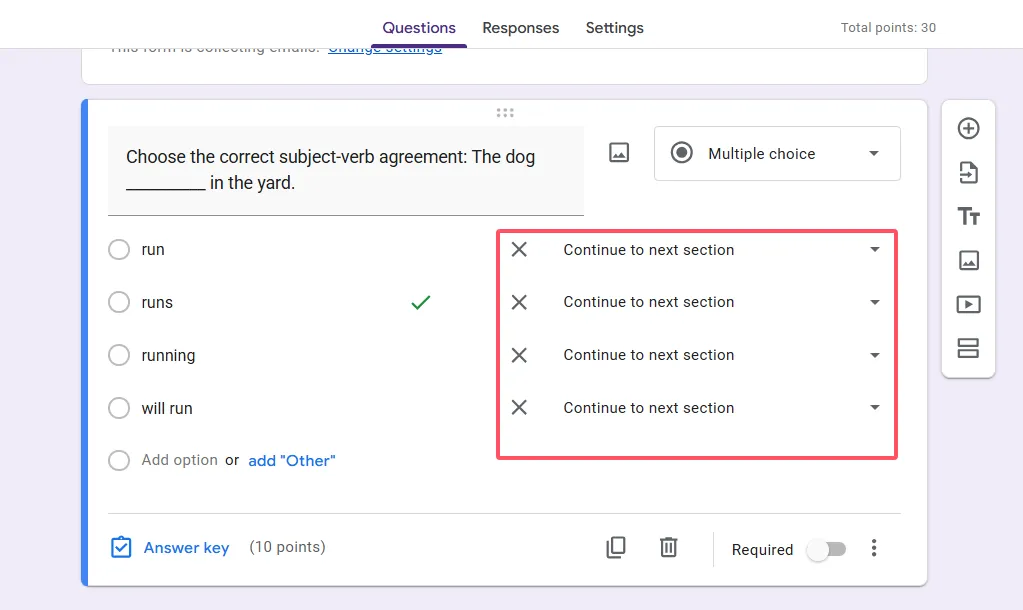
Type your question. Add your answer options. Now click the three-dot menu in the bottom-right corner of that question. You’ll see several options; the one you want is “Go to section based on answer.”
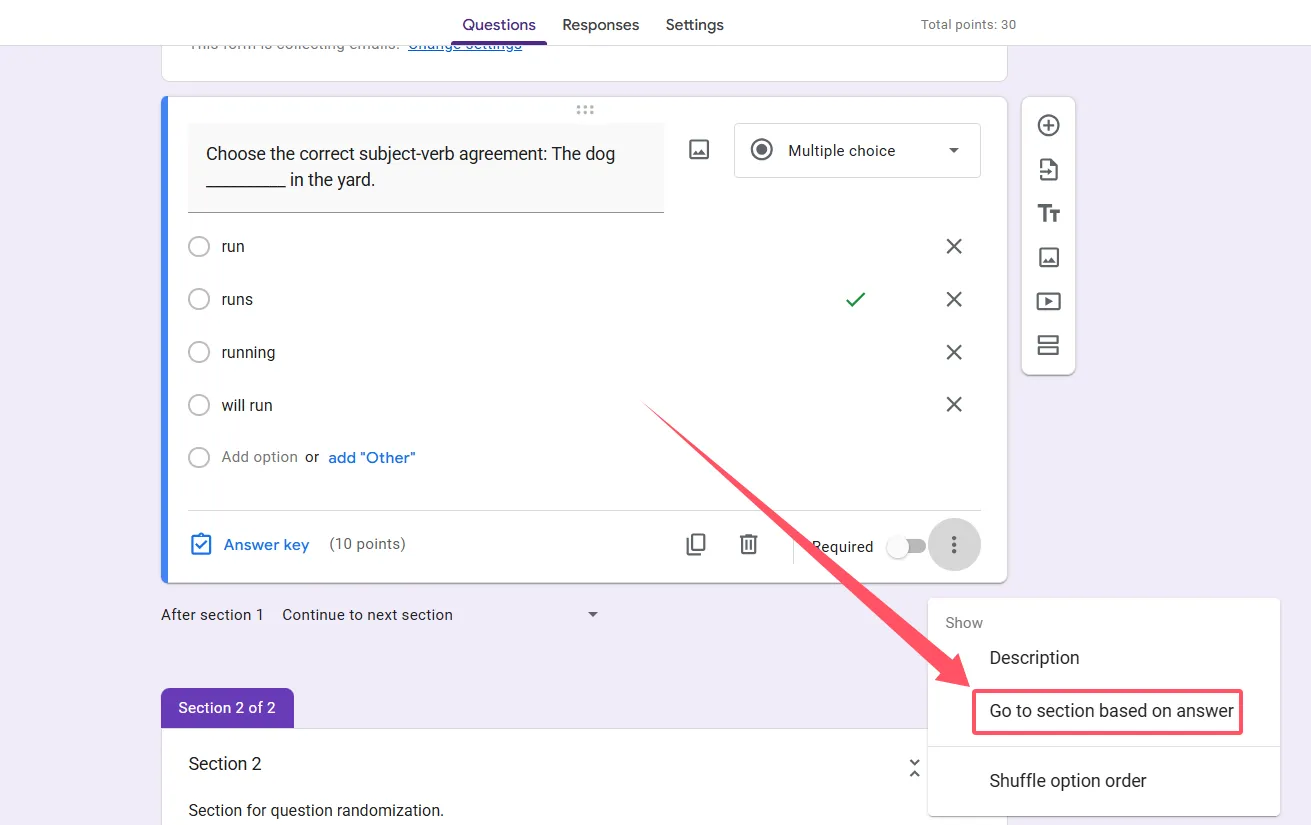
Click it. Watch what happens: a dropdown appears next to each answer choice. This is where you tell Google Forms where to send people based on what they select.
See why clear section names matter now? Instead of guessing which “Section 7” is the right destination, you can just pick “Q2 – Main Path” or “Q1 – Retry Screen” from the dropdown.
One critical limitation: you can only have one question with branching per section. If you try to add a second branching question in the same section, it won’t work the way you expect. Each branching question needs its own dedicated section. Plan accordingly.
Routing Answers to Different Paths
Now let’s wire everything up. This is where your planning sketch becomes your blueprint.
For each answer option in your branching question, you need to decide: where should this send people?
The correct answer usually goes to the next main question. So if you’re on Question 1 and they get it right, the dropdown should point to “Q2 – Main Path.”
Wrong answers typically go to a help or retry section. So all the incorrect choices might point to “Q1 – Retry Screen.”
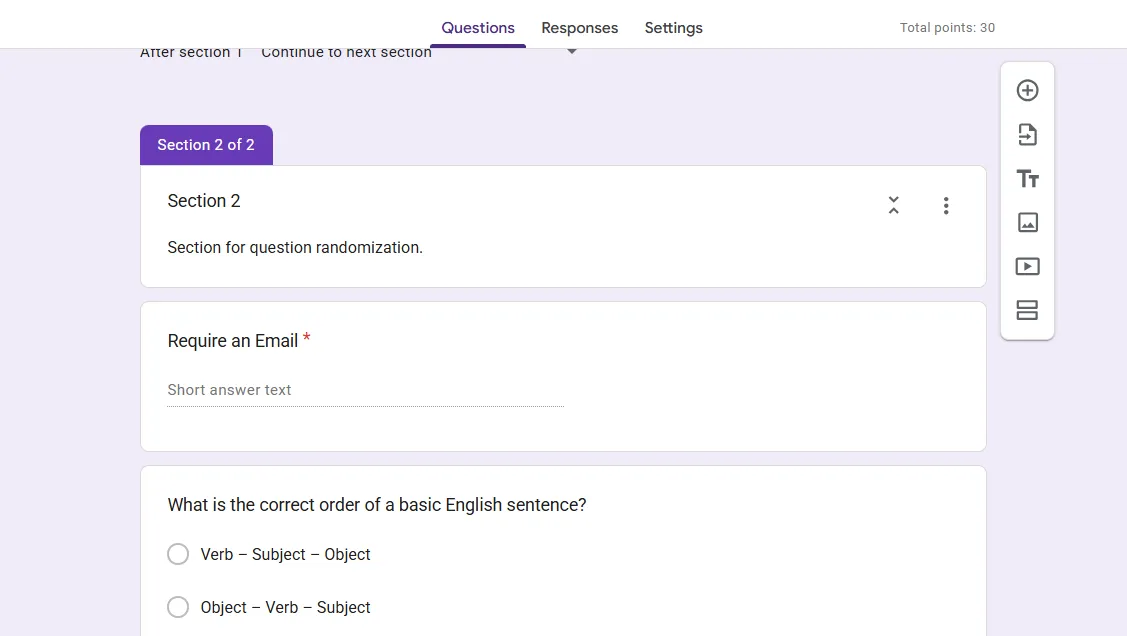
But here’s something easy to overlook: you also need to set what happens at the end of each section. Scroll down to the bottom of a section and you’ll see “After section X” with another dropdown. This controls where people go after finishing all questions in that section.
For a retry section, you probably want this to loop back to the main question flow—maybe jumping to “Q2 – Main Path” after they complete the retry.
For your final section, you’ll want to set this to “Submit form” so people actually finish the quiz instead of looping endlessly.
Think of it like train tracks switching. Each answer flips a switch, sending the respondent down a different path. Your job is to make sure those paths go somewhere useful.
Building a Right/Wrong Branch Structure
Let’s walk through a concrete example—the classic right/wrong branching pattern. This is probably the most common use case for teachers.
You have Question 1 in Section 2. A student selects an answer. If they’re right, they proceed to Question 2. If they’re wrong, they see an explanation screen with support materials, then get a retry question before moving on.
Here’s how to build it:
Section 2: Question 1
Add your multiple-choice question. Enable “Go to section based on answer.” Point the correct answer to Section 4 (Question 2). Point all incorrect answers to Section 3 (Retry Screen).
Section 3: Question 1 Retry Screen
This section might contain an explanation paragraph, a helpful video, maybe a diagram—whatever support materials make sense. Then add a second attempt at the question, possibly reworded slightly. Since this is a retry, you might not enable branching here; just let everyone proceed to Question 2 after answering. Set the section’s “After section 3” dropdown to go to Section 4.
Section 4: Question 2
Next question in your quiz. Repeat the branching setup as needed.
The beauty of this structure? Students who get it right the first time skip all the remediation content. They move through efficiently. Students who struggle get the help they need before advancing. Same quiz, personalized paths.
OnlineExamMaker: A Better Way to Create Quizzes Using AI
Setting up branching in Google Forms is manual. Every section, every dropdown, every path—you’re configuring it by hand. Make one quiz with five questions and it’s manageable. Make ten quizzes with twenty questions each and you’ll want to scream into a pillow.
There’s also no easy way to visualize the flow. You’re essentially building a complex decision tree while looking at a linear list of sections. It’s like trying to assemble furniture without the diagram—technically possible, but unnecessarily frustrating.
This is where OnlineExamMaker changes the game.
Create Your Next Quiz/Exam Using AI in OnlineExamMaker
OnlineExamMaker is AI-powered exam creation software designed specifically for educators and trainers. Instead of manually routing every answer through dropdowns, you get an intelligent interface that understands branching logic. You can actually see your quiz flow as a visual diagram, making it immediately obvious if something’s broken or if a path goes nowhere.
The AI component is the real differentiator. Upload your content—notes, textbooks, lecture slides—and OnlineExamMaker can generate quiz questions automatically, complete with branching logic suggestions based on difficulty levels and learning objectives. It’s like having a teaching assistant who never sleeps.
You also get features Google Forms simply doesn’t offer: randomized question pools, advanced anti-cheating measures, detailed analytics showing exactly where students struggle, and integration with learning management systems. For HR managers running training assessments or teachers managing multiple classes, these aren’t nice-to-haves—they’re essential.
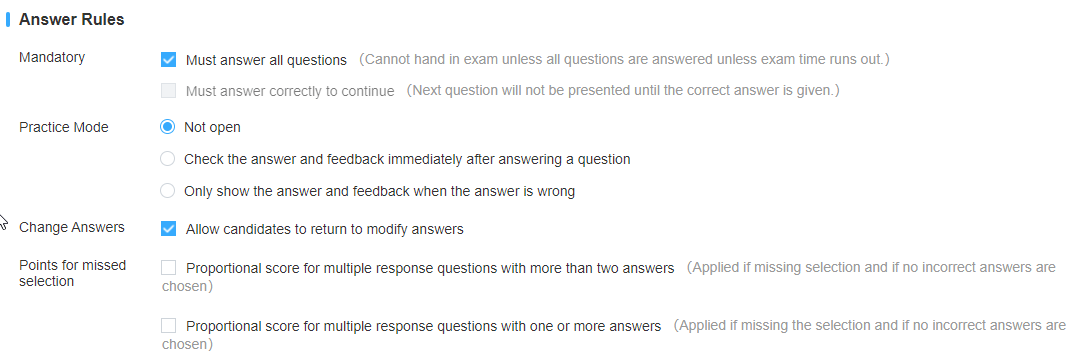
The most important step, in the exam answer rules setting , you can enable “Must answer correctly to continue”, then your quiz taker must answer a question correctly to continue to the next one.
Google Forms is the Swiss Army knife of surveys and simple quizzes. OnlineExamMaker is the specialized tool built specifically for educational assessment. Both have their place. If you’re serious about creating adaptive, professional quizzes at scale, OnlineExamMaker is worth exploring.
Final Thoughts
Branching quizzes aren’t rocket science, but they do require planning and patience. The payoff? Assessments that actually adapt to your students instead of treating everyone identically.
Start small. Build a simple two-question quiz with one retry path. Test it thoroughly. Once you understand how sections and routing work, expand from there. Before long, you’ll be creating sophisticated adaptive assessments that would’ve taken weeks to build manually.
The key is that planning phase. Sketch your flow first. Name your sections clearly. Test every branch. Do those three things and you’ll avoid 90% of the headaches.
Whether you stick with Google Forms or upgrade to something like OnlineExamMaker, the principles are the same: understand your learners’ paths, build in helpful support for struggles, and create experiences that meet people where they are.
Because at the end of the day, that’s what good teaching is—meeting students where they are and guiding them forward. Branching quizzes are just one more tool to make that happen.
Now go build something that adapts, helps, and actually improves learning. Your students will thank you for it.