Ever sent out a quiz and realized—too late—that you have no idea who actually took it? It’s like throwing a party and forgetting to check the guest list. Whether you’re a teacher tracking student progress, a trainer measuring comprehension, or an HR manager screening candidates, collecting email addresses in your Google Forms quiz isn’t just helpful—it’s essential.
- Why Email Collection Matters for Quizzes?
- Method 1: Enable Verified Email Collection
- Method 2: Use Responder Input
- Method 3: Add a Manual Email Question with Validation
- Quiz-Specific Tips and Troubleshooting
- Creating Lead Generation Quizzes with OnlineExamMaker
- Best Practices for Email Collection
Why Email Collection Matters for Quizzes?
Before we dive into the technical stuff, let’s talk about why this matters. Email addresses aren’t just contact information—they’re accountability anchors. When someone knows their response is tied to their identity, they take it more seriously. Plus, you’ll need those emails to:
- Return graded results to the right people
- Follow up with additional resources or feedback
- Prevent duplicate submissions from the same person
- Build your contact list for future courses or opportunities
- Track completion rates across multiple assessments
Think of it this way: a quiz without email collection is like a conversation without names. It might work in a crowded room, but good luck remembering who said what. Since everyone knows the importance of getting email from quiz takers, below are 3 methods that a quiz organizer can collect emails from Google Forms quizzes.
Method 1: Enable Verified Email Collection
This is the Fort Knox approach—secure, reliable, and foolproof. When you enable verified email collection, respondents must sign in with their Google account before accessing your quiz. No wiggle room, no fake emails, no “[email protected]” nonsense.
Here’s how to set it up:
- Open your Google Form quiz and click the “Settings” in the top right corner
- Navigate to the Responses tab
- Look for the option labeled “Collect email addresses”
- Expand it and select “Verified”
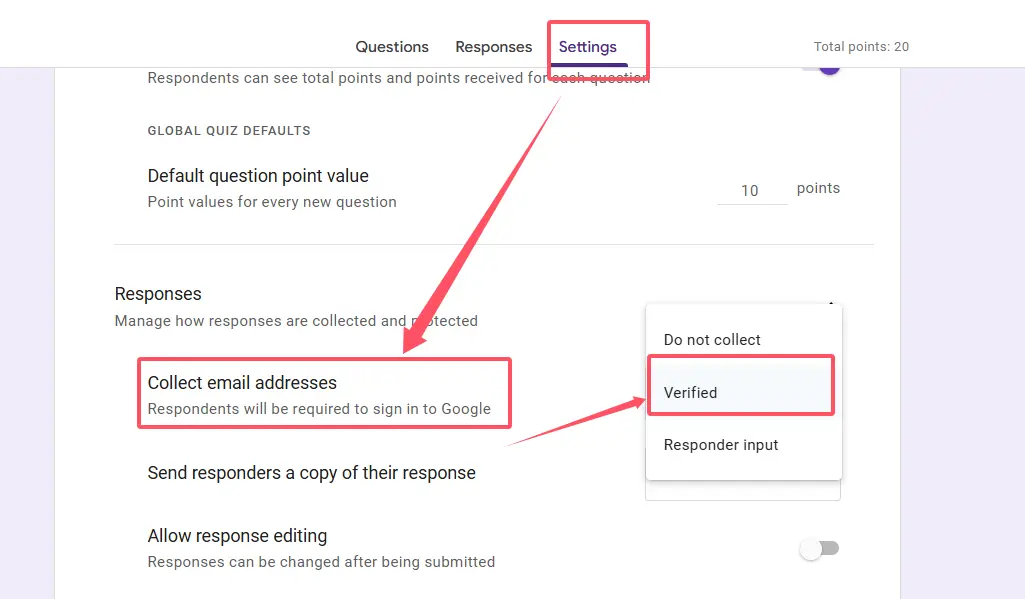
Boom. Done. Google automatically captures the email associated with each respondent’s account, and you’ll see a confirmation message at the top of your quiz letting users know they need to sign in.
When to use this method:
- You’re working within an organization (school, company) where everyone has Google accounts
- You need guaranteed authenticity—no fake submissions
- You’re using Google Classroom (this method integrates seamlessly)
- You want to prevent the same person from submitting multiple times
The catch? Anyone without a Google account or who doesn’t want to sign in will hit a wall. This method prioritizes security over accessibility, which is perfect for internal assessments but might alienate external audiences.
Method 2: Use Responder Input
Now, if Method 1 is Fort Knox, this one’s more like an honor system with a suggestion box. Responder input prompts users to manually enter their email address—no Google sign-in required. It’s the democratic option that keeps your quiz accessible to anyone with an internet connection.
Setup is just as simple:
- Open your quiz settings
- Go to Responses
- Under “Collect email addresses,” choose “Responder input”
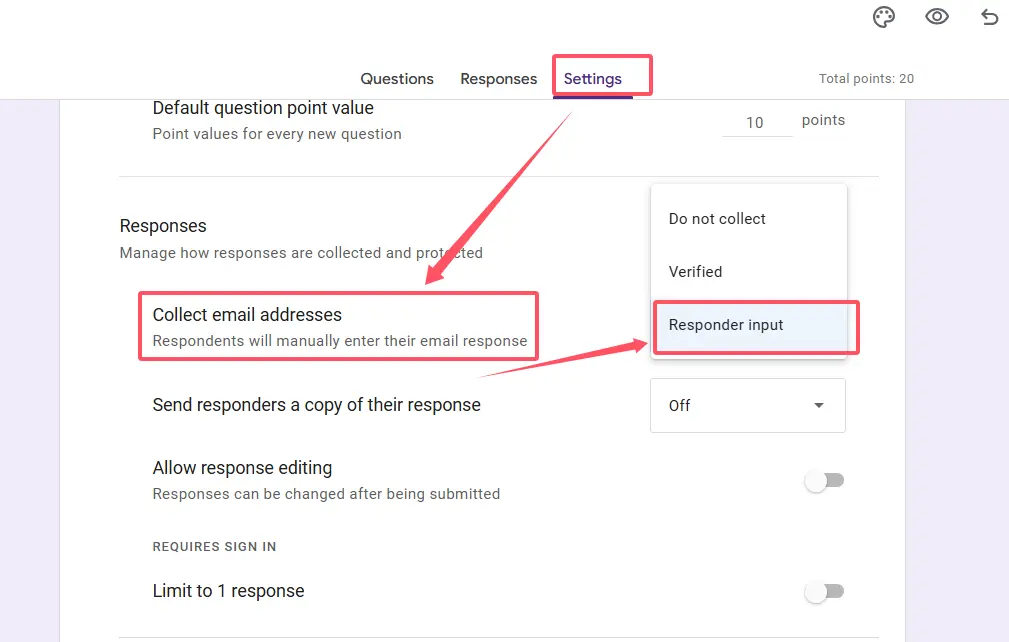
Google Forms will automatically add a required email field at the beginning of your quiz. Respondents type in their email manually, and you’re all set.
The pros and cons:
| Pros | Cons |
|---|---|
| No Google account needed | Risk of invalid or fake emails |
| Broader accessibility | Typos happen (and they’re annoying) |
| Lower barrier to entry | Easier for people to submit multiple times |
| Great for public-facing quizzes | Less secure than verified method |
Use this when: You’re casting a wide net—maybe for a public workshop, an online course signup, or a lead generation campaign where you’d rather get 100 responses with a few bogus emails than scare off potential respondents with mandatory sign-ins.
Method 3: Add a Manual Email Question with Validation
Want the best of both worlds? Manual entry with built-in quality control? This method gives you that. You’ll create a dedicated email question and use Google Forms’ validation feature to ensure people enter actual email addresses—not “abc123” or “I don’t want to share.”
Step-by-step setup:
- In your Google Form, click the plus icon (+) to add a new question
- Change the question type to “Short answer”
- Label your question “Email address” (or something similar)
- Click the three-dot menu in the bottom right of the question box
- Select Response validation
- Choose Text → Email from the dropdown options
- Make the question required by toggling the “Required” switch
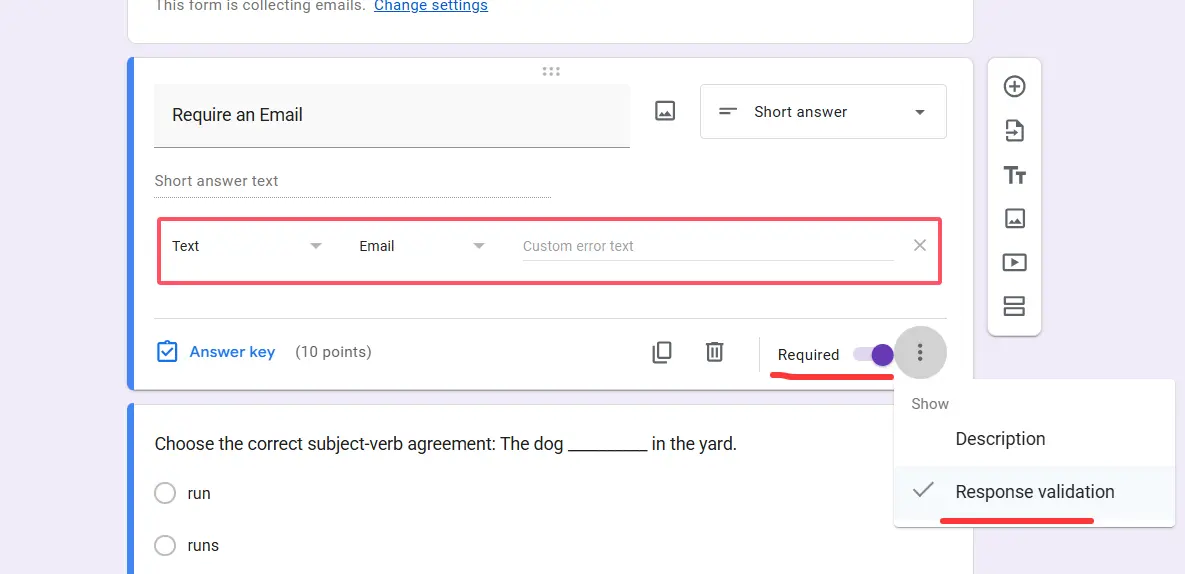
Now Google Forms will automatically check if the entry matches email format ([email protected]). It won’t verify the email exists, but it will catch obvious mistakes like “johngmail.com” or “test@.”
Pro tip for data organization:
Connect your quiz responses to Google Sheets by clicking the Responses tab in your form, then clicking the green Sheets icon. This creates a live spreadsheet where emails appear in the first column, making it ridiculously easy to export, sort, or integrate with other tools.
Why choose this method? Maximum control. You design the question, you set the validation rules, and you decide where it appears in your quiz flow. It’s perfect for trainers who want to customize the experience or HR managers building multi-step assessment funnels.
Quiz-Specific Tips and Troubleshooting
Google Forms quizzes have some quirks that regular forms don’t. Here’s what you need to know to avoid headaches:
Timing matters
Always enable email collection before you share your quiz. Enabling it midway won’t retroactively capture emails from earlier respondents—you’ll just have anonymous submissions sitting in your data like ghosts at a reunion.
Test, test, test
Before sending your quiz to 500 people, take it yourself. Check that emails appear in the response summary or your linked Google Sheet. Nothing’s worse than realizing you skipped a step after the fact.
Google Classroom integration
If you’re assigning quizzes through Classroom, verified email collection is automatic. Students’ accounts are already linked, so their submissions tie directly to their profiles. This is chef’s kiss for teachers—zero extra setup required.
Score release and email collection
Quizzes release scores immediately after submission (if you’ve set them to), but email collection follows the same rules regardless. Just make sure it’s turned on in settings. The two features play nicely together—your students get instant feedback, and you get their contact info for follow-ups.
Common mistakes to avoid:
- Forgetting to make email questions required (you’ll end up with blank fields)
- Using “Paragraph” instead of “Short answer” for email questions (validation won’t work)
- Not linking to Google Sheets (manual data entry is a time thief)
- Assuming verified emails work without Google accounts (they don’t—pick the right method for your audience)
A Better Way: Creating Lead Generation Quizzes with OnlineExamMaker
While Google Forms is great for basic quizzes, what if you want something more sophisticated? Enter OnlineExamMaker—an AI-powered exam and quiz creation platform that takes lead generation to the next level.
OnlineExamMaker is designed specifically for educators, trainers, and businesses who need professional-grade assessments with built-in lead capture. Think of it as Google Forms’ overachieving cousin who went to business school and came back with marketing superpowers.
What makes OnlineExamMaker different?
Unlike Google Forms, OnlineExamMaker offers advanced features tailored for lead generation:
- AI-powered question generation (yes, the software can actually create quiz questions for you)
- Custom branding with your logo, colors, and domain
- Lead scoring to identify high-quality prospects
- Conditional logic that adapts questions based on previous answers
- Automated email follow-ups triggered by quiz completion
- Integration with CRMs like HubSpot, Salesforce, and Mailchimp
Create Your Next Quiz/Exam Using AI in OnlineExamMaker
How to create a lead generation quiz in OnlineExamMaker?
- Sign up and choose your quiz type: Log into OnlineExamMaker dashboard, then click “New exam” to create an exam.
- Use AI to generate questions: This is where it gets cool. Input your topic—say, “digital marketing fundamentals”—and OnlineExamMaker’s AI suggests relevant questions. You can accept, edit, or regenerate until you’re happy with the content.
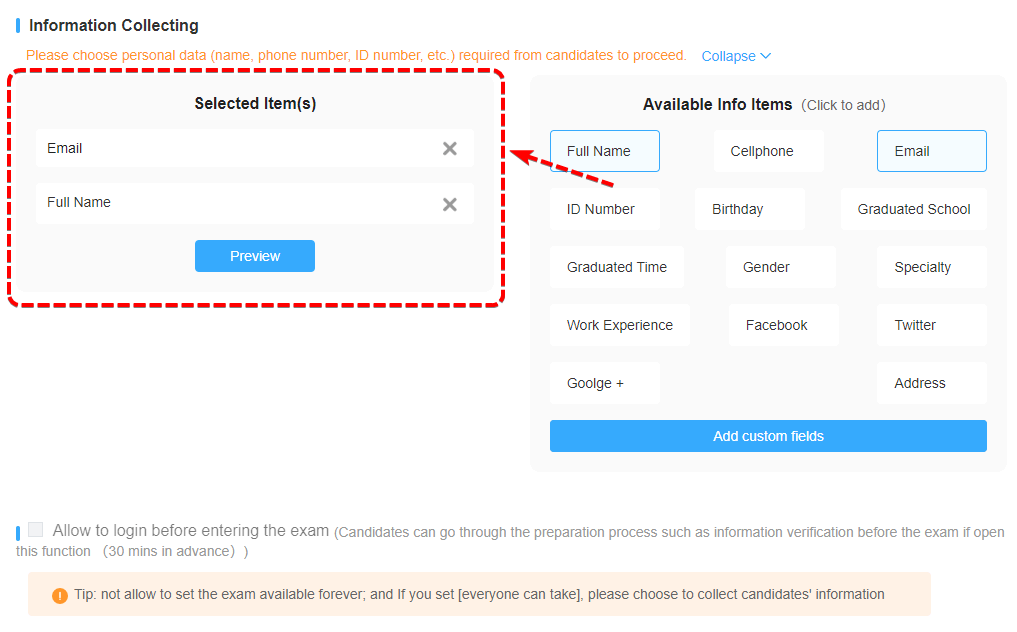
- Set up your lead capture form: Customize which fields you want to collect (email is mandatory, but you can add name, company, phone, etc.). Unlike Google Forms, you can create multi-step forms that feel less invasive—ask one question, build rapport, then request contact info.
- Add conditional logic: Want to ask different follow-up questions based on someone’s answer? OnlineExamMaker handles this seamlessly. For example, if someone indicates they’re a “beginner” in question 2, the quiz can skip advanced topics and tailor content to their level.
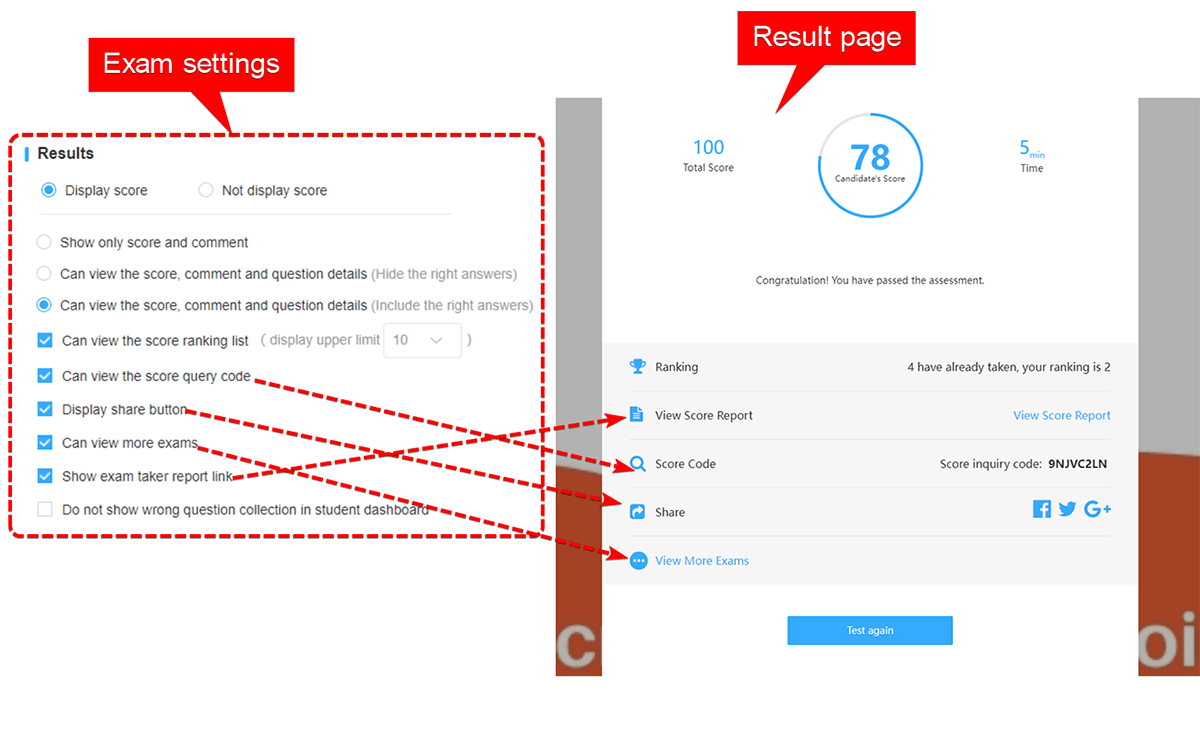
- Design your results page: Here’s where lead generation magic happens. Create personalized results based on quiz scores—”You’re a Social Media Novice!” vs. “You’re a Marketing Maven!”—and include opt-in offers like free guides, webinars, or consultations.
- Configure email automation: Set up instant email delivery of quiz results, then schedule follow-up emails based on responses. Someone scores high? Send them advanced resources. Someone struggles? Offer a free training session.
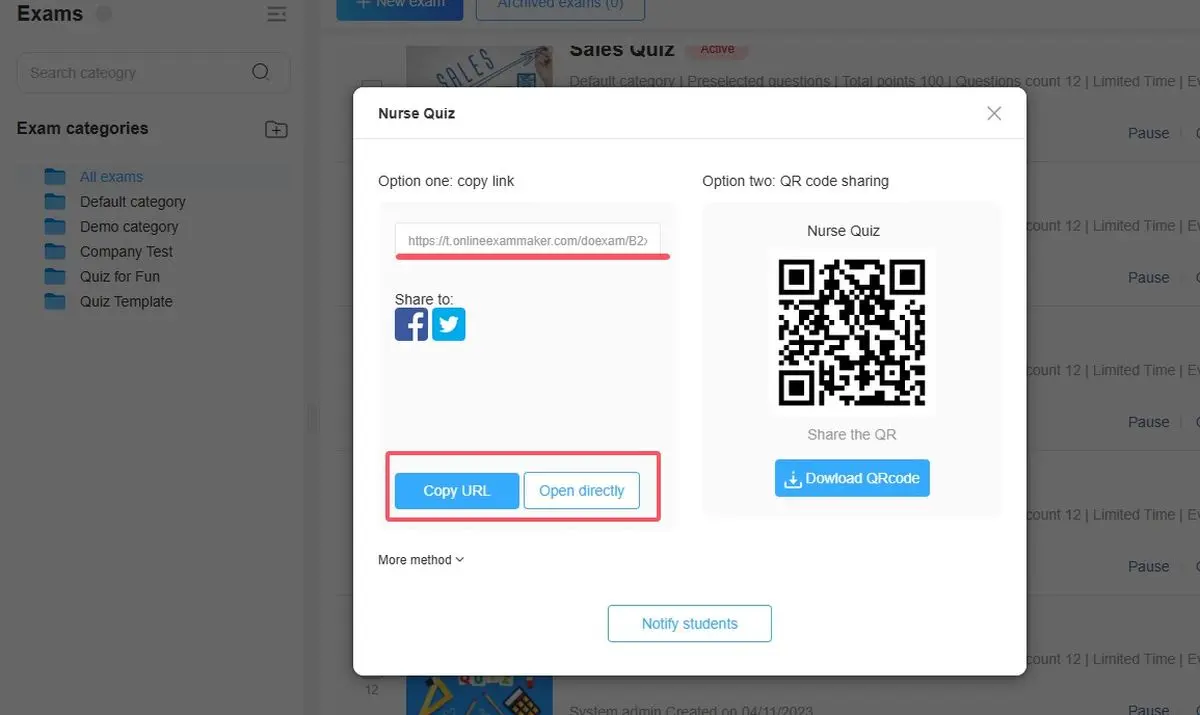
- Publish and share: Embed the quiz on your website, share via social media, or send direct links. OnlineExamMaker tracks every interaction, giving you detailed analytics on completion rates, drop-off points, and lead quality.
When to use OnlineExamMaker over Google Forms:
- You’re building marketing funnels that require sophisticated lead nurturing
- You need professional branding and custom domains
- You want AI assistance in creating quiz content
- You’re collecting leads at scale (hundreds or thousands monthly)
- You need integration with your existing marketing stack
Google Forms is perfect for straightforward data collection. OnlineExamMaker is for when your quiz is actually a strategic asset—a tool to identify prospects, qualify leads, and move people through your sales or education funnel.
Best Practices for Email Collection
Regardless of which tool or method you choose, here are some universal principles to keep email collection ethical and effective:
Be transparent
Always tell people why you’re collecting their email and what you’ll do with it. “We’ll use your email to send quiz results and occasional updates” is clear and honest. Mystery creates suspicion, and suspicion kills completion rates.
Keep it simple
Don’t ask for email plus phone number plus mailing address plus LinkedIn profile unless you absolutely need all that. Every additional field is a micro-decision that increases drop-off. Start with email only—you can always ask for more later if someone converts into a lead.
Respect privacy
Make it obvious how you’ll protect data. A simple note like “We respect your privacy and won’t share your information” goes a long way. And then actually don’t share it. Trust is earned slowly and lost quickly.
Offer value in exchange
People are more willing to share emails when there’s a clear benefit. Immediate quiz results, personalized feedback, a free resource, or entry into a prize draw—give people a reason to say yes beyond just “we want your data.”
Follow up thoughtfully
You collected those emails for a reason, right? Use them. Send results promptly, provide additional resources, or invite people to the next session. But don’t spam—nobody wants 17 emails about tangentially related topics. Quality over quantity always wins.
The bottom line? Collecting email addresses in Google Forms quizzes isn’t complicated—it’s just a matter of choosing the right method for your audience and purpose. Verified emails for security-conscious environments, responder input for maximum accessibility, or manual questions with validation for control freaks (we say that affectionately).
And if you’re ready to level up beyond basic forms into full-blown lead generation machinery, tools like OnlineExamMaker offer the sophistication that scales with your ambitions. Whether you’re tracking student progress, screening candidates, or nurturing marketing leads, getting those email addresses right is step one. Everything else—the follow-ups, the relationships, the conversions—builds from there.
Now go forth and collect emails like the organized, strategic professional you are. Your future self (and your CRM) will thank you.