So you’ve created the perfect quiz. Questions are sharp, answers are clever, and you can practically hear the suspenseful Kahoot music building as students race to respond. There’s just one problem: nobody can actually find your masterpiece.
Making a Kahoot quiz public isn’t rocket science, but it does require knowing where to click. And honestly? The difference between a private quiz gathering digital dust and a public one that teachers worldwide can discover is just a few simple settings.
- Understanding Kahoot Visibility Options
- Method 1: Making a Kahoot Public from the Library Tab
- Method 2: Making a Kahoot Public from the Kahoot Creator
- Why Visibility Settings Matter for Educators
- OnlineExamMaker: A Better Way to Create Interactive Quizzes
- Frequently Asked Questions
Understanding Kahoot Visibility Options
Before you rush to make your quiz public, let’s talk about what “public” actually means in Kahoot-land. Because unlike your high school diary (which was definitely private, despite what your sibling claimed), Kahoot offers you multiple levels of sharing.
Think of these visibility settings as the privacy settings on your social media, except instead of controlling who sees your vacation photos, you’re controlling who can access your “Renaissance Art or Renaissance Fair?” quiz.
| Visibility Setting | Who Can Access | Best Used For |
|---|---|---|
| Public | Everyone on Kahoot’s Discover page | Sharing with the teaching community, building your reputation, or contributing educational content |
| Unlisted | Anyone with the direct link | Sharing with specific groups without making it searchable |
| Private | Only you | Drafts, personal practice materials, or sensitive content |
| Team Only | Your organization members | School-wide resources or department-specific materials |
Here’s the thing: public means searchable. Your quiz will appear when educators search relevant keywords on Kahoot’s Discover page. It’s like being listed in the phone book, except people actually want to find you.
According to Kahoot’s platform statistics, billions of participants have engaged with Kahoots globally, making the Discover page a bustling marketplace of educational content. Going public puts your quiz in front of this massive community.
Method 1: Making a Kahoot Public from the Library Tab
This is the express lane. You’re not editing the content, you’re just flipping the visibility switch. Perfect for when you’ve already polished your quiz and you’re ready to unleash it on the world.
Step-by-Step Instructions
1. Log into your Kahoot account. Head to the Library tab in the top navigation bar. This is your personal collection of all the Kahoots you’ve created or saved.
2. Locate your quiz. Scroll through your library or use the search function if you’re one of those overachievers with 50+ quizzes. Find the specific quiz you want to make public.
3. Click the three vertical dots next to your quiz’s name. This ellipsis menu is where the magic happens. It’ll open a dropdown showing options like Edit, Share, Duplicate, and the all-important Visibility.
4. Select Visibility. From the dropdown, choose the Visibility option. A new menu will appear showing all available visibility settings.

5. Choose Public and confirm. Click Public from the options. Kahoot might ask you to confirm your choice because, well, there’s no taking it back easily. Once it’s public, it’s out there.
Pro Tip: Before making your quiz public, preview it one last time. Typos in question three become a lot more embarrassing when 10,000 teachers have already used your quiz.
That’s it. Your quiz is now discoverable on Kahoot’s Discover page. Teachers searching for content related to your topic can now find and use your creation.
Method 2: Making a Kahoot Public from the Kahoot Creator
Already elbow-deep in editing your quiz? No need to back out to the Library. You can adjust visibility settings right from the creator interface. It’s like changing your outfit while you’re still getting dressed.
The Creator Route
1. Open your quiz in the creator. From your Library, click the pencil icon next to your quiz name. Alternatively, if you’re creating a brand new quiz, you’ll already be in the creator interface after selecting Create > Kahoot.
![]()
2. Click the Settings button. Look for the Settings button at the top of the screen, usually positioned near the quiz title. This opens a panel with all your quiz configuration options.
3. Navigate to the Visibility section. Scroll through the settings panel until you find the Visibility section. It’s typically located partway down the settings menu.
4. Select Public from the dropdown. Click on the visibility dropdown and choose Public. You’ll see all four options here: Public, Unlisted, Private, and Team Only (if applicable to your account type).
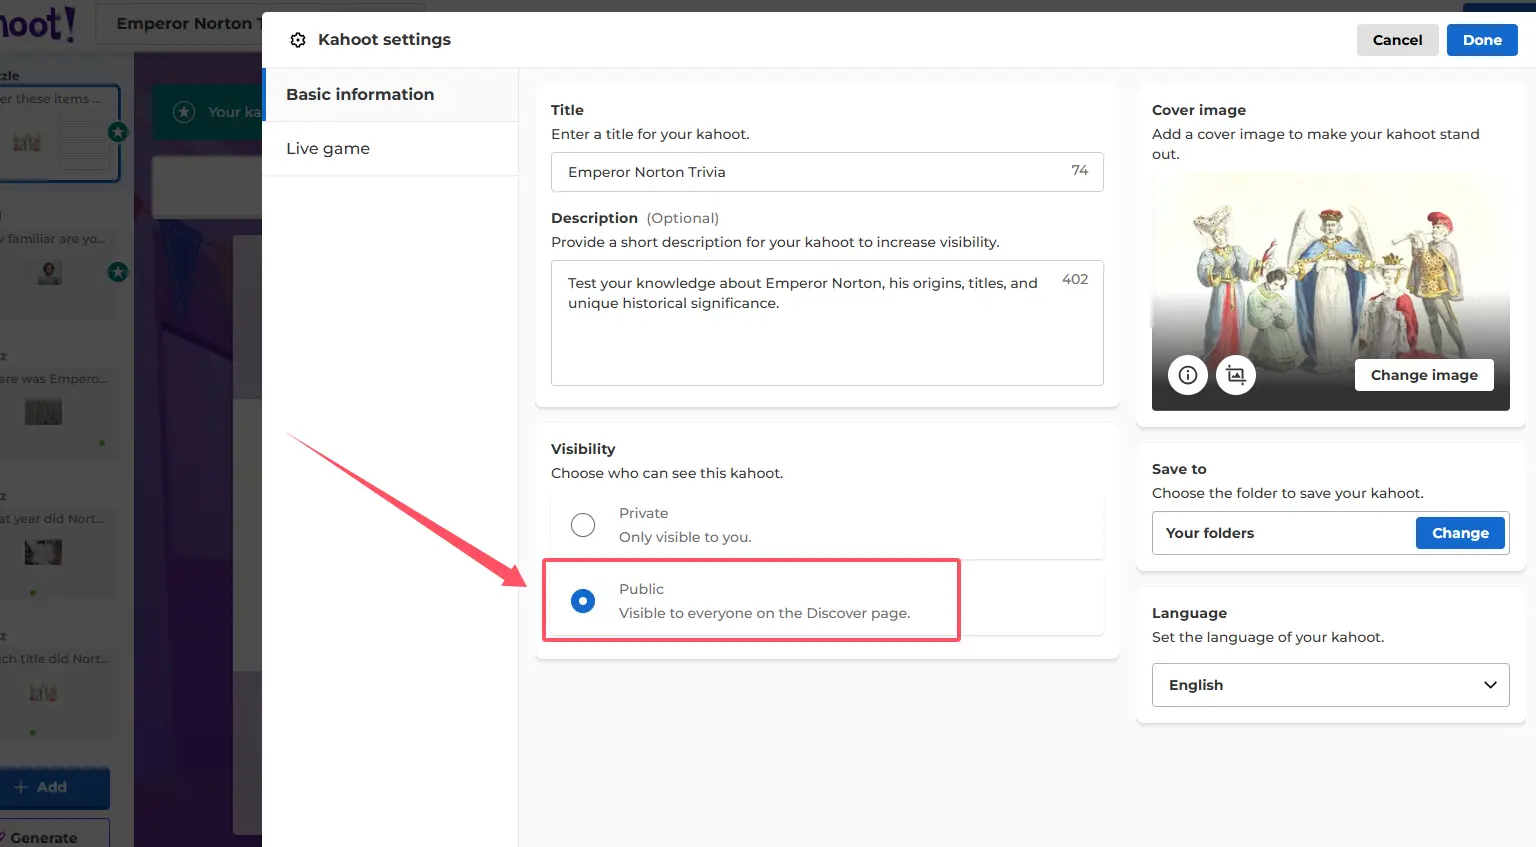
5. Save your changes. This is crucial—and often forgotten. Click Done to close the settings panel, then hit the Save button in the top right corner. Without saving, your visibility change evaporates like morning dew.
Why use this method? Well, if you’re already tweaking questions, adjusting timers, or perfecting those answer options, it makes sense to handle visibility in the same session. It’s efficiency at its finest.
Why Visibility Settings Matter for Educators
You might be thinking, “Does it really matter if my quiz is public or unlisted?” Short answer: absolutely. The visibility setting you choose impacts how your content is shared, discovered, and used.
Public quizzes benefit the entire teaching community. When you make a well-crafted quiz public, you’re contributing to a global repository of educational resources. Other teachers can discover your work, save it to their libraries, and use it with their own students. It’s like leaving a really good book in a Little Free Library, except thousands of people can read it simultaneously.
According to research on educational resource sharing, teachers who contribute to open educational resources report higher levels of professional collaboration and community engagement. Going public isn’t just about visibility; it’s about participating in a larger educational ecosystem.
Unlisted gives you control without the spotlight. Maybe you’ve created a quiz specifically for your district’s professional development session, or perhaps it contains inside jokes only your students will understand. Unlisted keeps it accessible via direct link while preventing random strangers from stumbling upon your “World History or Taylor Swift Lyrics?” quiz.
Private protects works-in-progress. Not every quiz is ready for prime time. Private settings let you draft, experiment, and revise without pressure. Once it’s polished, you can switch to public.
OnlineExamMaker: A Better Way to Create Interactive Quizzes
While Kahoot has dominated the educational quiz space for years, there’s an increasingly compelling alternative that deserves your attention: OnlineExamMaker.
Here’s the thing about OnlineExamMaker—it takes everything we love about interactive quizzes and supercharges it with artificial intelligence. Instead of manually typing out each question, multiple-choice option, and answer key, you can leverage AI to generate quiz content based on your teaching materials, textbooks, or topic requirements.
Why Educators Are Switching to OnlineExamMaker
Imagine this: you have a 30-page PDF on the American Revolution. With traditional quiz platforms, you’d spend hours crafting questions. With OnlineExamMaker’s AI capabilities, you upload the document, specify your preferences, and the platform generates comprehensive quiz questions in minutes. It’s not magic—it’s machine learning applied to education.
Time-Saving Reality Check: According to user reports, educators save an average of 3-5 hours per week using AI-assisted quiz generation compared to manual creation. That’s time you can spend actually teaching instead of formatting questions.
Create Your Next Quiz/Exam Using AI in OnlineExamMaker
But OnlineExamMaker isn’t just about speed. The platform offers:
- Flexible question types beyond basic multiple choice, including essay questions, fill-in-the-blank, matching, and ordering questions
- Advanced analytics that show exactly which concepts students are struggling with
- Customizable branding so your quizzes reflect your institution’s identity
- Integrated anti-cheating features for remote assessments
- Mobile optimization that actually works on all devices (not just “technically works but looks terrible”)
The visibility controls are also more intuitive. Rather than navigating through multiple menus, OnlineExamMaker presents clear sharing options right in the main dashboard. You can make quizzes public, share via link, embed them in your learning management system, or restrict access to specific student groups.
For HR managers and corporate trainers, OnlineExamMaker shines even brighter. The platform supports certification programs, compliance training, and onboarding assessments with professional-grade features that Kahoot’s game-show format simply wasn’t designed to handle.
Frequently Asked Questions
Can I change a public quiz back to private?
Yes! Visibility settings aren’t permanent. You can change your quiz from public back to private (or unlisted) at any time using the same methods outlined above. However, keep in mind that if other teachers have already discovered and saved your quiz to their libraries, they’ll retain their saved copies even if you make the original private.
Will making my quiz public affect my account storage?
No. Visibility settings don’t impact storage limits or account capacity. Public quizzes don’t take up more space than private ones.
Can I see who’s using my public quiz?
Kahoot provides basic analytics showing how many times your quiz has been played and how many teachers have saved it, but you won’t see detailed information about individual users. This protects user privacy while giving you useful metrics about your quiz’s reach.
Do I need a paid Kahoot account to make quizzes public?
No! Even free Kahoot accounts can create and publish public quizzes. Paid accounts offer additional features like advanced question types and deeper analytics, but basic public sharing is available to all users.
What happens if someone reports my public quiz?
Kahoot has community guidelines and a reporting system. If your quiz violates these guidelines (contains inappropriate content, copyrighted material, or misinformation), it can be removed. However, educational content created in good faith rarely faces issues. Just ensure your quiz is factually accurate and appropriate for your target audience.