Converting Word documents into Google Forms quizzes isn’t just about going digital. It’s about transforming static worksheets into interactive, self-grading assessments that save you hours of manual correction. And the best part? You don’t need to be a tech wizard to pull it off.
- Why Convert Word Documents to Google Forms?
- Preparing Your Files for Conversion
- Setting Up Google Drive for Automatic Conversion
- Installing the Doc to Form Add-on
- Creating Your Quiz from the Document
- Converting Your Form into a Self-Grading Quiz
- Advanced Tips for Better Quizzes
- The Better Alternative: OnlineExamMaker AI Quiz Maker Tool
- FAQs about Converting Document into Quiz

Why Convert Word Documents to Google Forms?
Most of us have mountains of assessment materials we’ve created over the years. Multiple choice quizzes, worksheets, practice tests. They’re perfectly good content, but they’re stuck in the analog age.
Here’s what happens when you convert them to Google Forms:
Automatic grading. Instead of spending your evenings marking papers, you get instant results. Students submit their answers, and Google tells them—and you—exactly how they did. No red pen required.
Instant feedback. Students don’t have to wait days to know if they nailed that equation or totally missed the point. They get immediate clarity on what they got right and where they stumbled.
Better engagement. Let’s face it: filling out a digital form feels less like homework and more like… well, still homework, but at least it’s interactive homework. For the TikTok generation, that matters.
Easy distribution. One link. That’s all it takes. Email it, post it on your learning management system, share it in a class chat. No more photocopying or wondering if students actually received their worksheets.
Whether you’re teaching online, managing hybrid classrooms, or just trying to reduce your paper consumption (hello, environment), this conversion process makes your life simpler.
Preparing Your Files for Conversion
Before we dive into the technical stuff, let’s talk about your source material. The conversion works with both Word documents (.docx files) and PDFs, so dig through those archives and find what you need.
Here’s something clever: if you’re creating a new quiz from scratch, arrange your multiple-choice answers so the correct one is always first. Sounds lazy, right? Actually, it’s strategic. You can easily identify correct answers during setup, then shuffle them later so students don’t catch on to any patterns.
Got your Word doc ready? Great. Want to hedge your bets? Create a PDF version too. Go to “Export” in Word and save it as a PDF. Why both formats? Different conversion results. Sometimes the PDF handles formatting better, sometimes the Word doc does. Having both gives you options.
What Makes a Good Candidate for Conversion?
Not every document converts smoothly. The ideal candidates are:
Clean, simple formatting. Basic fonts, standard spacing, minimal graphics. Think clarity over creativity.
Clear question structure. Numbered questions with distinct answer choices work best. The add-on needs to understand what’s a question and what’s an answer.
Multiple choice or checkbox format. These translate perfectly to Google Forms. Essay questions? Not so much—you’ll need to add those manually later.
Setting Up Google Drive for Automatic Conversion
Here’s where the magic starts. Open Google Drive—if you’re signed into your Google account, just type “Google Drive” in your browser and click the first link. You’ll land right in your digital filing cabinet.
Create a folder for your worksheets if you haven’t already. Organization now saves headaches later, trust me. Click on that folder to open it.
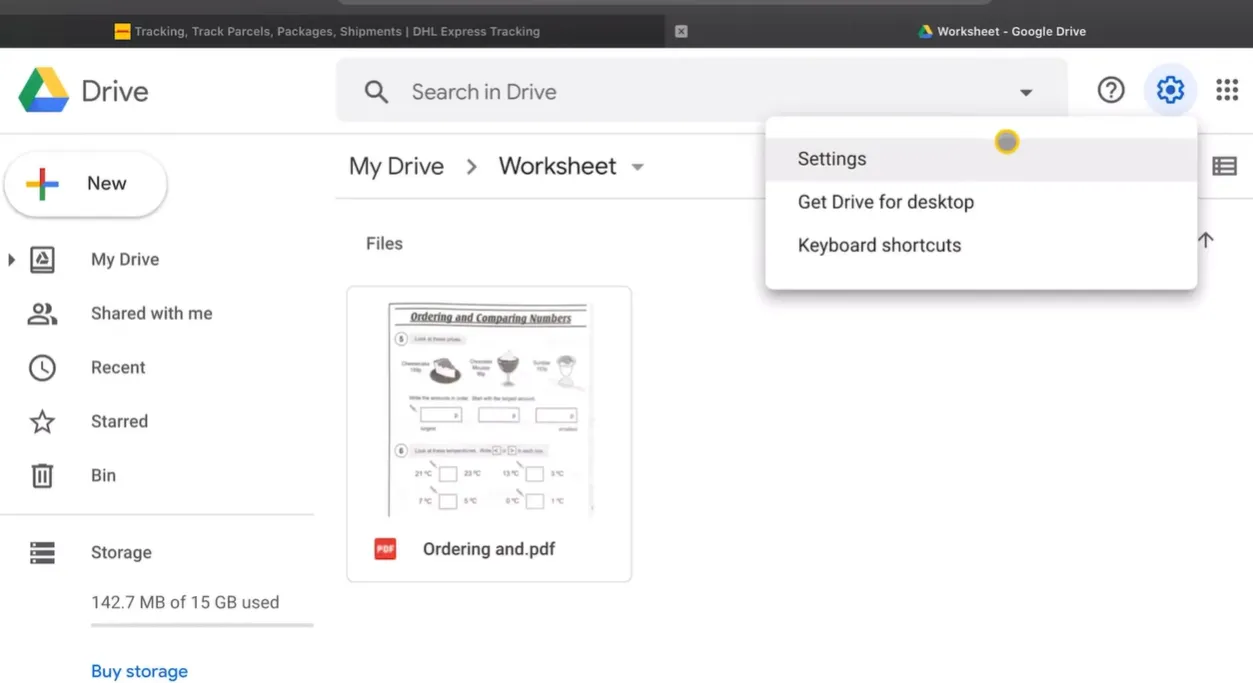
Now comes the crucial step that most people skip. Go to Settings (click the gear icon in the top-right corner). Look for an option that says “Convert uploaded files to Google Docs editor format.” Check that box. Click “Done.”
Why does this matter? Without this setting enabled, your Word documents upload as Word documents. With it enabled, Google automatically converts them to Google Docs format when you upload. This compatibility is essential for the next steps.
Uploading Your Files
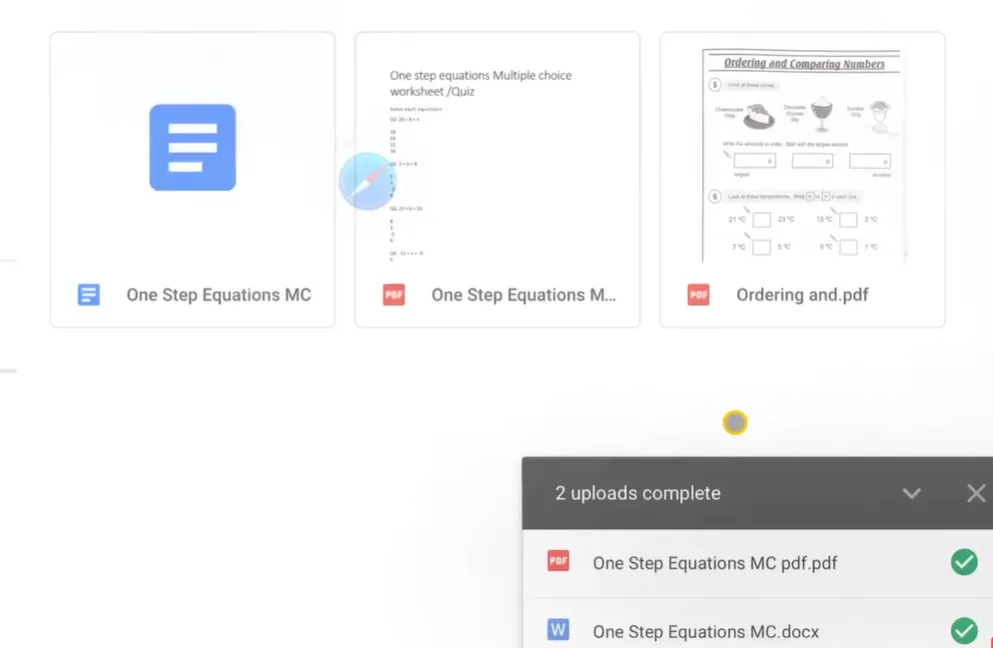
Watch them upload. It’s usually pretty quick—we’re talking seconds, not minutes. Once they’re there, click on your newly uploaded Word document (.docx file).

It opens as a Google Doc. Look at that—your formatting stayed intact, your questions are all there, everything looks exactly like it should. No compatibility chaos. Just clean conversion.
Installing the Doc to Form Add-on
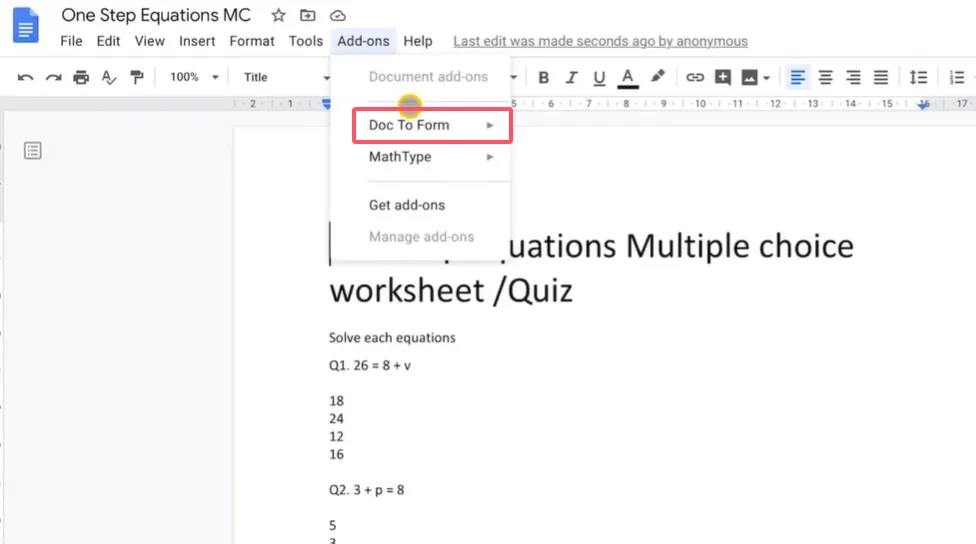
With your document open in Google Docs, navigate to the “Add-ons” menu. Think of add-ons as apps for Google Docs—little tools that extend what you can do.
In the add-ons marketplace, search for “Doc to Form.” You’ll see it pop up—it’s the one that turns documents into forms with just a few clicks.
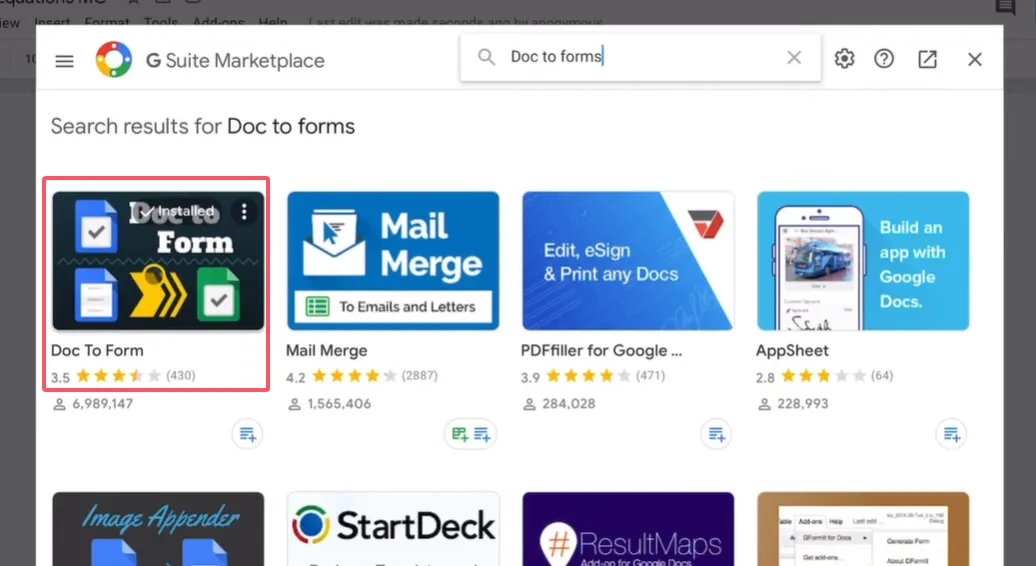
Click “Install.” Google will ask you to sign in (use the account you’re currently using, obviously) and grant permissions. Don’t panic about the permissions—it needs access to create forms on your behalf. Click “Allow.”
The installation takes maybe ten seconds. When it’s done, you’ll get a confirmation message. Now you’re armed and dangerous.
Creating Your Quiz from the Document
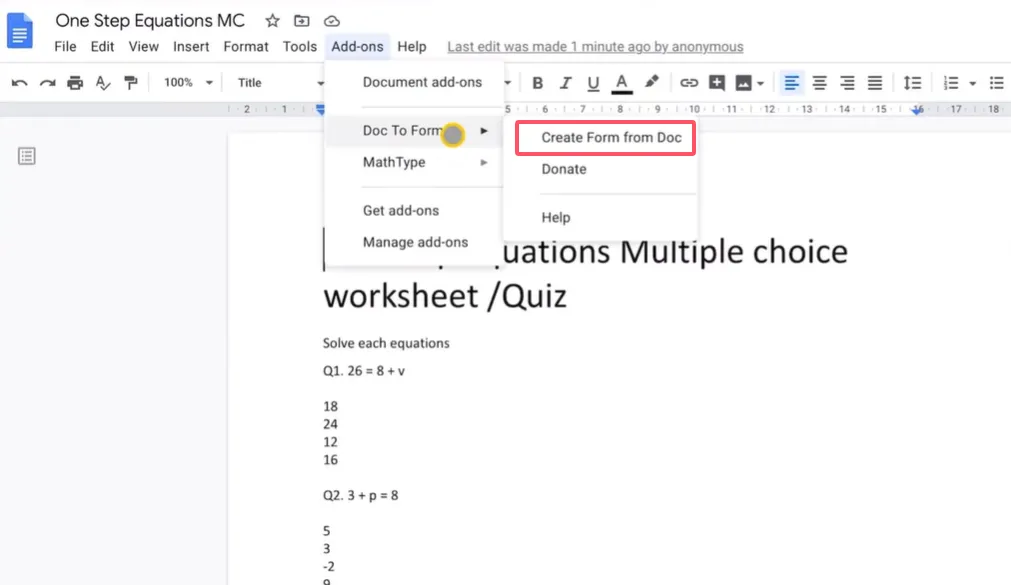
Back to the Add-ons menu. Find “Doc to Form” and click “Create form from doc.” A sidebar appears—this is your control panel.
Setting Up Basic Information
The sidebar asks if you want to collect usernames, email addresses, teacher names, student names. Here’s the thing: you decide based on your needs.
Teaching multiple classes? Maybe ask for the class name so you can sort responses later.
Want accountability? Collect email addresses.
New students you don’t know yet? Ask for names.
For most teachers, collecting email and student name is enough. Keep it simple.
Building Your Questions
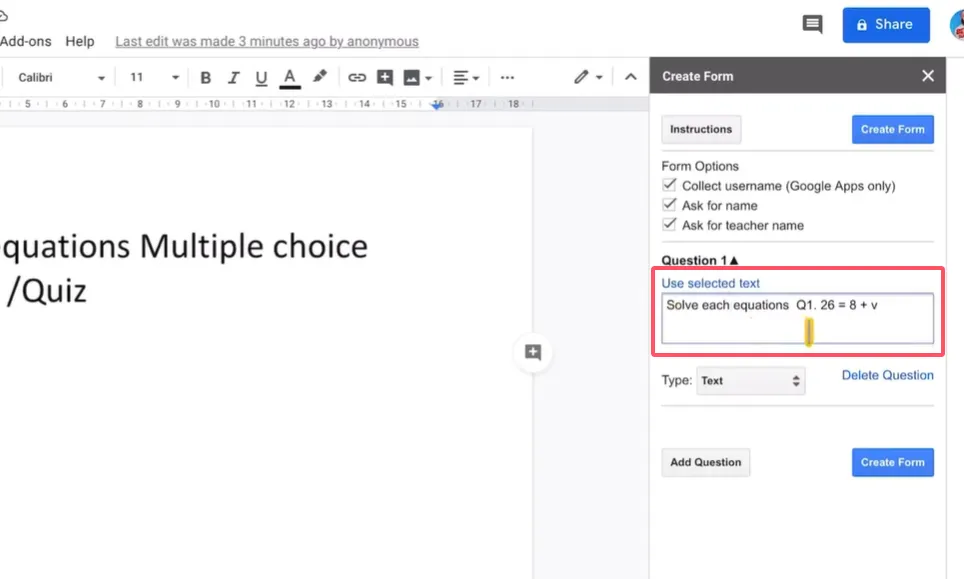
Here’s where it gets fun. For Question 1, highlight the question text in your document—include the instruction if there is one (like “Solve each equation”). Don’t copy it. Just select it.
Back in the sidebar, click “Use selected text.” Boom. Your question appears.
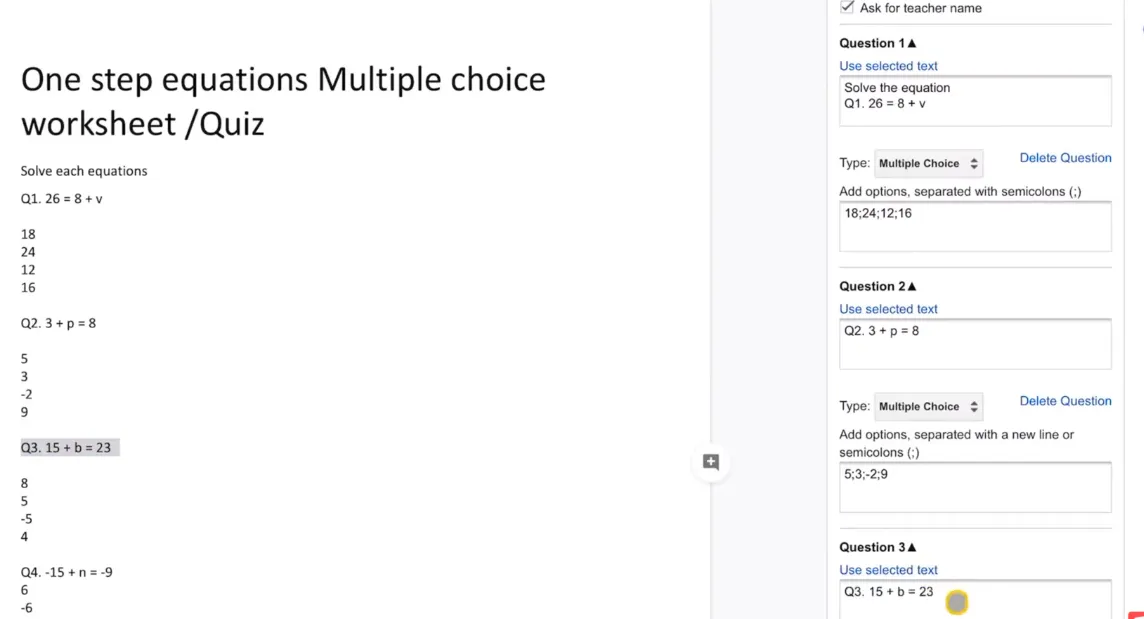
Now for the answers. You’ve got options: multiple choice, checkboxes, dropdown, short answer. For a typical quiz, multiple choice is your friend.
Here’s the format: Copy your answer choices and paste them in the answer field. Separate each choice with a semicolon. So if your answers are 12, 18, 24, and 30, you’d type: 12;18;24;30
The semicolon tells Google “these are separate options.” Simple, right?
Repeat this for each question. Select the question text. Choose your answer format. Add the answers with semicolons. It becomes rhythmic after a couple questions—you’ll get into a flow.
Working through a 10-question quiz takes maybe five minutes once you get the hang of it. Way faster than creating a Google Form from scratch.
Creating the Form
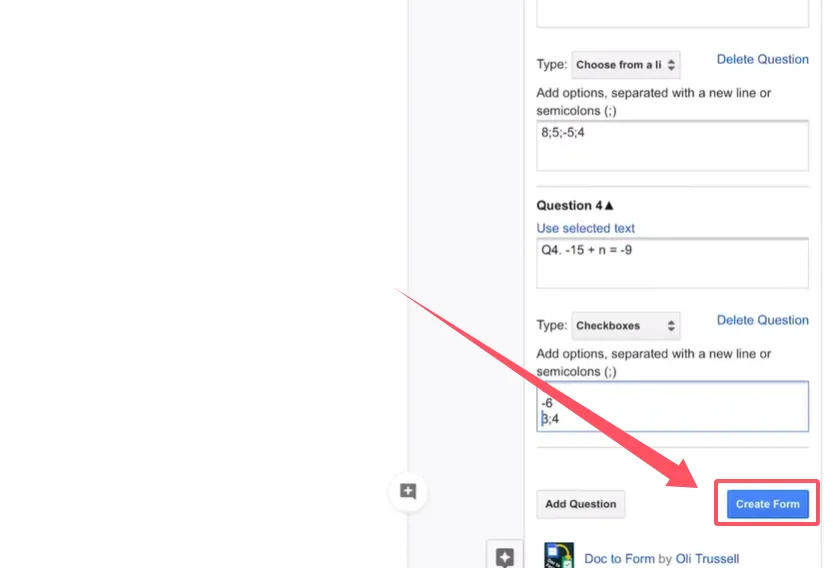
Once all your questions are set up, click the big “Create the form” button at the bottom of the sidebar.
Google thinks for a second. Then: success. Your form has been created and saved to Google Drive. Click the link to open it.
There’s your quiz, looking professional and polished. All those questions you just set up are now in a proper Google Form. But we’re not done yet.
Converting Your Form into a Self-Grading Quiz
Right now, you’ve got a form. But you want a quiz—one that grades itself and gives students immediate feedback. Here’s how to make that happen.
In your Google Form, click the Settings gear icon (top right). Go to the “Quizzes” tab.
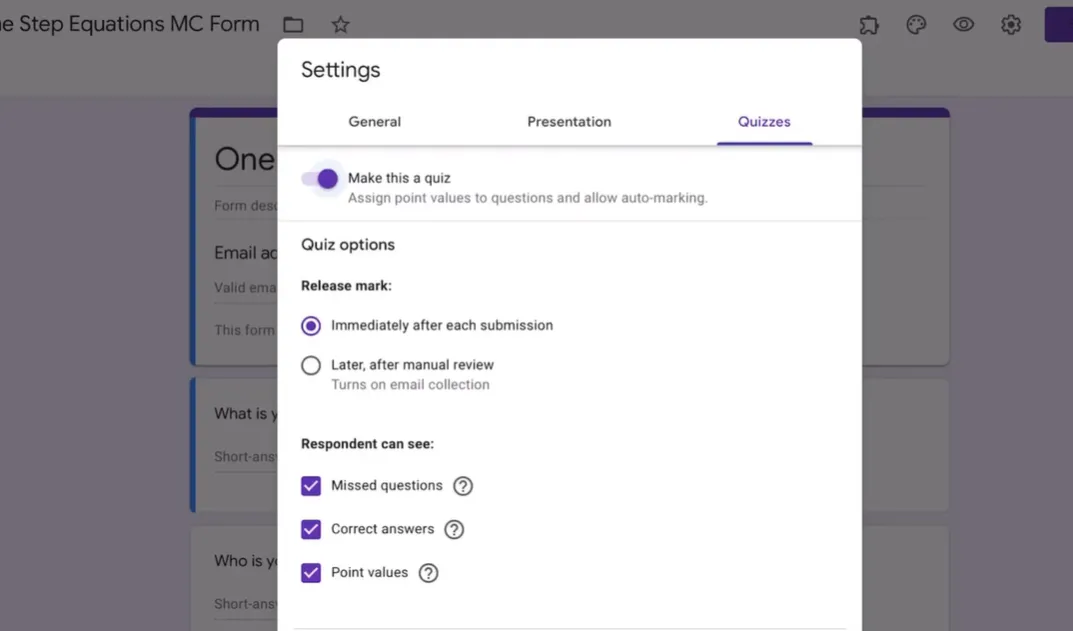
Toggle on “Make this a quiz.” Suddenly, new options appear.
Configuring Quiz Settings
You can choose when students see their results:
Immediately after submission: Students get instant gratification (or disappointment). Great for practice quizzes where learning is the goal.
Later, after manual release: You review everything first, maybe add comments, then release scores. Better for high-stakes assessments.
For self-grading quizzes, go with immediate feedback. Check the boxes for “Missed questions,” “Correct answers,” and “Point values.” Transparency helps students learn.
Click “Save.”
Setting Answer Keys
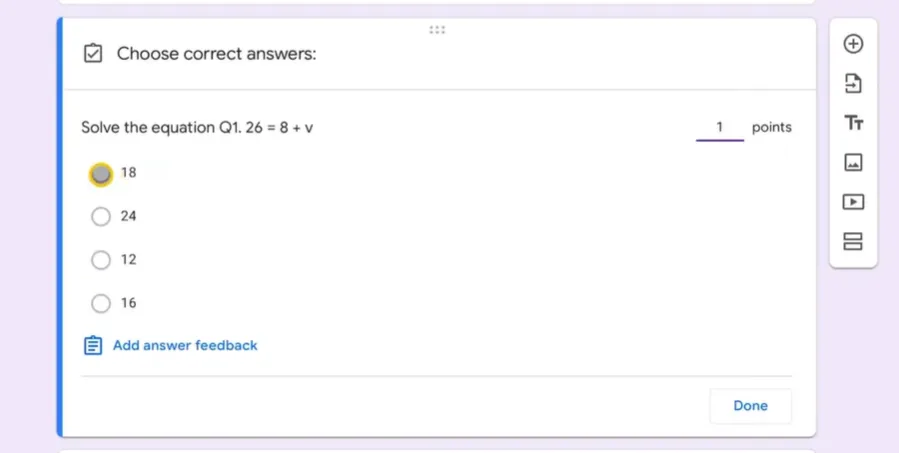
Now click on your first question in the form. You’ll see a new option: “Answer key.” Click it.
Assign points to the question—most teachers use 1 point per question, but you do you. Then click the correct answer. Remember that strategic setup where all your correct answers were first? This is why. You know exactly which one to click.
Click “Done.”
Repeat for every question. Yes, it’s a bit tedious. But it’s way less tedious than grading 30 students’ paper quizzes by hand, so… perspective.
Making Questions Required
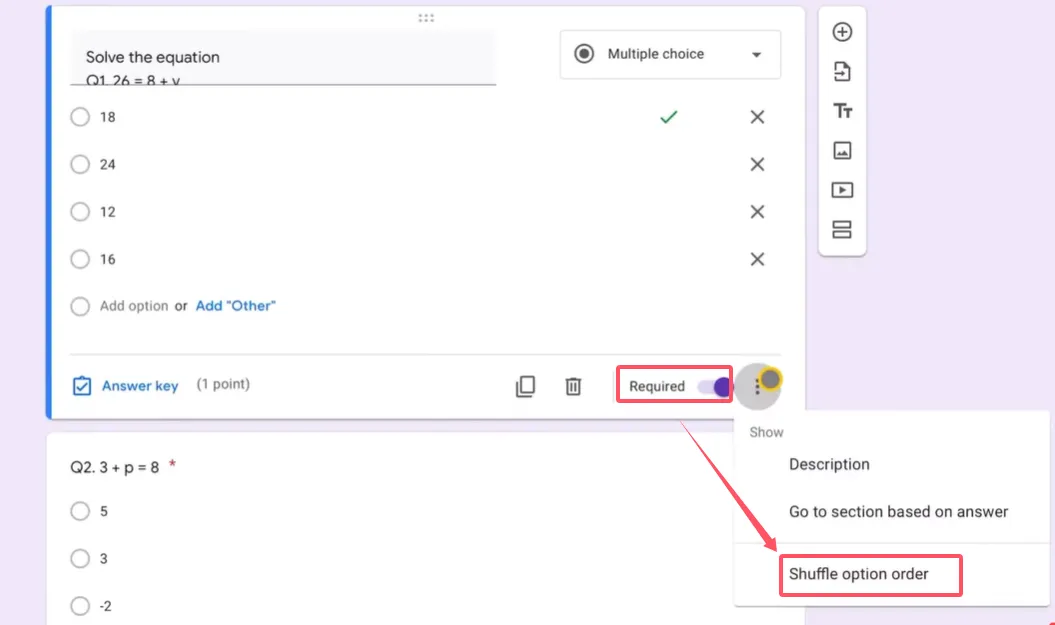
For each question, you’ll see a “Required” toggle at the bottom. Turn it on. This prevents students from skipping questions (intentionally or by accident).
Advanced Tips for Better Quizzes
Shuffle Answer Options
Here’s a neat trick. Click the three dots in the bottom-right corner of any question. Select “Shuffle option order.”
Now every student sees the answers in a different order. The correct answer isn’t always “A” or always “the first one.” This reduces cheating and forces students to actually read the options.
Do this for every multiple-choice or checkbox question.
Preview Before Sharing
Before you unleash this quiz on your students, click the eye icon at the top to preview it. Fill it out yourself. Make intentional mistakes. See what the feedback looks like.
Submit the preview quiz and check your score. Does the grading work correctly? Do the right answers show up? Is the feedback clear?
The Better Alternative: OnlineExamMaker AI Quiz Maker Tool
Now, everything I just showed you works. It’s free, it’s built into Google’s ecosystem, and for basic quizzes, it’s absolutely fine. But let’s talk about what happens when you want more.
What if you could convert Word documents to quizzes using AI?
OnlineExamMaker takes the concept of document-to-quiz conversion and supercharges it. Instead of manually selecting each question and typing in semicolon-separated answers, you upload your Word document and the AI does the heavy lifting.
What Makes OnlineExamMaker Different?
Intelligent question extraction. The AI reads your document and automatically identifies questions and answers. It understands context—even if your formatting isn’t perfect.
More question types. True/false, fill-in-the-blank, matching, essay questions, even video response questions. Google Forms is limited; OnlineExamMaker isn’t.
Advanced analytics. You don’t just get scores. You get insights: which questions students struggle with most, how long they spend on each question, patterns in wrong answers that reveal misunderstandings.
Question banks. Build a library of questions you can mix and match. Create randomized quizzes where every student gets different questions from the same topic pool. This makes academic integrity way easier.
Professional presentation. The quizzes look polished and branded. You can add your school logo, customize colors, create a professional assessment experience that doesn’t scream “free Google tool.”
For teachers handling high-volume assessments, HR managers conducting training evaluations, or anyone running serious quizzes, OnlineExamMaker represents the natural evolution of the Google Forms approach. It keeps the convenience, adds intelligence, and delivers professional-grade results.
Think of it this way: Google Forms with Doc to Form is like learning to ride a bike with training wheels. OnlineExamMaker is the carbon-fiber road bike you graduate to once you realize how much faster you could be going.
Create Your Next Quiz/Exam Using AI in OnlineExamMaker
How to Convert Word Document into a Quiz Using OnlineExamMaker AI?
OnlineExamMaker’s AI Question Generator tool can help exam organizers turn a Word file into responsive quiz in minutes, this is the step-by-step guide.
Step 1: Upload a Word Document

Go to OnlineExamMaker AI Question Generator, then upload a Word document, select question type, OnlineExamMaker AI will automatically generate questions based on the document.
Step 2: Create a Quiz
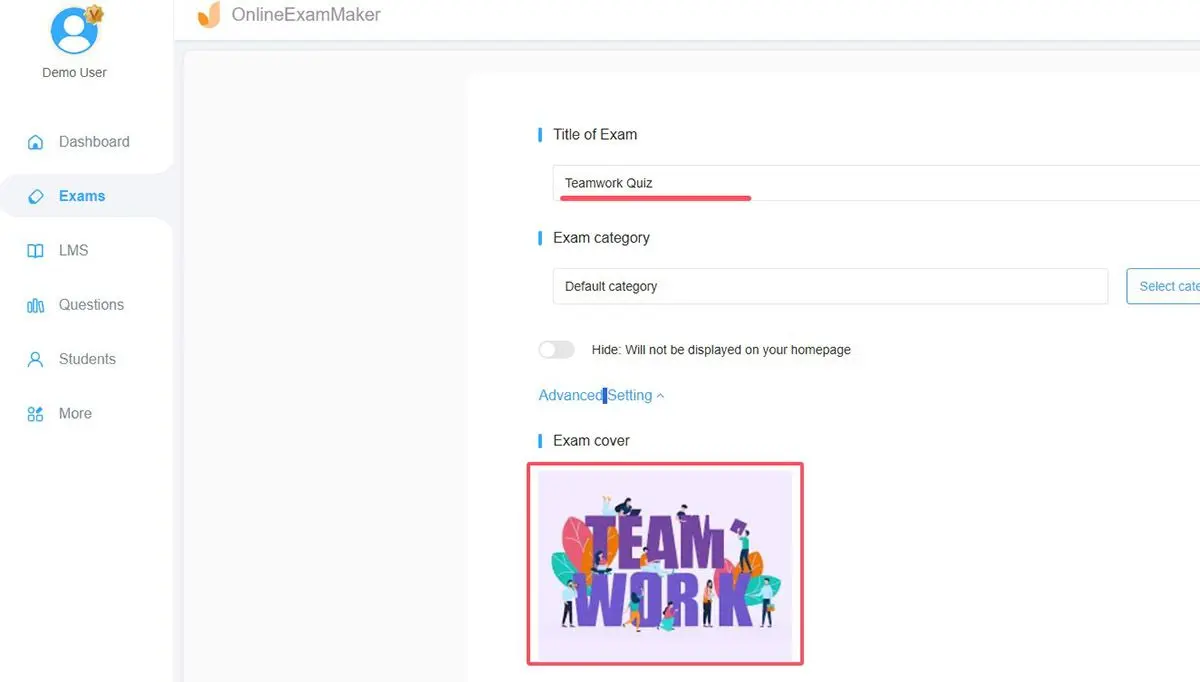
Press “New exam” button to set up a new quiz, and edit quiz title, description, and upload a cover image. After a quiz is created, you can add the questions you created in the step one to the quiz.
Step 3: Set Exam Settings
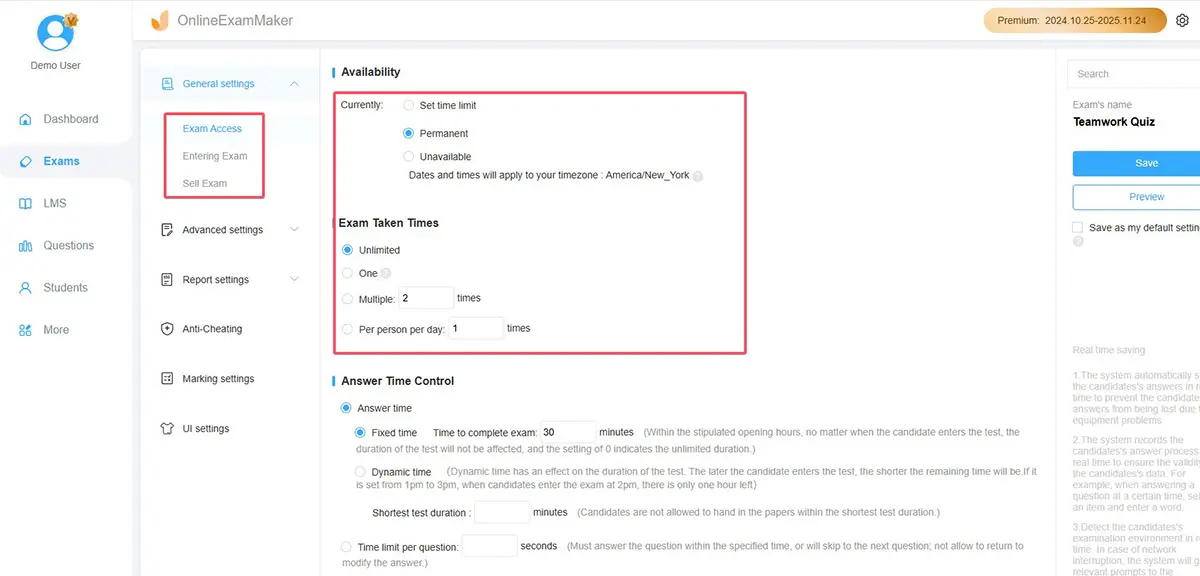
Configure quiz time, access setting, passing score, invitation emails, passing standard, and active date.
Step 4: Publish and Release
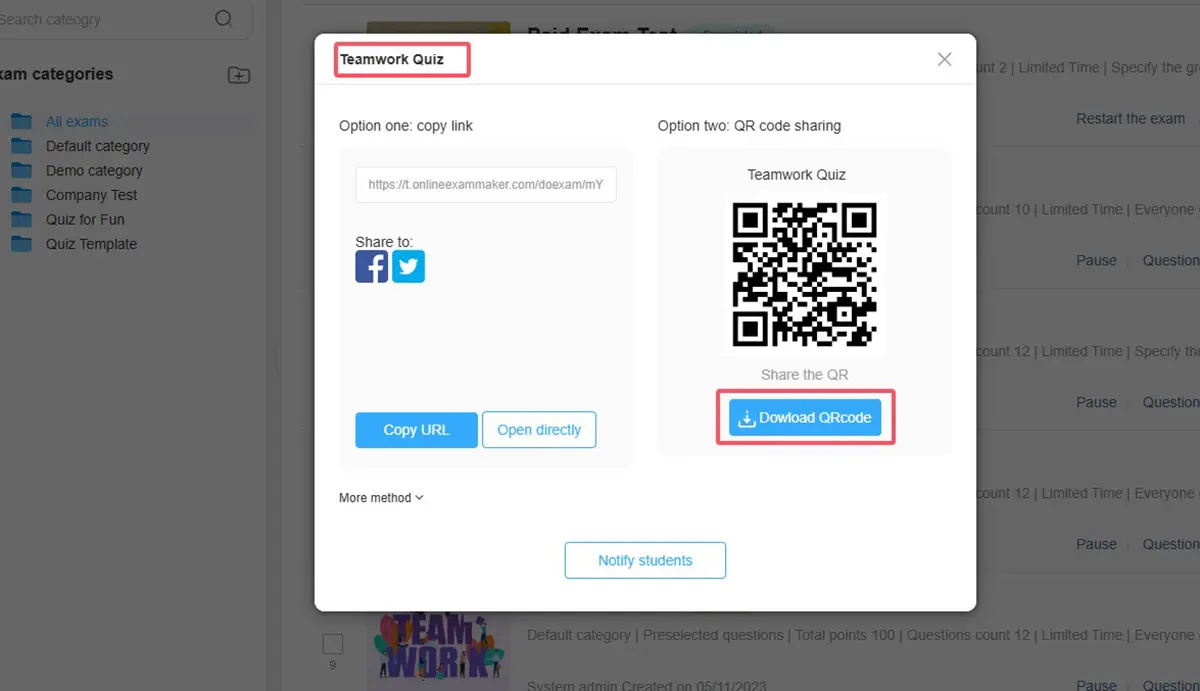
Save exam settings, then publish the test and allow the users to access the exam. After the quiz is live, you can share the direct link or QR code with your studnets.
FAQs about Converting Document into Quiz
Can I edit the form after creating it from my Word document?
Absolutely. Once the form is created, it’s just a normal Google Form. You can add questions, delete questions, change formatting, insert images, embed videos—whatever you want. The Doc to Form add-on just gives you a head start.
What happens if my Word document has images or diagrams?
Images don’t transfer automatically through Doc to Form. You’ll need to add them manually to your Google Form after creation. Click on a question, then click the image icon to insert relevant graphics. It’s an extra step, but not a dealbreaker.
Can students see the correct answers before they submit?
Not unless you configure it that way. In the quiz settings, you control when students see results and what information they get. The default setup shows them feedback only after submission.
Does this work with other question types like essay questions?
Doc to Form handles multiple choice, checkboxes, and dropdown questions best. For paragraph or short-answer questions, you’ll need to add those manually in Google Forms. The add-on focuses on structured answer formats that can be auto-graded.
How do I share the quiz with my students?
Click the “Send” button at the top of your Google Form. You can share via email (enter student addresses), generate a link to post anywhere, or embed the form on a website. Most teachers just copy the link and paste it in their learning management system or class chat.
Can I reuse the same quiz for different classes?
Yes. You can send the same form link to multiple groups. If you want to track responses by class, add a question asking students to identify their class section. Or create duplicate forms (File > Make a copy) and give each class its own version for separate response tracking.
What if I need to change an answer after students have already taken the quiz?
You can edit answer keys anytime in the Google Form. However, this doesn’t retroactively change scores for students who already submitted. You’d need to manually adjust their grades in the Responses section or ask them to retake the quiz.
Is Doc to Form free?
Yes. It’s a free Google Workspace add-on. No hidden costs, no premium tiers. You just need a Google account.
Can I limit when students can access the quiz?
Google Forms doesn’t have built-in time restrictions, but you can use Google Forms add-ons like “formLimiter” to set opening and closing dates. Or simply share the link only during your desired time window and use the form settings to stop accepting responses when you’re done.
How secure is this for assessments?
Google Forms has basic security—you can require sign-in (so only people with specific email domains can access), limit to one response per person, and shuffle questions. For high-stakes testing, you might want more robust proctoring solutions. For classroom quizzes and formative assessments, it’s perfectly adequate.
Converting Word documents to Google Forms quizzes transforms static assessments into dynamic, self-grading tools that save time and improve student feedback. Whether you use the free Doc to Form approach or level up with AI-powered platforms like OnlineExamMaker, the core principle remains: work smarter, not harder. Your archive of old quizzes isn’t gathering dust—it’s waiting to be reborn.