It is best to learn when creativity is welcomed in the class! Are you tired of the routinary method of plain discussions in class? Why not try these interactive features of the Canvas LMS Discussion Board? This is an online forum where students and instructors can interact through post messages asynchronously and synchronously. Bring your class to the next level and ensure their participation through prompting insights and giving peer feedback through the Discussion Board. If you want to know more about this amazing feature keep reading this article for the easy steps to follow.
- Steps in Utilizing Canvas LMS Discussion Boards Effectively
- OnlineExamMaker: An Alternative Way to Utilize LMS Discussion Boards Effectively
- How to Embed Media Contents in OnlineExamMaker?
Steps in Utilizing Canvas LMS Discussion Boards Effectively
Step 1:
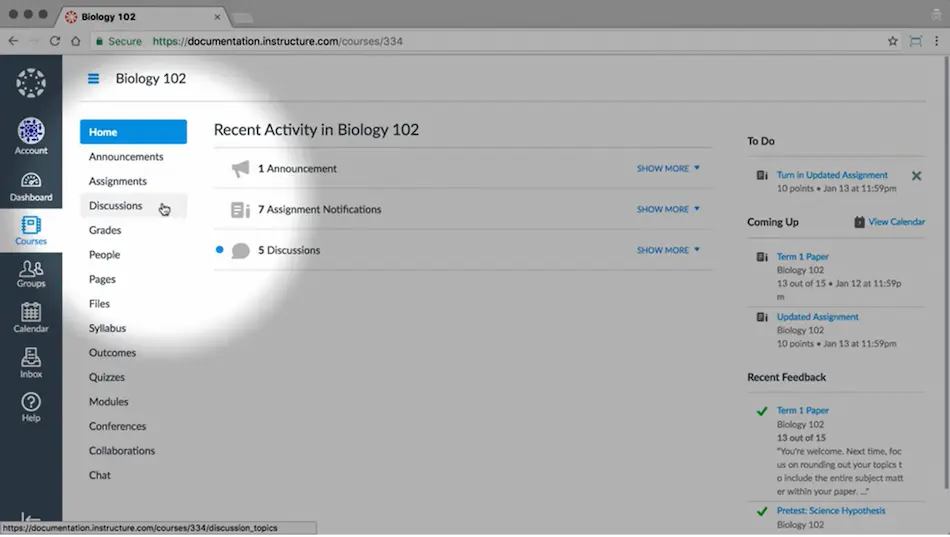
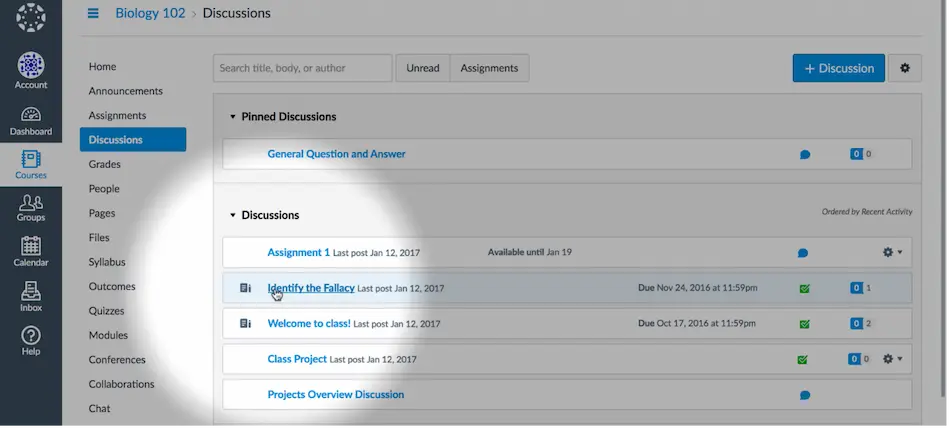
Start by logging in to your Canvas account; go over the “Courses” on the right sidebar; click on “Discussions”, then open “SHOW MORE” to see the types of Discussions.
Step 2:
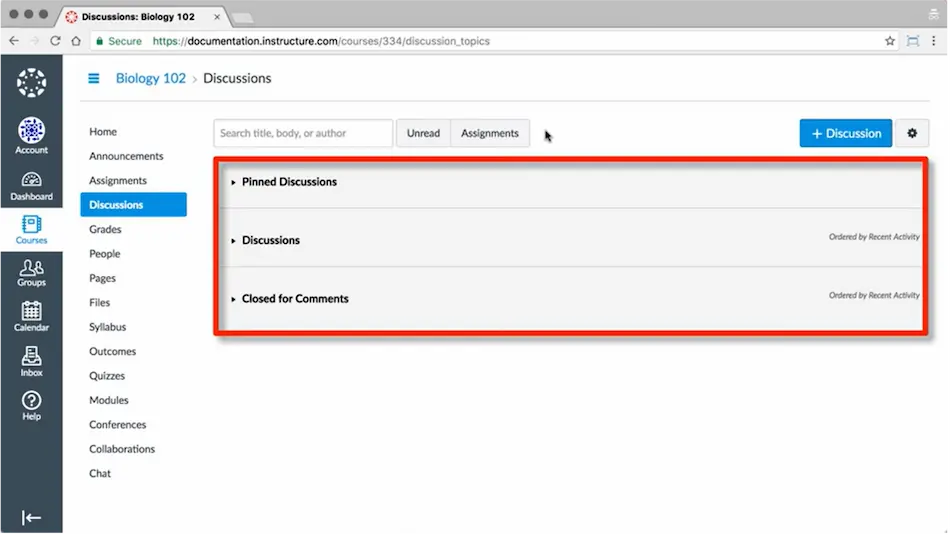
From here, you can choose the type of discussion you want to set up. In “Pinned Discussions”, the topic stays atop, pinned, so it will not be swamped with comments from students and the instructor; “Discussions” displays current discussions within the course; “Closed for Comments” discussions that have been manually closed or its date has passed to reply.
Step 3:
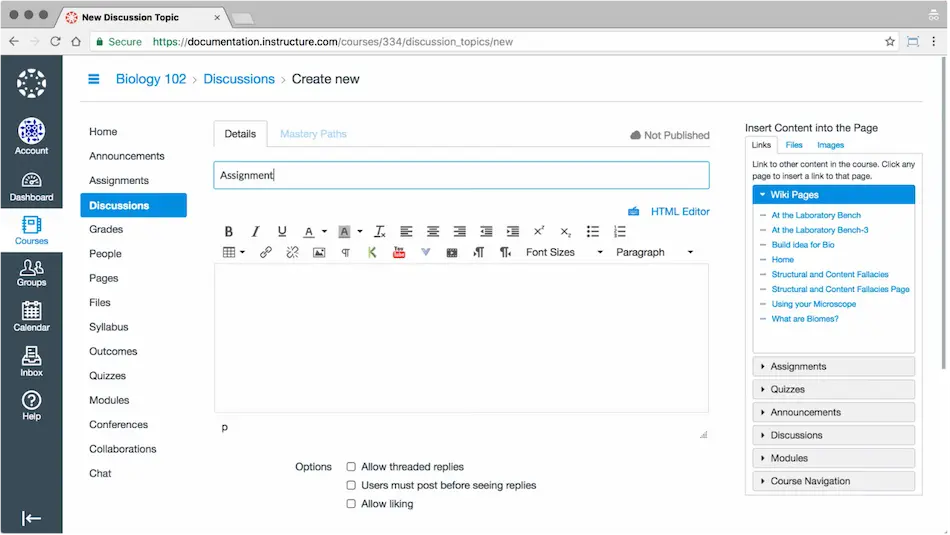
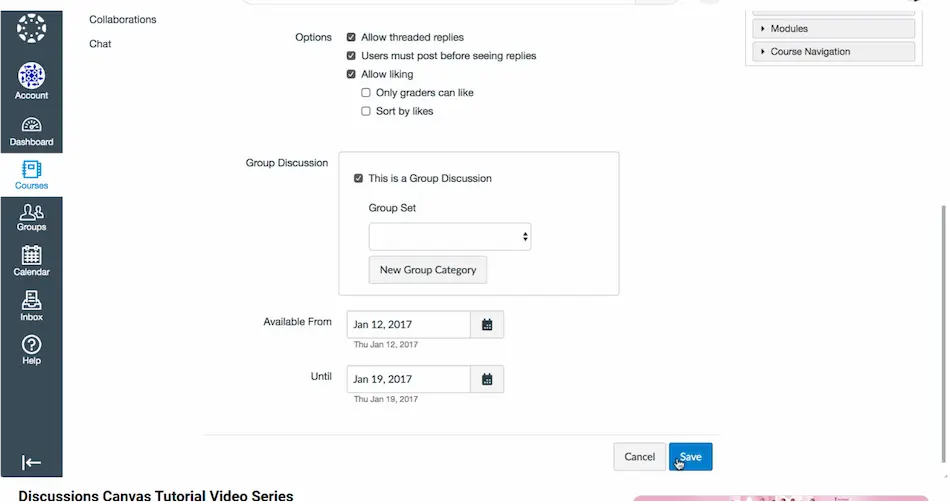
To add a discussion, click the “+ Discussion” beside the setting icon; add the title of your discussion, and then fill it up with the details needed. Then, select the appropriate option for your discussion and save.
Step 4:
Next, select the discussion title you want your students to participate in. Then click “Subscribe” to be notified of their replies.
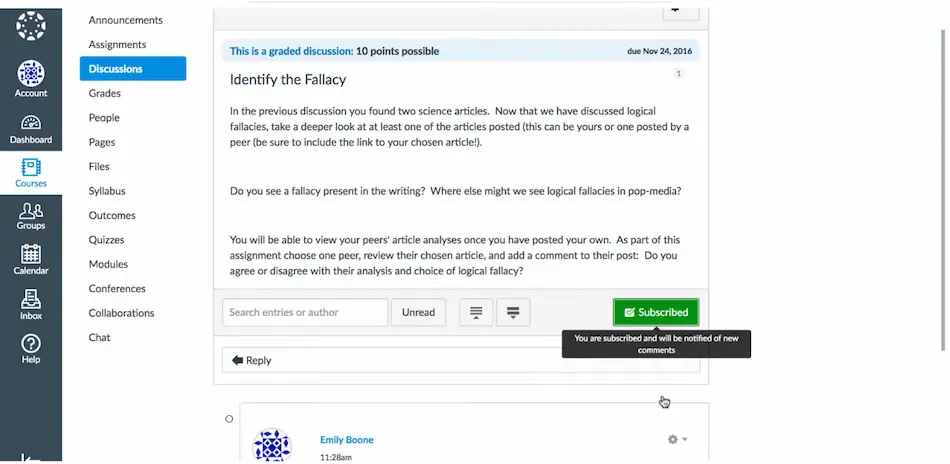
The ongoing discussion could be graded or not it’s up to the instructor how students become more engaged in the topics at hand.
You can now turn the plain discussion into a more fun and interactive one, all by following these simple steps!
OnlineExamMaker: An Alternative Way to Utilize LMS Discussion Boards Effectively
There are plenty of choices when it comes to more effective Discussion Boards online. One alternative platform is the OnlineExamMaker webpage, it is where you may navigate user-friendly features to manage your online teaching and learning experience! This is also a Learning Management System that empowers educators and learners to connect, engage, and collaborate with peers in a challenging online learning environment. So, here’s how the discussion area works in OnlineExamMaker.
How to Embed Media Contents in OnlineExamMaker?
Step 1:
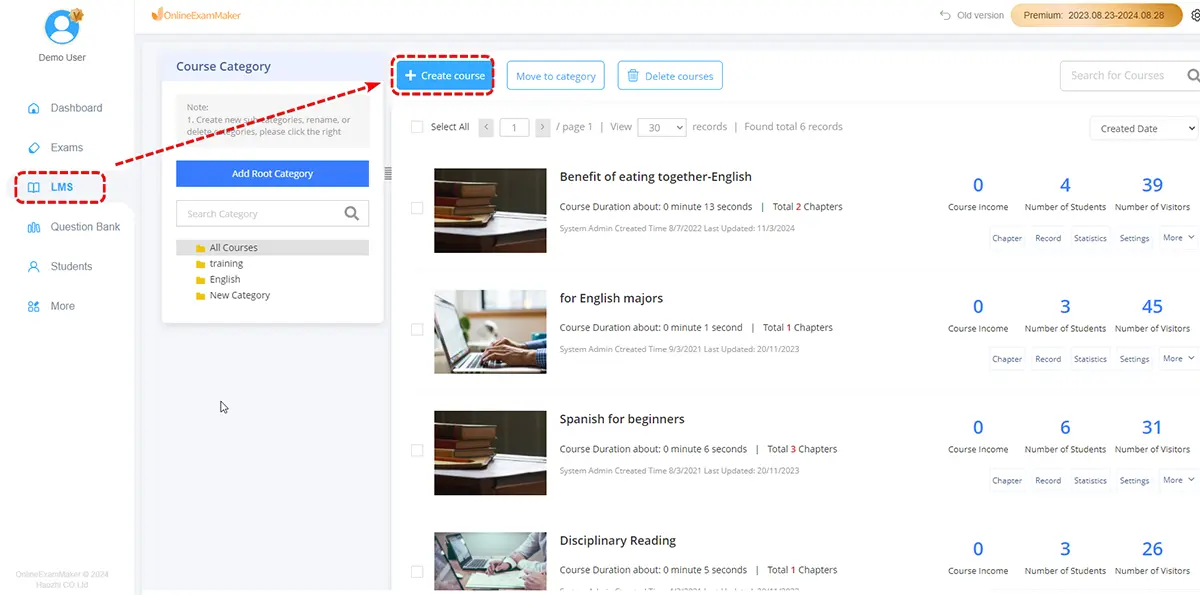
The first step is to log in to your OnlineExamMaker account; then go to the “Courses” and find the title to set off discussion among the class.
Step 2:
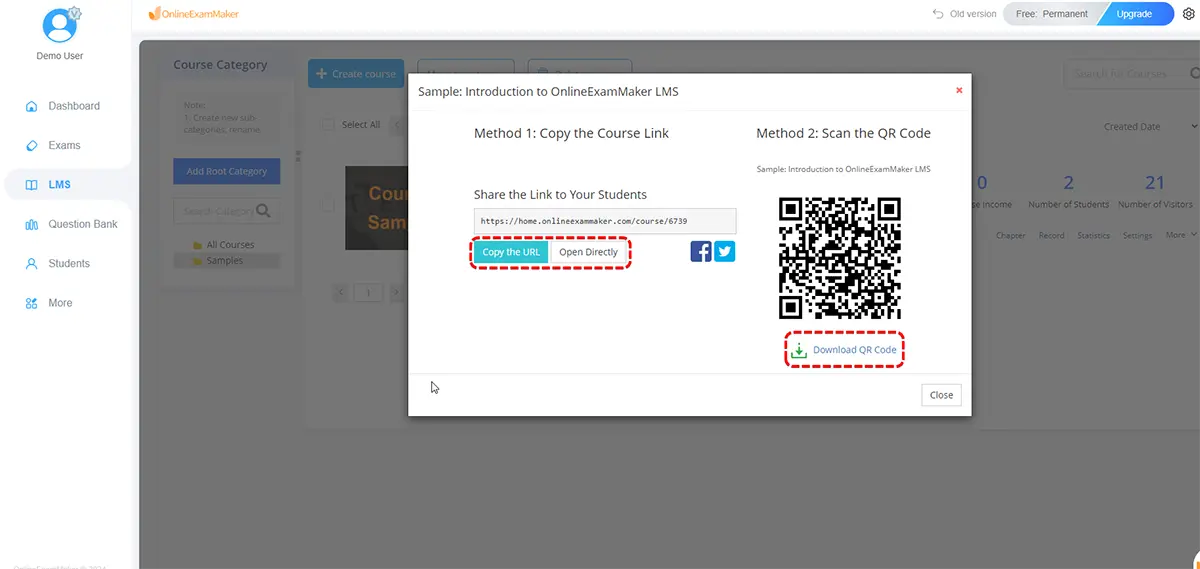
Next, with everything needed in the discussion, click on “Save”, and then share the access to your class through sending the URL or QR code of your discussion.
Step 3:
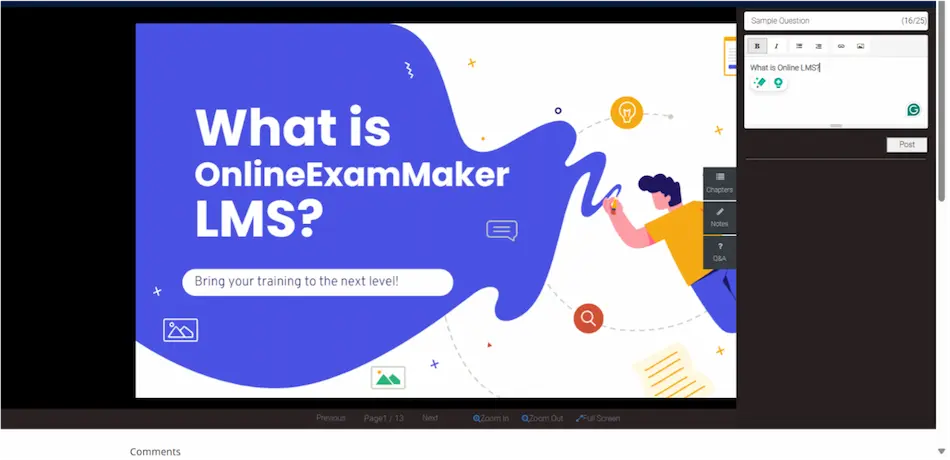
Anyone who has access to your discussion URL or QR code will be prompted to the discussion board where they can participate through a comment, question, or notes about its topic. The other party must click on “Continue Learning” to start off. In this example, infographics are presented on the board. Your students may ask a question by clicking the “Q&A” button on the left side of the board, take “Notes”, see the “Chapters”, and “Comment” on the presentation.
Step 4:
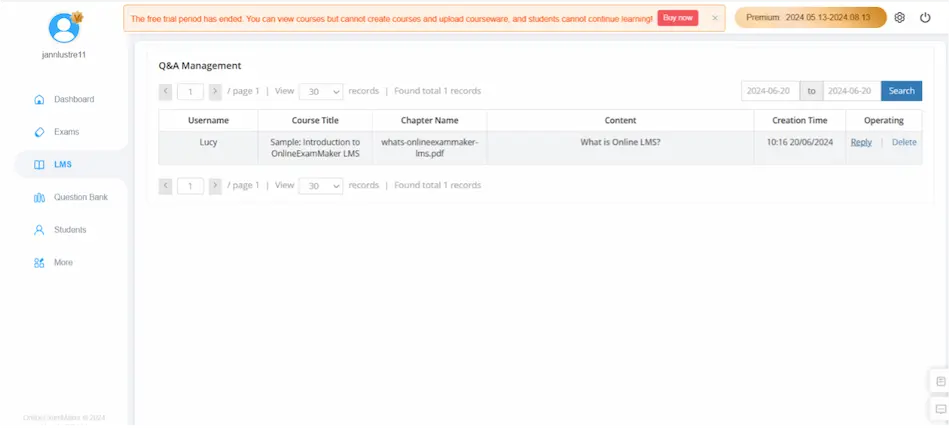
If you wish to see who’s actively participating, go to the list of courses, then from your chosen topic, click on “More”; choose Manage Q&A where you will see questions coming from your students and you may also answer their questions for a guided discussion. You get to see the summary of their question which you can answer. Just click “Reply” then type your answer to a specific question.
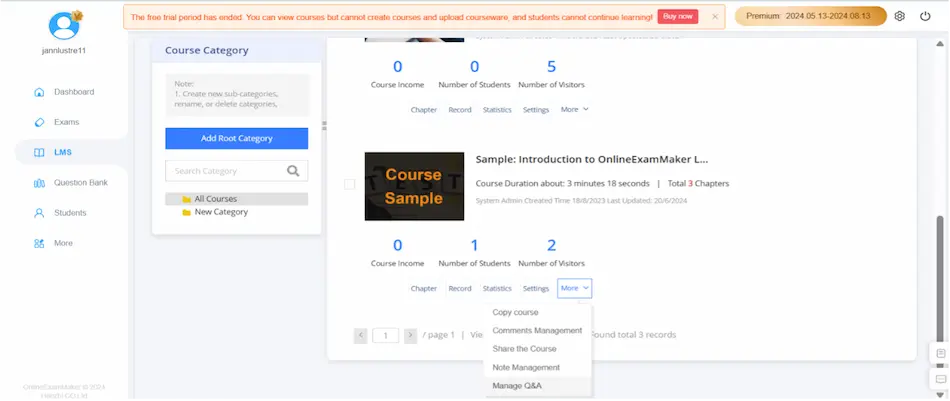
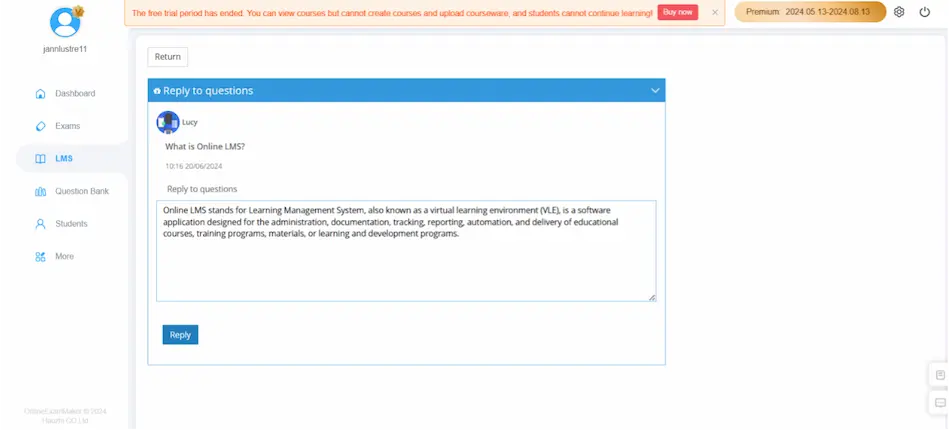
Go to the list of courses then find “More” from your chosen course to manage the comments and notes of your students.
Tips for Using LMS Discussion Boards Effectively
Plan Discussion’s Content and Schedule
It’s better to plan on what and when to discuss with your students so you can have a straight track toward learning a certain topic. Avoid the rush and disorganized content that might lead to out-of-the-topic responses on your students’ end.
Set Goals and Expectations
Provide guidelines for discussion post length, tone, etiquette, and citation of sources.
Communicate what you expect from your students to achieve.
Promote Critical Thinking
Encourage students to practice their critical thinking skills through your open-ended questions.
Prompt necessary questions to help them give a more tailored response. Guide students to relate your discussion to their real-life scenarios so they can see its relevance.
Stay Engaged
As an instructor, you have to be present and actively manage your discussion. You are the one to guide and moderate the discussion to make sure it stays on track.
Educate Students Good Netiquette
Set a culture of respect, understanding, and responsibility in your discussion boards. Let everybody know the importance of reading and thinking before posting their thoughts. You can collaborate with them to make some rules during your discussions.
Isn’t this discussion more interesting and engaging? You can now have your students’ responses in real-time or asynchronously without a sweat! Just follow these quick and easy steps and you’re all set to an interactive and deeper discussion. Explore this cool online learning platform called, OnlineExamMaker now for effective participation in your class!