Selling quizzes online can be a lucrative way to engage your audience and generate revenue. By integrating a quiz with WooCommerce, a popular e-commerce platform for WordPress, you can create a seamless purchasing experience. This article guides you through the process of setting up and selling a quiz using WooCommerce and the Quiz Maker plugin.
- Benefits of Selling Quizzes or Courses in WooCommerce
- Step-by-Step Guide to Sell A Quiz via WooCommerce
- Tips for Selling Exams or Courses in WooCommerce
- An Alternative Way to Sell Exams Online Using OnlineExamMaker

Benefits of Selling Quizzes or Courses in WooCommerce
Selling quizzes or courses through WooCommerce offers numerous advantages for course creators and businesses looking to monetize their expertise. Below are the key benefits, based on the flexibility, functionality, and cost-effectiveness of WooCommerce as an eCommerce platform integrated with a WordPress-based Learning Management System (LMS):
1. Cost-Effective and Open-Source:
WooCommerce is a free, open-source WordPress plugin, allowing you to set up an online store without significant upfront costs. While premium extensions or hosting may incur fees, it remains a budget-friendly option compared to platforms like Teachable or Udemy, which charge subscription or transaction fees. This affordability maximizes profit margins, especially for small businesses or individual creators.
2. Full Control and Ownership:
Unlike third-party platforms that may impose restrictions or risk account suspension, WooCommerce gives you complete ownership of your course content, student data, and website. This ensures you retain control over your business without relying on external platforms that could change terms or shut down.
3. Wide Range of Payment Gateways:
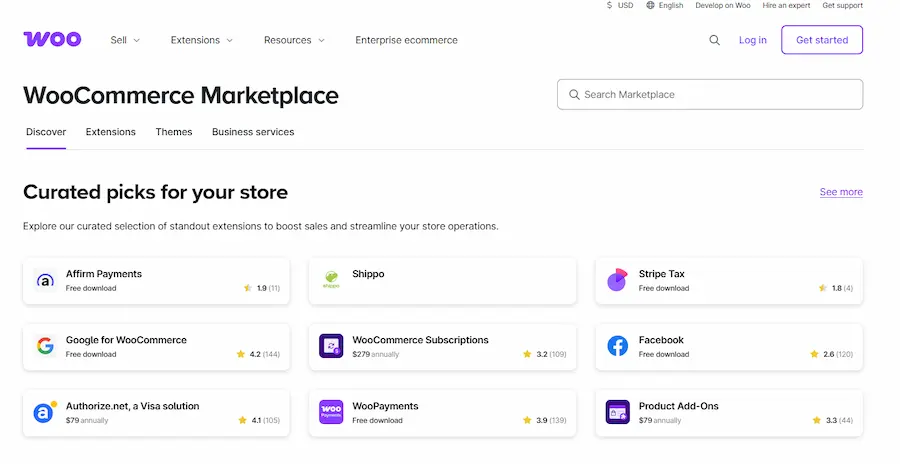
With support for over 100 payment methods (e.g., PayPal, Stripe, Razorpay), WooCommerce makes it easy for students globally to purchase your quizzes or courses. You can also offer discounts, coupons, or custom payment options, increasing accessibility and sales potential.
4. Global Reach and Scalability:
Selling online courses and quizzes through WooCommerce removes geographical barriers, allowing you to reach a worldwide audience. The platform is scalable, supporting small-scale creators and large institutions alike, with the ability to handle growing student numbers and course catalogs.
5. Community and Support:
WooCommerce benefits from a vast WordPress community, offering extensive documentation, forums, and support resources. This ensures you can troubleshoot issues, access tutorials, or hire experts to enhance your platform.
Create Your Next Quiz/Exam with OnlineExamMaker
Step-by-Step Guide to Sell A Quiz via WooCommerce
Before you begin, ensure you have the following:
WordPress Website: A functional WordPress site.
Quiz Maker Plugin: Install and activate the Quiz Maker plugin (Pro version required for WooCommerce integration).
WooCommerce Plugin: Install and activate the free WooCommerce plugin.
WooCommerce Add-On for Quiz Maker: Obtain the add-on created by the Quiz Maker team for seamless integration.
Pre-Made Quiz: Create a quiz in the Quiz Maker plugin to sell.
Step-by-Step guide to sell a quiz in WooCommerce:
Step 1: Create a product in WooCommerce
1. Navigate to WooCommerce:
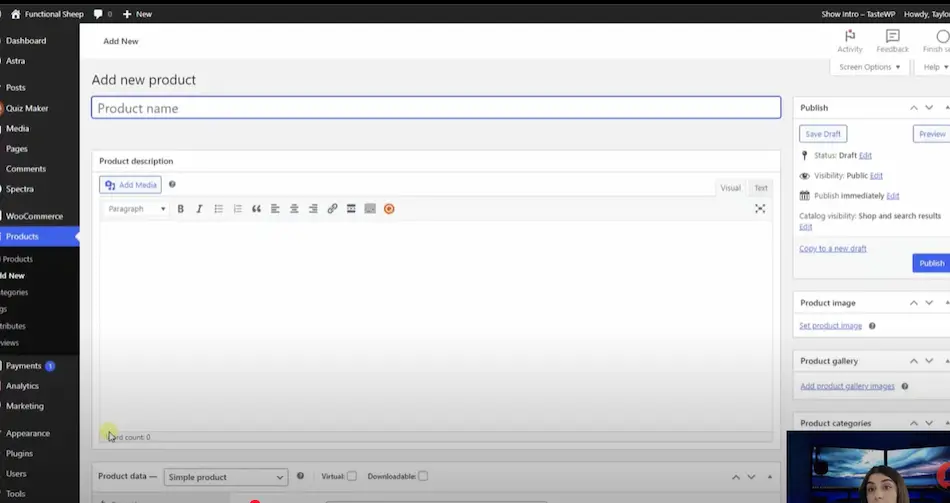
Go to your WordPress dashboard, click on “WooCommerce”, and then select “Products”, and click “Add New” to create a new product.
2. Set Up Product Details:
• Enter a product name, e.g., “Personality Quiz.”
• In the product description, paste the shortcode of the quiz you want to sell. To find the shortcode:
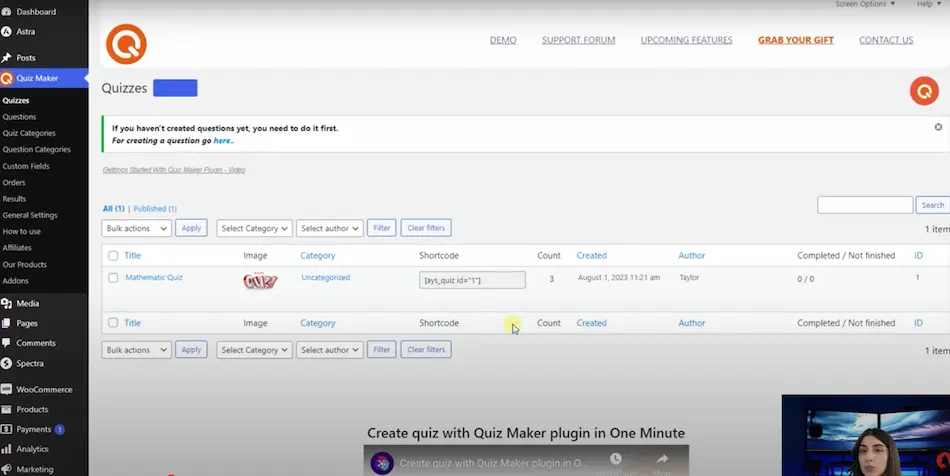
(1) Go to the Quiz Maker dashboard, locate your quiz (e.g., Personality Quiz), and copy its shortcode.
(2) Paste it into the WooCommerce product description field.
• Set a product image by clicking “Set Product Image” and uploading an appropriate image.
• In the “Product Data section, you can set the price of the quiz, and select “Virtual” product type since the quiz is a digital product.
• Save the product as a draft or publish it immediately, depending on your preference.
Step 2: Configure Quiz Maker for WooCommerce Integration
1. Access the Quiz:
In the Quiz Maker dashboard, select the quiz you want to sell.
2. Enable WooCommerce Integration:
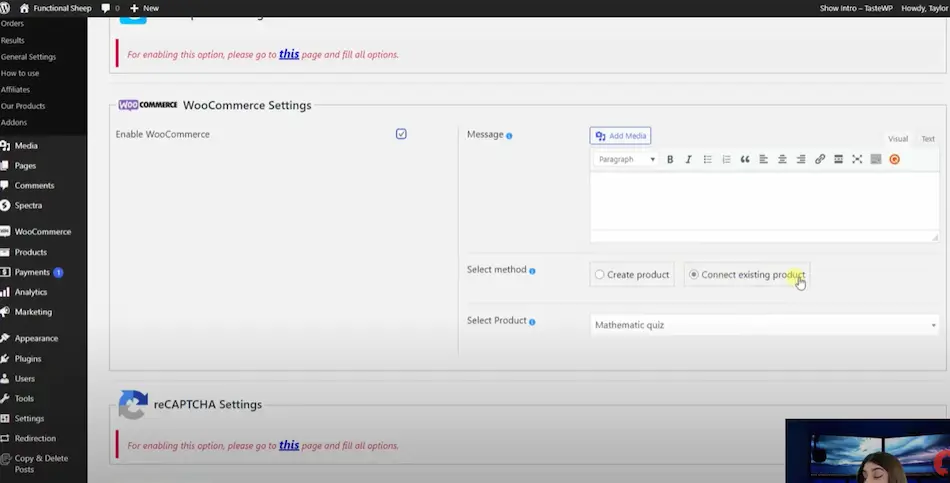
In the WooCommerce settings, you can go to the “Integrations” tab within the quiz settings.Just locate the “WooCommerce” settings tab, then check the box to “Enable WooCommerce”.
Optionally, You can also add a product image and a custom message for the quiz. Click “Connect Existing Product” and select the WooCommerce product you created.
Step 3: Display the Quiz on Your Website
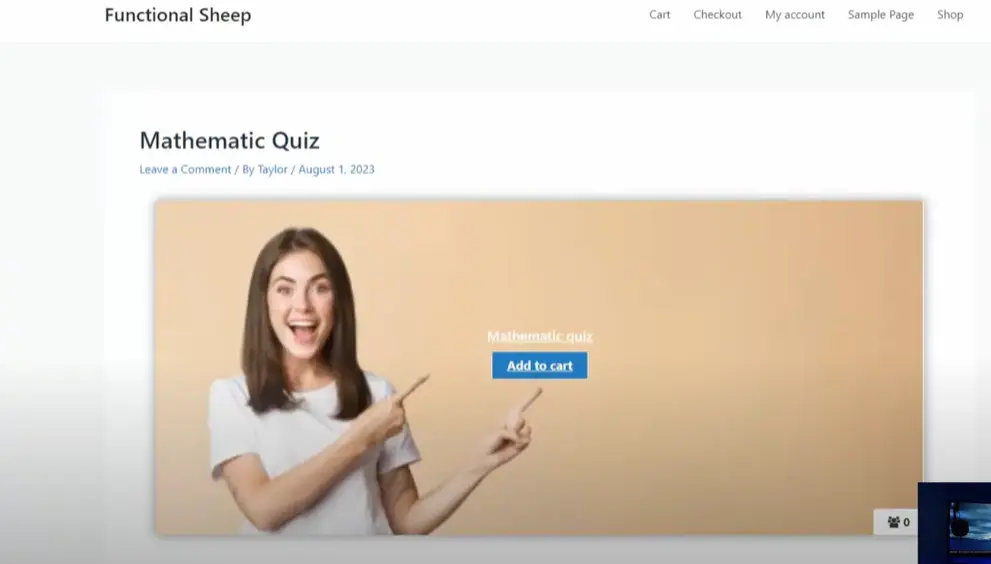
Create a Post or Page:
Go to “Posts” or “Pages” in your WordPress dashboard and click “Add New”. After the page or post is created, you can paste the quiz shortcode into the content area.
Publish and Test:
Save the post/page as a draft or publish it, then click “View Post/Page” to preview it. The quiz will only be accessible after a user completes the purchase process.
Tips for Selling Exams or Courses in WooCommerce
Pro Version Requirement: The Quiz Maker plugin’s Pro version is necessary for WooCommerce integration.
WooCommerce Add-On: Ensure you have the Quiz Maker WooCommerce add-on installed. Links to download these are typically provided by the Quiz Maker team.
Customization: The Quiz Maker plugin allows you to create fully customizable quizzes, such as personality tests, scored quizzes, or level tests, which can enhance their marketability.
Monetization Potential: By investing in the Pro version and add-on, you can create and sell diverse quizzes, potentially doubling your investment through sales.
An Alternative Way to Sell Exams Online Using OnlineExamMaker
OnlineExamMaker is an all-in-one online assessment platform to help teachers and webmasters create paid courses and exams online. The tutorial is structured to guide users clearly through the process of setting up and selling online exams using the platform’s premium features.
Create Your Next Quiz/Exam with OnlineExamMaker
Step 1: Create a Candidate Group for Paid Exams
To sell exams, you need to organize candidates into a group. OnlineExamMaker offers two methods to create a candidate group:
Method A: Create a signup form for new candidates
Create a signup form to collect candidate information and assign new registered users to a group for the paid exam. After creating the form, share its link with candidates to allow them to register and make payments.
Method B: Use an existing student Group
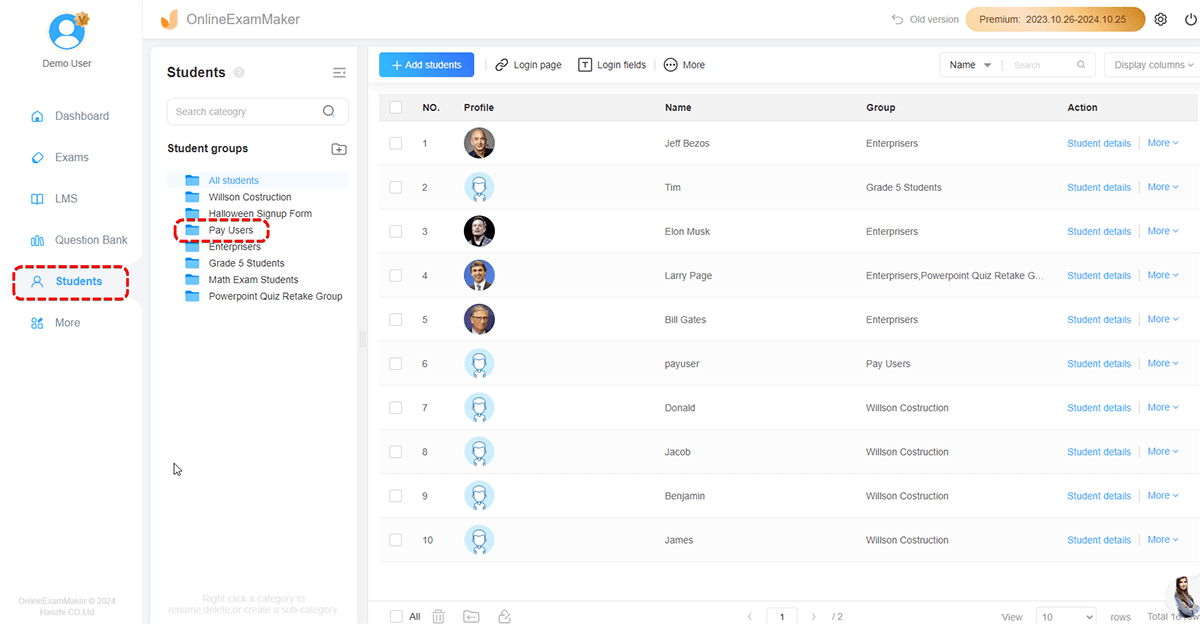
Import student accounts in bulk using an Excel file and segment them into groups for testing. Once student accounts are imported, you can assign the relevant group to the paid exam.
Step 2: Fill in Company Information
Before selling exams, provide your company details to ensure a professional presentation:
From the sidebar, select “More” > “System Settings” > “Company Settings” and add your company logo, name, and website URL. After the settings are setted, you can save the information to update your account profile.
Step 3: Set Up Stripe Payment Gateway
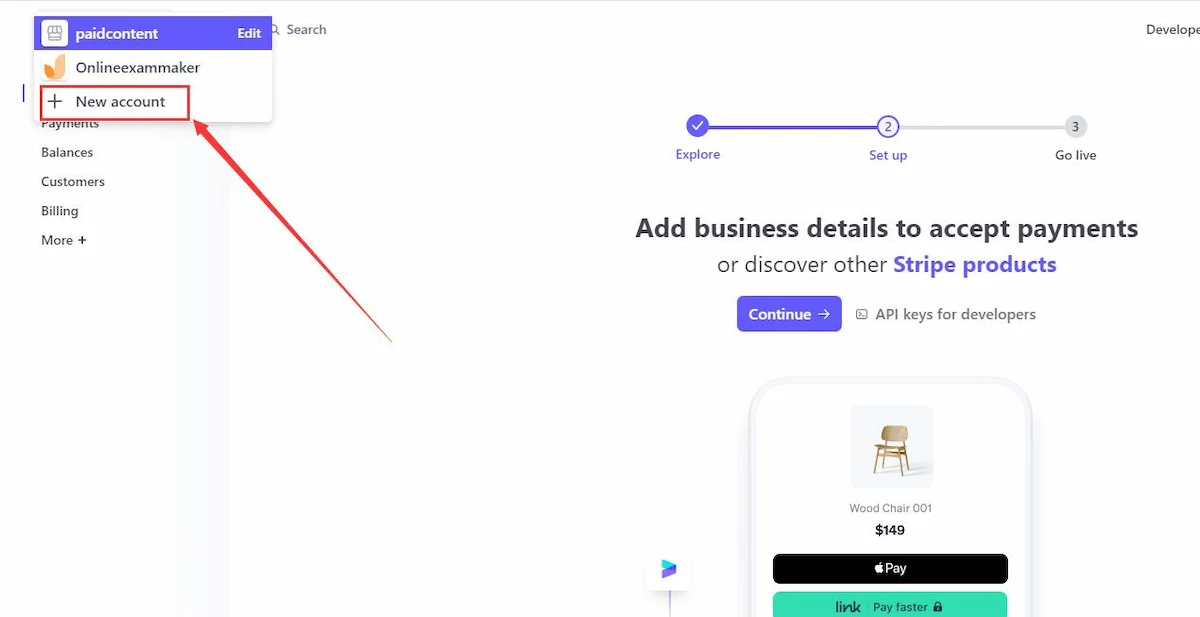
To process payments, integrate OnlineExamMaker with Stripe:
Sign up for a Stripe account at [stripe.com](https://stripe.com) and create a new account in your Stripe dashboard. In the Stripe dashboard, go to “Developers” > “API Keys” to find your “Publishable Key” and “Secret Key”. You can copy both keys and paste them in OnlineExamMaker system settings.
Step 4: Configure Sell Exam Settings
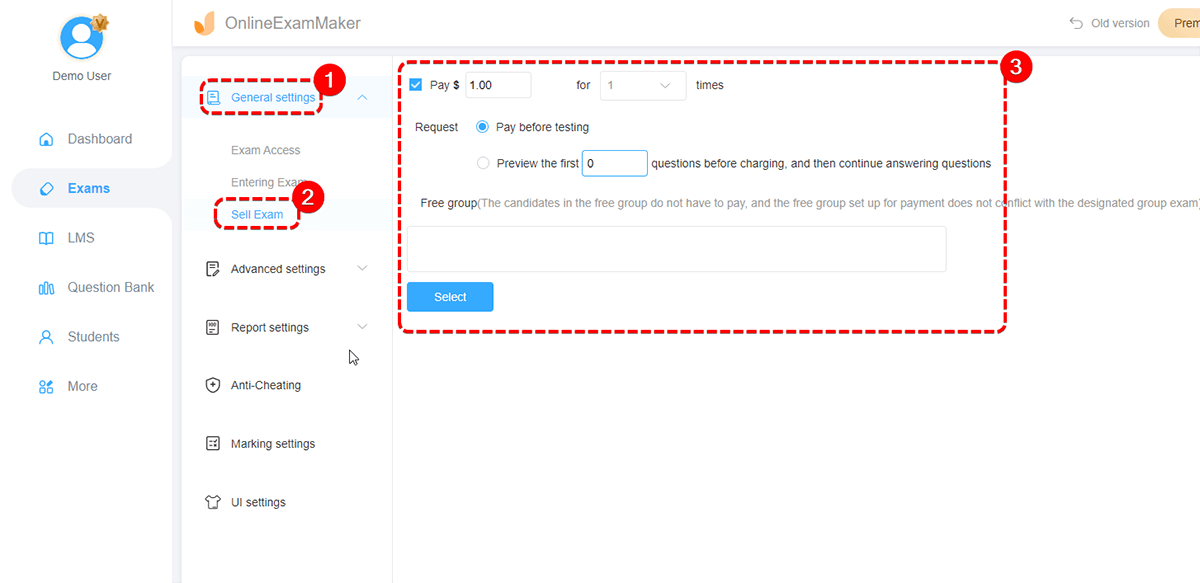
Set up the exam for sale:
Go to “Exams” > “All Exams” in the OnlineExamMaker dashboard, you can select an existing exam or create a new one by clicking “+ New Exam”. You can set the price in this step
Step 5: Assign the Exam to a Candidate Group
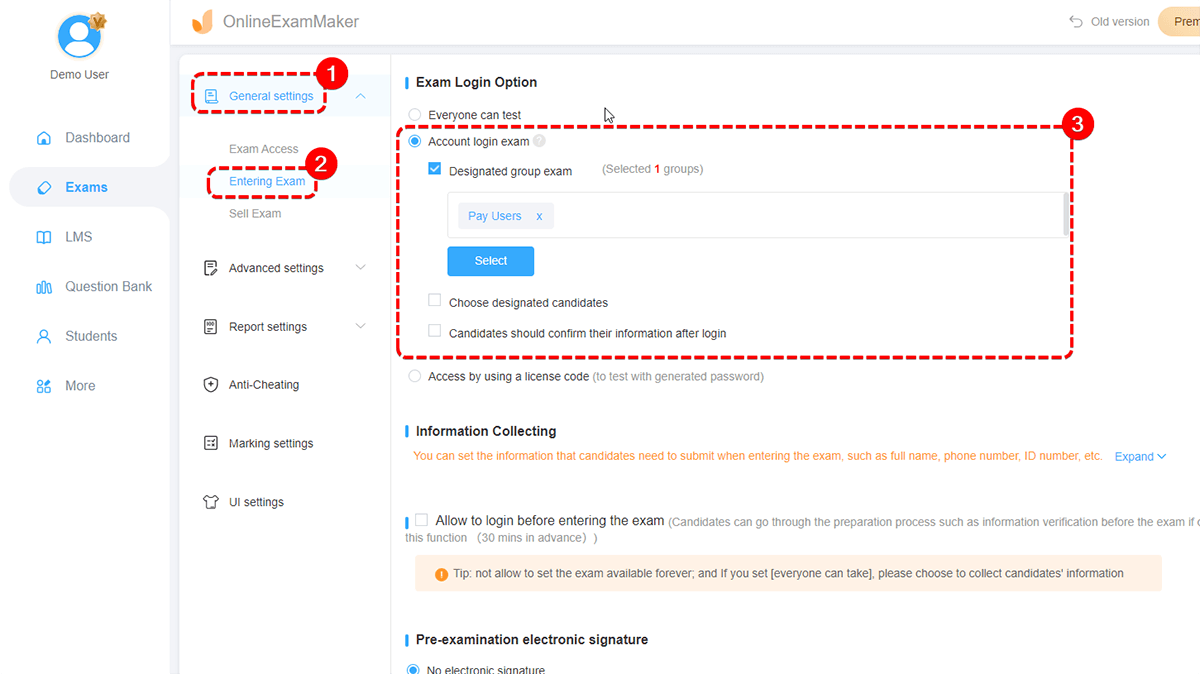
In orderto link the exam to the appropriate candidate group, you are required to select the candidate group (created in Step 1) to restrict access to designated candidates. Then save the settings to ensure only group members can take the paid exam.
Step 6: Share the Exam with Candidates
Share the exam link directly with candidates in the designated group. So candidates can access the exam after completing payment via the Stripe gateway.
Conclusion
Selling a quiz through WooCommerce is straightforward with the right tools. By leveraging the Quiz Maker plugin and its WooCommerce integration, you can create engaging, customizable quizzes and offer them as virtual products on your WordPress site. Follow the steps above to set up your quiz, connect it to a WooCommerce product, and start monetizing your content today.
If you want to save time and money, you can choose OnlineExamMaker solution, it is easy to use and zero commission, you can get 100% revenue from your orders.