Think about you create the perfect assessment, students complete it with enthusiasm (or at least compliance), and then you’re stuck clicking through dozens of submissions, tallying points, and second-guessing whether that creative answer to question seven deserves partial credit.
What if I told you there’s a better way? Google Forms has a built-in automatic grading feature that can transform your quiz workflow from hours of tedious work into minutes of smart setup. Whether you’re a teacher managing classroom assessments, a trainer evaluating employee knowledge, or an HR manager screening candidates, automatic grading isn’t just convenient—it’s practically essential in our fast-paced world.
- Why Automatic Grading Changes Everything?
- Step-by-step Guide to Set up Automatic Grading in Google Forms
- Understanding Auto-Grading Limitations
- OnlineExamMaker: The AI-Powered Alternative
Why Automatic Grading Changes Everything?
Think about the last time you graded a stack of quizzes. How long did it take? An hour? Two? Now imagine that same task completed in seconds, with perfect consistency and zero human error. That’s the promise of automatic grading.
But here’s what really matters: time saved is time gained. Instead of spending your evenings marking papers, you could be designing more engaging lessons, providing personalized feedback, or—radical thought—actually having a life outside work. For HR professionals conducting large-scale assessments, the efficiency gains are even more dramatic. What used to take days now happens instantly.
The benefits extend beyond mere convenience. Automatic grading provides immediate feedback to learners, which research consistently shows improves retention and understanding. Students don’t have to wait a week to discover what they missed—they know right away, while the material is still fresh.
Step-by-step Guide to Set up Automatic Grading in Google Forms
Here’s where the magic begins. Google Forms doesn’t automatically know you want to create a quiz—you need to tell it. The process is surprisingly simple, though you’d be amazed how many people miss this crucial first step.
Select Quiz Mode in Google Forms
Step 1: Open your Google Form (or create a new one if you’re starting from scratch). Look for that little gear icon in the top right corner—that’s your settings button. Click it like you mean it.
Step 2: You’ll see several tabs appear. Navigate to the one labeled Quizzes. This is your command center for turning an ordinary form into a powerful assessment tool.
Step 3: Toggle the switch that says Make this a quiz to the ON position. Congratulations—you’ve just crossed the threshold from casual questionnaire to serious evaluation instrument.
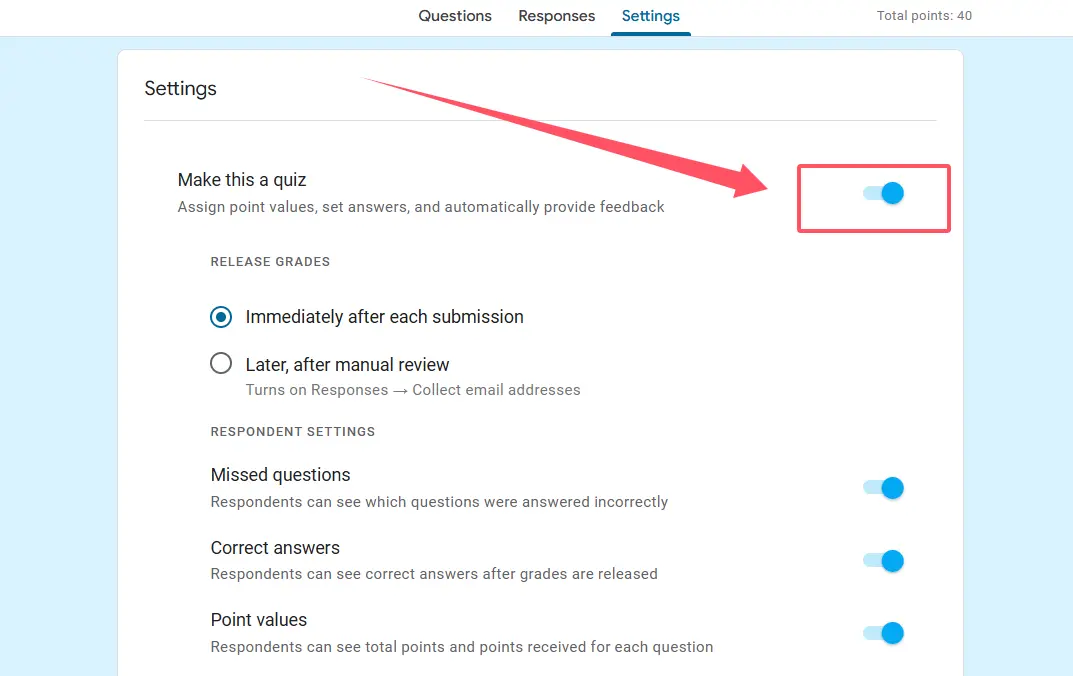
But don’t close that settings window yet! You’ve got important decisions to make about how and when students see their results.
Choosing Your Grade Release Strategy
This is where strategy comes into play. Do you want students to see their scores immediately after submission, or would you prefer to review everything first? Both approaches have merit, and your choice depends on your teaching philosophy and specific circumstances.
Immediate release works beautifully for low-stakes practice quizzes where instant feedback maximizes learning. Students can immediately understand what they got wrong and why, reinforcing the correct information while it’s still relevant.
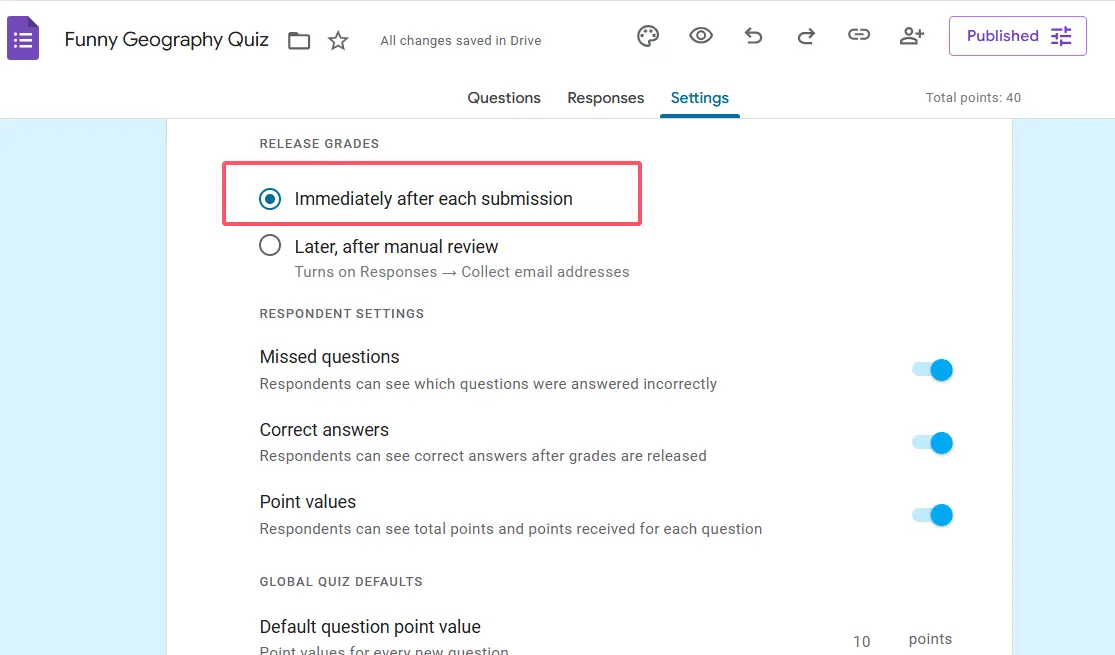
Later, after manual review gives you control—perfect for high-stakes assessments where you want to double-check everything before releasing grades, or when you need to manually grade some subjective questions alongside the auto-graded ones.
You’ll also decide whether respondents can see missed questions, correct answers, and point values. My recommendation? For formative assessments, show everything—transparency promotes learning. For summative tests, you might be more selective to prevent answer sharing.
Creating Answer Keys for Each Question
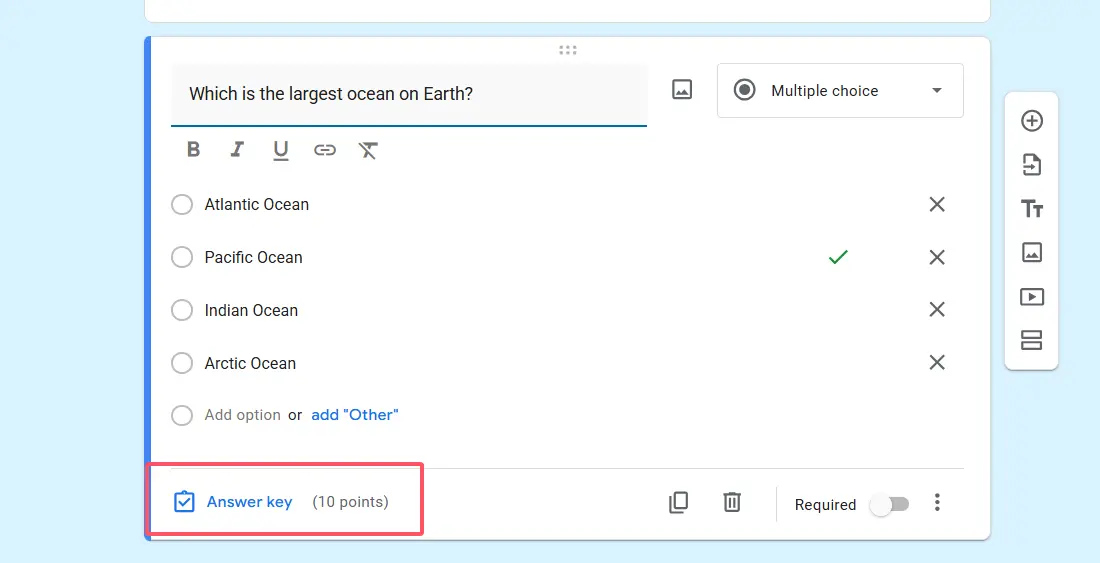
Now we get to the heart of automatic grading. Each question needs an answer key, and Google Forms makes this process remarkably intuitive once you know where to look.
For any question you’ve created—whether it’s multiple choice, checkboxes, or dropdown—you’ll see a small link at the bottom labeled Answer key. Click it, and a whole new world opens up.
The Art of Setting Correct Answers
Here’s where you select which options are correct. For multiple choice questions, simply click the right answer. For checkbox questions (where multiple selections are possible), click all the correct options. It’s almost too easy.
But here’s the clever part: you can assign different point values to different questions. Not all questions are created equal, right? That tricky problem-solving question might be worth 5 points, while a simple recall question gets just 1. Set these values thoughtfully—they communicate to students what you consider most important.
And don’t overlook the feedback feature! You can add custom messages that appear for both correct and incorrect responses. Imagine a student selects the wrong answer and immediately sees: “Close! Remember that photosynthesis requires sunlight—plants can’t make food in complete darkness.” That’s teaching happening in real-time.
| Question Type | Auto-Gradable? | Best Use Case |
|---|---|---|
| Multiple Choice | ✓ Yes | Single correct answers, factual recall |
| Checkboxes | ✓ Yes | Multiple correct answers, “select all that apply” |
| Dropdown | ✓ Yes | Categories, classifications, organized lists |
| Short Answer | Partial | Only with exact text matches predefined |
| Paragraph | ✗ No | Essays, extended responses (manual grading required) |
| File Upload | ✗ No | Projects, images, documents (manual review needed) |
Configuring Response Settings and Grade Release
You’ve set up quiz mode and created your answer keys. Now let’s talk about what happens after students submit their responses.
Navigate to the Responses tab at the top of your form. Here’s a pro tip that separates amateurs from experts: link your form to a Google Sheet. Click that little Sheets icon, and watch as every response flows into a beautifully organized spreadsheet. This gives you a comprehensive view of all submissions, makes data analysis infinitely easier, and provides a backup in case anything goes wrong.
If you chose delayed grade release in your quiz settings, you’ll manually enable Release scores here once you’ve reviewed everything. It’s a simple toggle, but it gives you that crucial moment to verify everything looks correct before students see their results.
Test Before You Launch
Here’s where many people make a critical mistake: they skip testing. Don’t be that person. See that little eye icon in the top right? Click it to preview your form exactly as students will see it. Fill it out yourself with both correct and incorrect answers. Check that the auto-grading works, that point values are correct, that feedback messages appear as intended.
Five minutes of testing can save you from embarrassment and confused emails from students wondering why question seven shows the wrong answer as correct. Trust me on this one.
Understanding Auto-Grading Limitations of Google Forms
Let’s talk about what automatic grading can’t do, because managing expectations is crucial for success.
Paragraph questions? Nope, can’t auto-grade those. They require human judgment, nuanced understanding, and the ability to recognize creative or unexpected but valid answers. This is actually a good thing—some assessments benefit from the human touch.
File uploads? Also manual territory. Whether students are submitting project photos, essay documents, or artwork, you’ll need to review and grade these yourself.
Short answers? This one’s tricky. Google Forms can auto-grade short answers, but only if you predefine exact text matches. The student has to type precisely what you specified—same spelling, same capitalization, same punctuation. It’s useful for fill-in-the-blank vocabulary or simple factual responses, but frustrating when a student writes “photosynthesis” instead of your specified “Photosynthesis” and loses points for a capitalization difference.
Smart Quiz Design Tip: Use 4-5 options in multiple choice questions to reduce random guessing. Too few options and students have a good chance of lucking into the right answer. Too many and the question becomes unnecessarily difficult and time-consuming.
OnlineExamMaker: The AI-Powered Alternative
While Google Forms serves many educators well, it’s worth knowing about more advanced alternatives—particularly if you’re dealing with complex assessments or need features that Google Forms simply doesn’t offer.
Unlike Google Forms, which relies on exact matching for most answers, OnlineExamMaker’s AI grading feature can actually understand responses—evaluating not just whether an answer matches a template, but whether it demonstrates comprehension.
What Makes OnlineExamMaker’s AI Grading Special?
The AI capability means you can ask open-ended questions and still get automated scoring. Ask students to “Explain the water cycle in your own words,” and the AI can evaluate whether their response captures the key concepts—evaporation, condensation, precipitation—even if they use different phrasing than your model answer.
This bridges the gap between the efficiency of automatic grading and the depth of assessment that essay questions provide. For trainers and HR managers, this is particularly valuable when evaluating scenario-based questions or testing conceptual understanding rather than rote memorization.
Create Your Next Quiz/Exam Using AI in OnlineExamMaker
How to Create an Auto-Grading Quiz in OnlineExamMaker?
Step 1: Sign up and access the quiz builder.
OnlineExamMaker offers a streamlined interface designed specifically for assessment creation—no hunting through generic form settings.
Step 2: Add your questions.
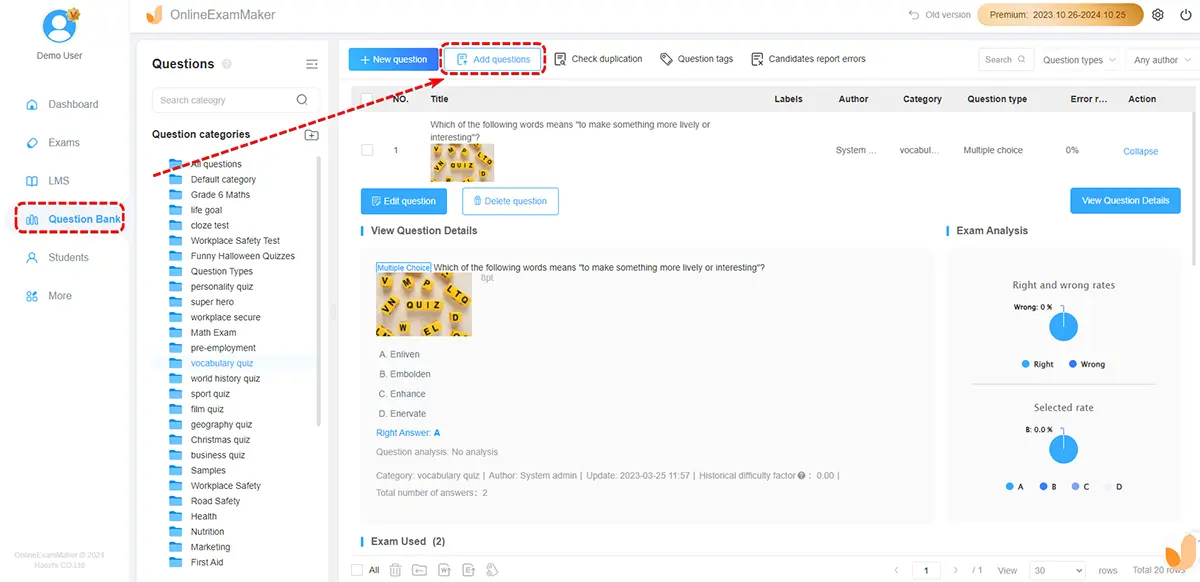
The platform supports all standard question types (multiple choice, true/false, matching) plus more advanced options like fill-in-the-blank with partial credit and short answer questions with AI evaluation.
Step 3: Configure auto-grading settings.

For objective questions, set correct answers just as you would in Google Forms. For subjective questions, enable AI grading and provide sample answers or key concepts the AI should look for.
Step 4: Set scoring parameters.
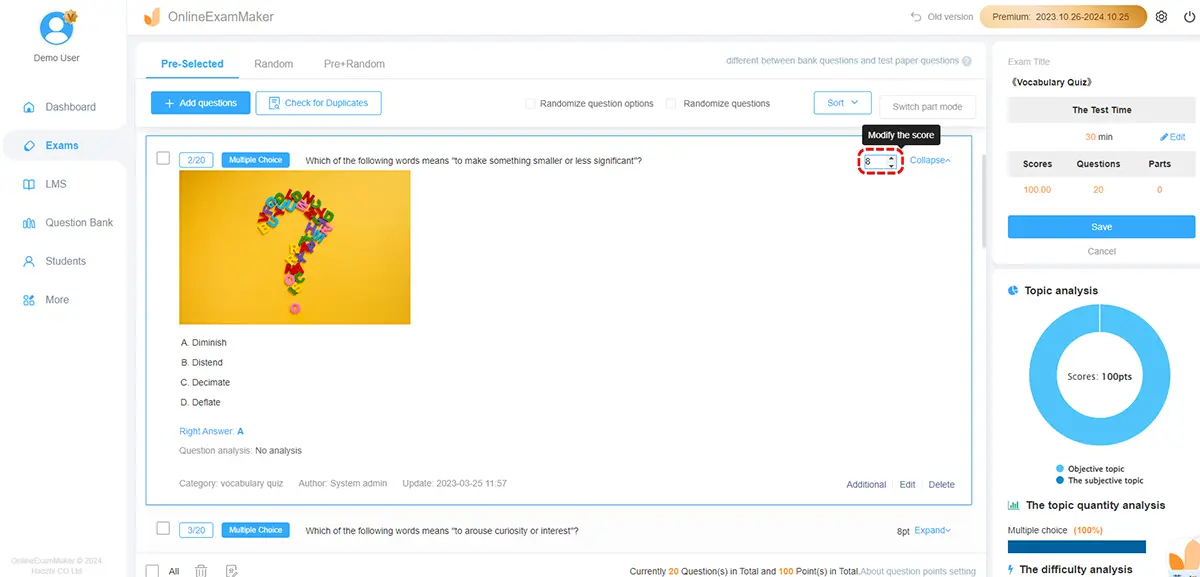
Define point values, passing scores, and whether partial credit applies. OnlineExamMaker’s system is more flexible than Google Forms, allowing weighted question categories and complex scoring rubrics.
Step 5: Publish and share.
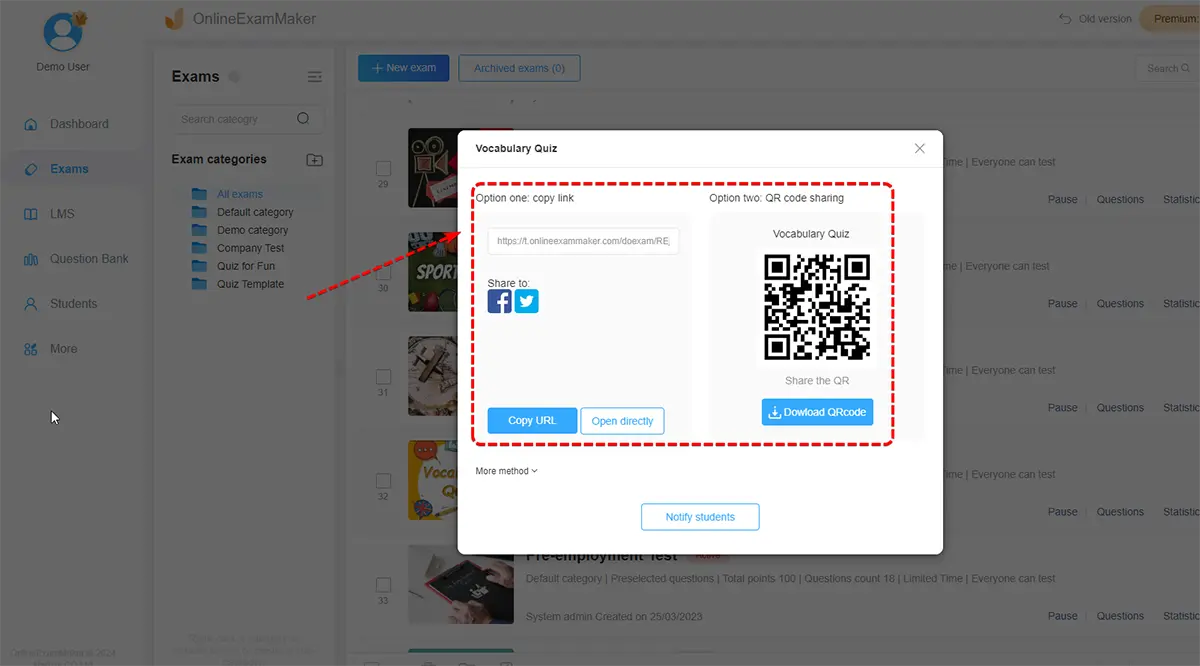
Generate a link or embed the quiz directly into your learning management system. Results compile automatically with detailed analytics showing not just scores but performance patterns across questions and topics.
The platform also offers features like randomized question order (preventing cheating), time limits, and proctoring options—making it suitable for high-stakes assessments where Google Forms might fall short.
The Bottom Line
Automatic grading in Google Forms isn’t perfect, but it’s remarkably effective for the right types of assessments. The setup takes a few minutes, but those minutes buy you back hours of grading time while providing students with faster, more consistent feedback.
For basic quizzes and assessments, Google Forms delivers excellent value—it’s free, integrated with the Google ecosystem most educators already use, and requires minimal technical expertise. When you need more advanced features like AI grading or sophisticated analytics, platforms like OnlineExamMaker offer powerful alternatives worth exploring.
The real question isn’t whether to use automatic grading—it’s how to use it most effectively. Start with simple quizzes to build confidence, experiment with different question types and feedback options, and gradually refine your approach based on what works for your specific teaching context.
Your evenings will thank you. Your students will benefit from faster feedback. And you’ll wonder how you ever managed without it.