Ever tried to build a matching quiz in Google Forms and felt like you were solving a puzzle yourself? You’re not alone. While Google Forms doesn’t roll out the red carpet with a dedicated matching question type, there’s a clever workaround that gets the job done—and it’s simpler than you might think.
- Understanding the Matching Question Challenge
- Setting Up Your Multiple Choice Grid
- Creating Your Matching Assessment Step-by-Step
- Configuring Quiz Settings for Auto-Grading
- OnlineExamMaker: An AI-Powered Matching Quiz Maker for Teachers
- Tips for Effective Matching Assessments
Understanding the Matching Question Challenge
Here’s the thing about Google Forms: it’s fantastic for surveys and basic quizzes, but matching questions? Not exactly its forte. The platform lacks a native matching question type, which means you need to get a little creative. Think of it like making a cake without a proper cake pan—you can still bake it, you just need to improvise with what you’ve got.
The secret weapon? The Multiple Choice Grid. This question format lets you pair items from rows with columns, creating that classic matching experience where students connect terms with definitions, dates with events, or concepts with examples. It’s not perfect, but with the right setup, it mimics a true matching question remarkably well.
Setting Up Your Multiple Choice Grid
Before you dive in, head over to forms.google.com and start a fresh form. Give it a title that tells students exactly what they’re in for—something like “Vocabulary Matching Quiz” or “Historical Events Match-Up.” A clear description helps too, especially if you’re working with younger students or first-time users.
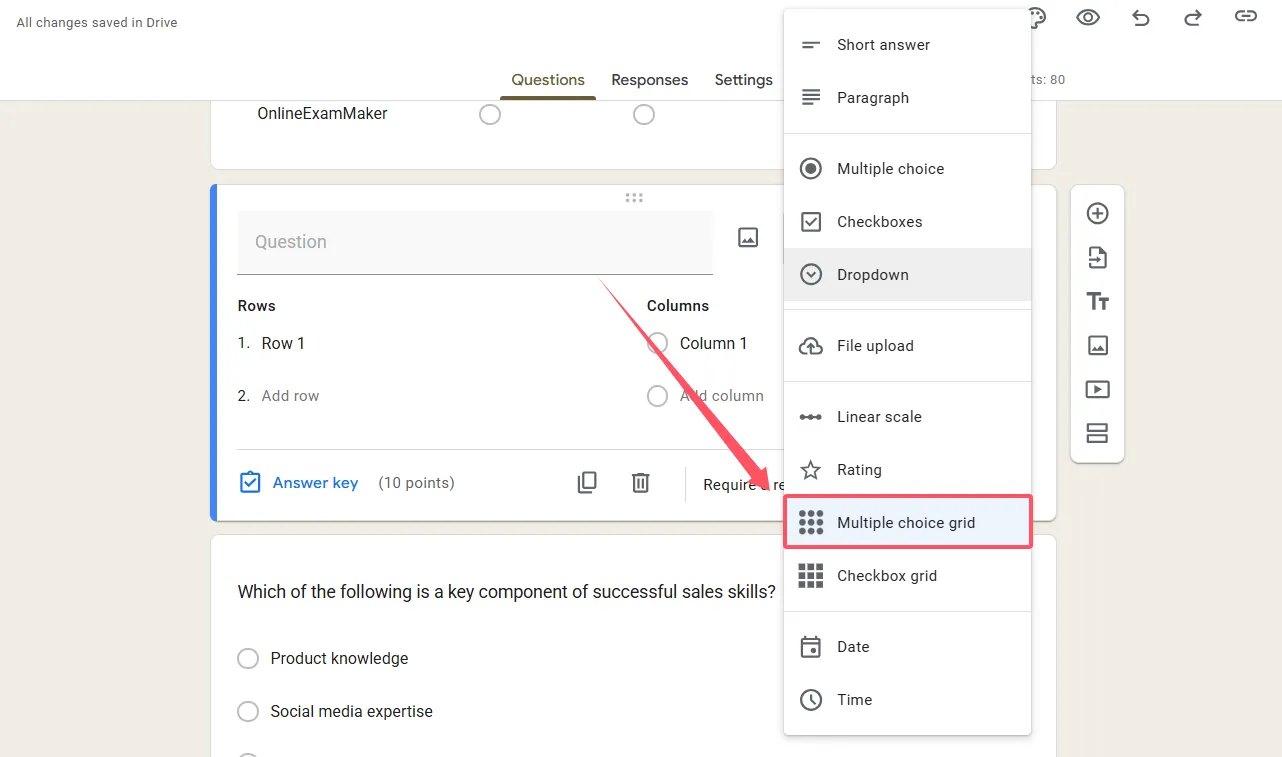
Now comes the fun part. Click that friendly “+” button to add a new question. You’ll see a dropdown menu with various question types—scroll down until you spot “Multiple choice grid” and select it. This is where the magic happens.
Structuring Your Rows and Columns
Think of rows as your questions and columns as your answer bank. For a vocabulary quiz, your rows might contain words like “benevolent,” “capricious,” and “eloquent,” while your columns hold the definitions. The beauty of this setup? Students can only select one answer per row, just like a traditional matching question.
Here’s a practical example:
Rows (Terms to Match): Photosynthesis, Cellular Respiration, Mitosis, Osmosis
Columns (Definitions): Process of cell division, Movement of water across membranes, Conversion of light to chemical energy, Breakdown of glucose for energy
Creating Your Matching Assessment Step-by-Step
Let’s walk through this together, shall we? Open your Google Form and follow along.
Step 1: Add Your Question Prompt
In the question field, write clear instructions like “Match each term to its correct definition” or “Connect the following dates with their corresponding events.” Don’t assume students know what to do—spell it out.
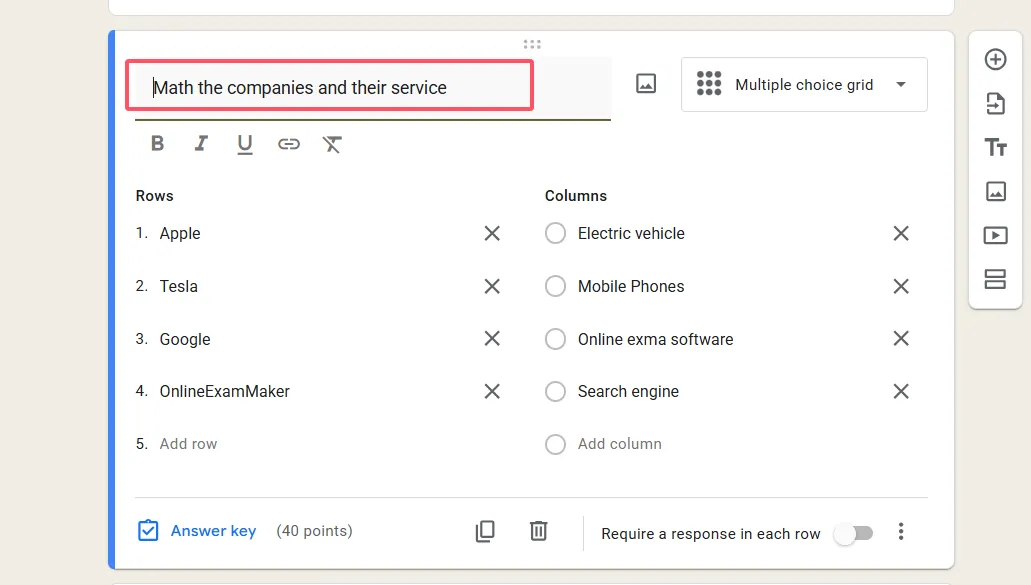
Step 2: Fill in Your Rows
This is where you list the items students need to match. Keep them concise—nobody wants to read a paragraph in a matching question. If you’re creating a history quiz, your rows might be: “1776,” “1865,” “1920,” “1945.”
Step 3: Add Your Column Options
These are your answer choices. For that history quiz, columns could be: “Declaration of Independence,” “End of Civil War,” “Women’s Suffrage,” “World War II Ends.” Make sure they’re parallel in structure—all dates with events, all terms with definitions.
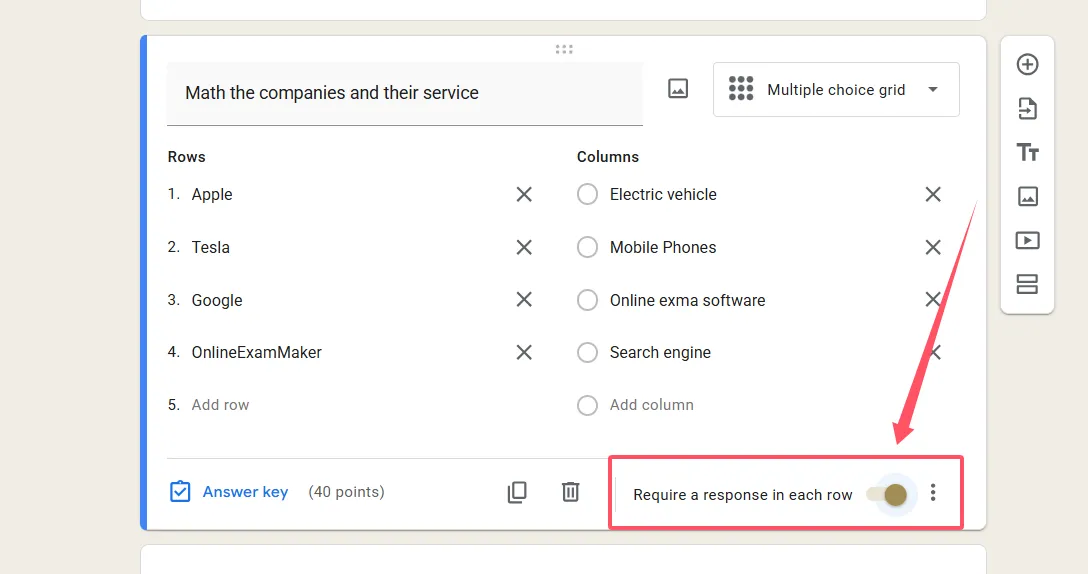
Step 4: Enable the Critical Setting
Click those three dots in the top right corner of your question. You’ll see an option that says “Limit to one response per column.” Turn this on. This is what transforms your grid from a multiple-choice free-for-all into a proper one-to-one matching exercise. Without it, students could match every row to the same column, which defeats the purpose entirely.
Step 5: Make It Required
Toggle on “Require a response in each row” to ensure students don’t skip any matches. This forces completion and gives you cleaner data to analyze.
Configuring Quiz Settings for Auto-Grading
This is where Google Forms really shines. Click the gear icon at the top of your form to access settings, then navigate to the “Quizzes” section. Toggle “Make this a quiz” to unlock auto-grading features.
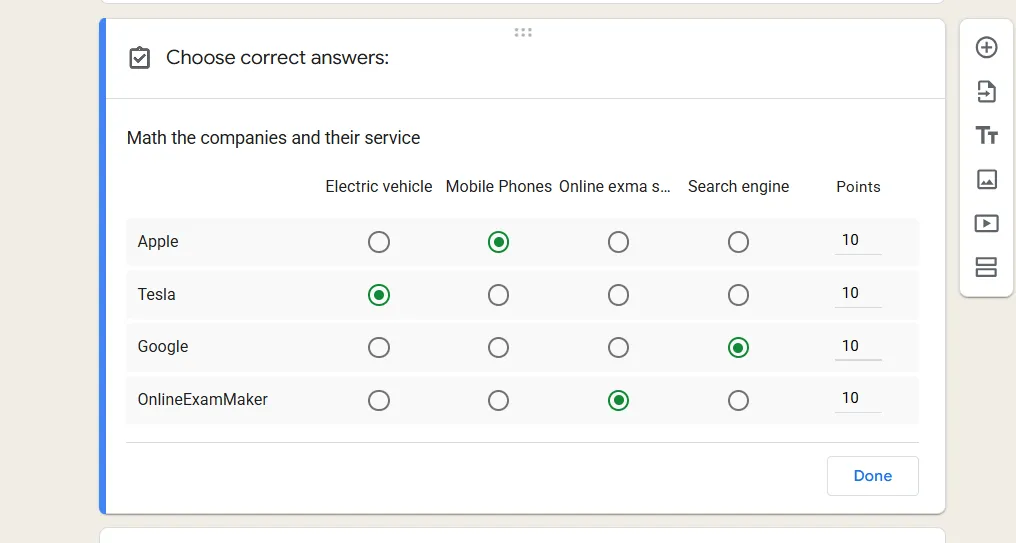
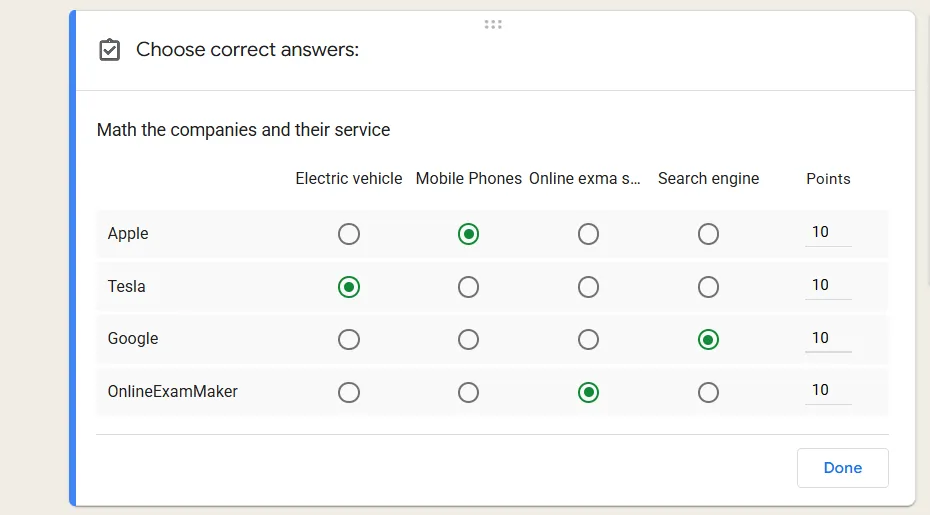
Setting Up Your Answer Key
Back in your matching question, you’ll now see an “Answer key” option at the bottom. Click it and select the correct column match for each row. Assign point values—you can give one point per row or weight them differently based on difficulty. Want to reward students for nailing the tricky ones? Give those rows more points.
Here’s something clever: add feedback for each row. When students select the wrong match, they’ll see a helpful explanation instead of just a red X. For instance, if they mix up photosynthesis and cellular respiration, your feedback might read: “Remember, photosynthesis creates energy from light, while cellular respiration releases energy from glucose.”
<
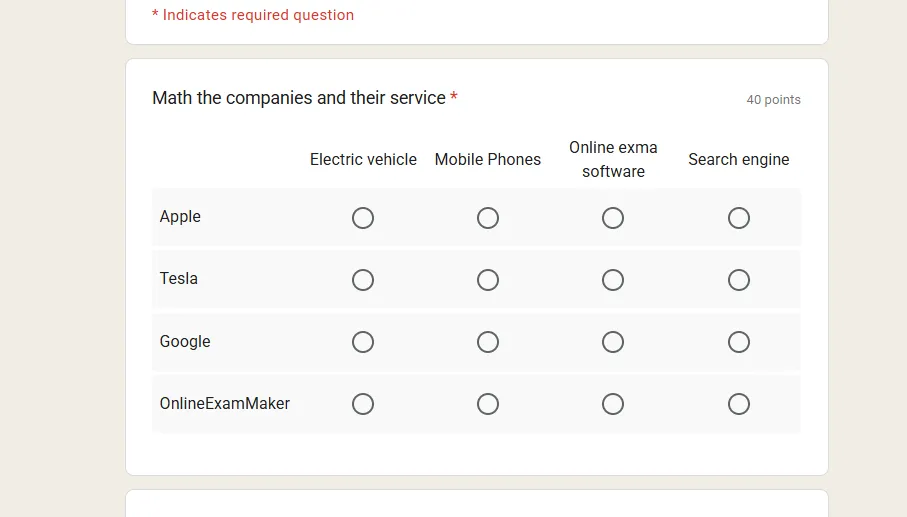
Preview and Polish
Before unleashing your quiz on students, click the eye icon to preview it. Test every match yourself. Does the layout make sense? Are the instructions crystal clear? Is the time limit reasonable? This preview is your safety net—use it.
Once everything looks good, grab your shareable link from the “Send” button. You can email it directly to students, post it in your learning management system, or even embed it on a website.
OnlineExamMaker: An AI-Powered Matching Quiz Maker for Teachers
Now, let’s talk about the elephant in the room. Google Forms works, but it’s a workaround. If you’re creating matching quizzes regularly, you might want a tool designed specifically for this purpose. That’s where OnlineExamMaker comes in.
This AI-powered exam software doesn’t make you jump through hoops to create matching questions—it’s built right into the platform. No grid gymnastics, no creative formatting hacks. Just straightforward matching question creation that saves you time and headaches.
When you click “Add Question” and select “Matching,” you get exactly that—a proper matching question format with pairs that students drag and drop or select from clearly labeled options. The AI question generator is particularly handy when you’re building a large question bank. Feed it a topic and it generates matching pairs based on curriculum standards. Need 20 vocabulary matches for your Spanish class? Done in minutes. Want to create a medical terminology quiz with 50 pairs? The AI handles the heavy lifting while you refine and customize.
Create Your Next Quiz/Exam Using AI in OnlineExamMaker
How to Creating Matching Quizzes in OnlineExamMaker?
The process is refreshingly straightforward. After signing up at onlineexammaker.com, you’ll land on a clean dashboard. Click “Add New Exam” and give your assessment a name.
Here’s where it gets interesting. Click “Add Questions,” then navigate to “New Question” and select “Matching Quiz” from the type dropdown. You’ll see two columns: one for items to match and one for their corresponding pairs. Add your content, set your point values, and you’re essentially done.

What really sets this apart is the flexibility. You can add images to your matching items (perfect for visual learners), shuffle the order for each student to prevent cheating, and even set time limits per question. The platform also handles multimedia—embed videos, audio clips, or documents alongside your matching questions for a richer assessment experience.
Advanced Features Worth Noting
OnlineExamMaker includes anti-cheating measures like AI proctoring, which monitors test-takers through their webcams. For high-stakes assessments, this provides peace of mind. The platform also offers detailed analytics, showing you which pairs students most frequently miss. This data is gold for identifying concepts that need reteaching.
Group testing is another standout feature. Upload your student roster, segment them into different groups, and assign specific matching quizzes to each cohort. Running differentiated instruction? This makes it manageable.
The mobile responsiveness deserves mention too. Whether students take your quiz on a desktop, tablet, or smartphone, the matching interface adapts beautifully. No squinting at tiny text or struggling with unresponsive buttons.
Tips for Effective Matching Assessments
Let’s get practical about creating matching questions that actually test understanding rather than just memorization.
Keep Choices Parallel
All your row items should be the same type of thing—all terms, all dates, all formulas. Same goes for columns—all definitions, all events, all solutions. Mixing categories creates confusion. Students should be matching apples to apples, not apples to mathematical theorems.
Avoid Obvious Outliers
Ever seen a matching question where one answer is hilariously longer than the others? Dead giveaway. Keep your options similar in length and complexity. If your other definitions are 5-8 words, don’t make one a three-word phrase and another a 20-word explanation.
Use Plausible Distractors
If you’re teaching American history and one column option is “Invented the airplane,” it should pair with “Wright Brothers,” not “Thomas Jefferson.” But what if you include “Henry Ford” and “Alexander Graham Bell” as options too? Now students actually have to know their innovators rather than just process of elimination.
Consider Cognitive Load
Five to ten matching pairs is the sweet spot for most learners. Go beyond that and you risk overwhelming students. They’ll spend more time scrolling and re-reading than actually demonstrating knowledge. For comprehensive assessments, use multiple matching questions with fewer pairs each.
Test Your Own Quiz
This sounds obvious, but you’d be surprised how many educators skip this step. Take your own matching assessment before assigning it. Time yourself. Notice any ambiguous phrasing? Any matches that could arguably go either way? Fix those now, not after 30 students have complained.
Provide Clear Context
Sometimes a simple question prompt isn’t enough. If you’re matching chemical formulas to compound names, make sure students know whether they’re matching based on common names or IUPAC nomenclature. A quick clarification at the top saves confusion and grade disputes later.
Balance Difficulty Appropriately
Include some gimmes that students should definitely know, some medium-difficulty pairs that require thought, and maybe one or two challenging matches that stretch their understanding. This creates a healthy distribution and helps you identify different levels of mastery.
Consider Adding Visual Elements
If you’re using OnlineExamMaker or another platform that supports images, take advantage of it. Matching anatomical diagrams to labels, geometric shapes to formulas, or famous paintings to artists adds engagement and can better assess visual-spatial learning.
When you’re dealing with Google Forms, remember you can include image links in your text, though students will need to click out to view them. Not ideal, but workable for assessments where visuals matter.
Review Analytics and Iterate
After students complete your matching assessment, dig into the data. Which pairs did everyone get right? Those might be too easy or need to be replaced with more challenging content. Which pairs did most students miss? That’s your signal to reteach that concept or clarify the wording.
Both Google Forms and OnlineExamMaker provide response analytics. Use them. Your quiz should evolve based on how students actually perform, not just how you think they’ll perform.
Final Thoughts
Creating matching assessments in Google Forms requires a bit of creativity, but it’s absolutely doable with the Multiple Choice Grid format. For educators who build these regularly, purpose-built platforms like OnlineExamMaker offer streamlined workflows and advanced features that make assessment creation feel less like a chore and more like an efficient part of your teaching toolkit.
Whether you stick with the free flexibility of Google Forms or invest in specialized software, the principles remain the same: clarity, appropriate difficulty, and meaningful assessment of student understanding. Your matching questions should illuminate what students know, not confuse them with ambiguous pairings or technical glitches.
So go ahead—build that matching quiz. Your students are waiting, and now you’ve got the roadmap to create an assessment that actually works.